Introduction
Regardless of the context and method, you’ve surely had to save files to be opened and viewed later. This concept can also be extended to data, regardless of whether they are numeric or alphanumeric characters. The data can in fact be stored in a Database, through which they can later be consulted.
Among the best known solutions for database management, there is undoubtedly MySQL, an open source system for the management of highly flexible relational databases, largely used by developers and sysadmins.
In this beginner’s tutorial you will see how to take your first steps in using MySQL, learning different notions and commands useful for managing databases and tables.
Prerequisites
To perform the instructions in this guide you need an Ubuntu 18.04 server where MySQL was previously installed.
If you haven't installed MySQL on your server yet, following the first step on how to install MySQL in the guide How to manage users and permissions with MySQL is recommended.
To get started, connect to your server via an SSH connection. If you haven’t done so yet, following our guide to connect securely with the SSH protocol. In case of a local server, go to the next step and open the terminal of your server.
First access to MySQL Server
After installing MySQL, you are ready to start creating your first database and its tables.
Access MySQL by typing:
mysql -u root -p
You will be requested to enter the password you specified for the root user when installing MySQL.
NB. Enter the password of the MySQL root user here and not that of your Linux Ubuntu server root user.
MySQL instructions are called queries and, although MySQL can identify which words in the queries are actual commands and which are names, the first ones should be written in upper case and the second in lower case.
The queries also respect three particular requirements to be kept in mind:
- Each query must end with the symbol "; " (semicolon). Without entering this symbol and pressing Enter, MySQL will not run the query but will simply wrap it until this character is entered;
- The commands are not case sensitive. For example, typing "SELECT * FROM x;" or "selecting * from x;" makes no difference and the result obtained will be the same;
- The names are case sensitive: when specifying custom names (such as database name, table name or even table fields) make sure you use the same syntax to call them. For example, typing "SELECT * FROM table" is totally different from typing "SELECT * FROM Table".
Creating and eliminating a MySQL database
All MySQL information is organized in databases that can contain multiple tables.
When MySQL Server is installed, databases are automatically generated. To view the tables present at any time, just run the command:
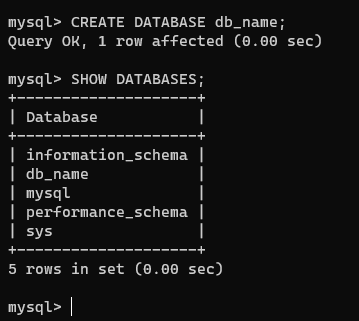
SHOW DATABASES;
The command will return an output similar to the following:

Creating a new database is very easy, simply type:
CREATE DATABASE db_name
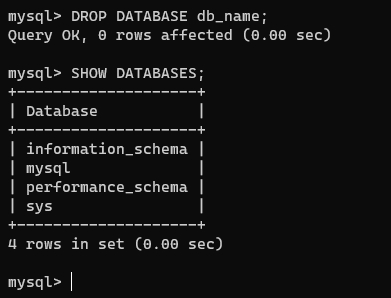
To make sure the database was created correctly, run the SHOW DATABASES command again. If there were no errors in the creation, the newly created database will also be shown in the list.
You may need to delete a previously created database. In this case, just use the "DROP" command to delete the database:
DROP DATABASE db_name
Once created the database,create the tables inside it.
Creating tables in the MySQL database
The database "db_name" just created does not contain information for now. To start inserting them, define at least one table with the related fields where to insert the data.
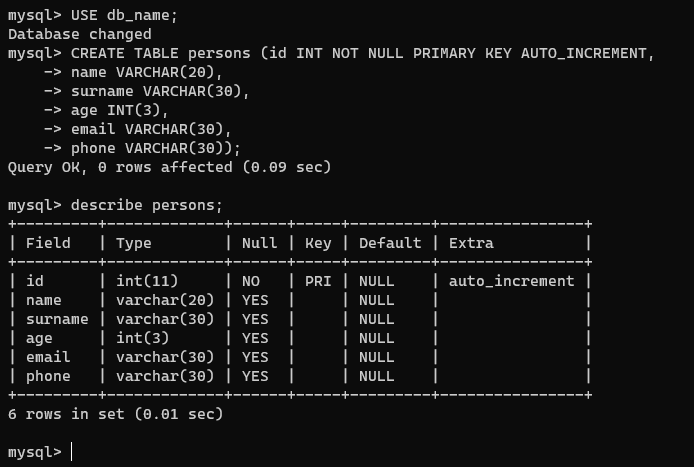
First, use the "USE" command to tell MySQL to use the existing database:
USE db_name
MySQL will notify you when the command has been executed via the" Database changed " message after the command has been sent..
Then, proceed by creating a table. In the following example the table created is called "persons" and each person in the list is provided with a name, surname, age, email and telephone number.
CREATE TABLE persons (id INT NOT NULL PRIMARY KEY AUTO_INCREMENT,
name VARCHAR(20),
surname VARCHAR(30),
age INT(3),
email VARCHAR(30),
phone VARCHAR(30));
This query creates a table called "persons" with different types of fields :
- the "id" field represents the primary key of each record (MySQL is a relational database, and therefore the key). Thus set, it represents an integer (INT) that cannot have a null value (NOT NULL), auto-generated and with auto increment every time a record is inserted (AUTO_INCREMENT). When inserting the data into the table, this field won’t need to be specified, as it will be generated by MySQL itself.
- the fields "name", "surname", "email" and "phone" are of the VARCHAR type, i.e. they accept the input of textual data only . Furthermore, a number (30) has been indicated for each field that identifies the maximum number of characters accepted.
- the "age" field is also an INT, but at which the 3-digit limit has been set.
Unlike the "id" field, all other data can also be left blank. If you decide that, when adding a record, a field has to be be mandatory, just specify the NOT NULL on the related field when creating the table.
Adding data to MySQL tables
Inserting data into a MySQL table is very simple, provided that you know the structure of the table and therefore respect the format of each input data.
Assuming that you want to add three users to the previously created table, the query must comply with the valid syntax:
INSERT INTO ‘persons’ (name, surname ,age, email, phone) values (“text”,”text”,integer,”text”,”text”);
So, to add a user with the following details:
The correct query to type in the MySQL shell is:
INSERT INTO persons (name,surname,age,email,phone) values (“Céline”,”Dion”,52,”[email protected]”,” 123456789”);
Using the same syntax, add other data to the table:
INSERT INTO persons (name,surname,age,email,phone) values (“Will”,”Smith”,51,”[email protected]”,”1234567890”);
INSERT INTO persons (name,surname,age,email,phone) values (“Edward Christopher”,”Sheeran”,29,”[email protected]”,”2345678901”);
Viewing data in a table
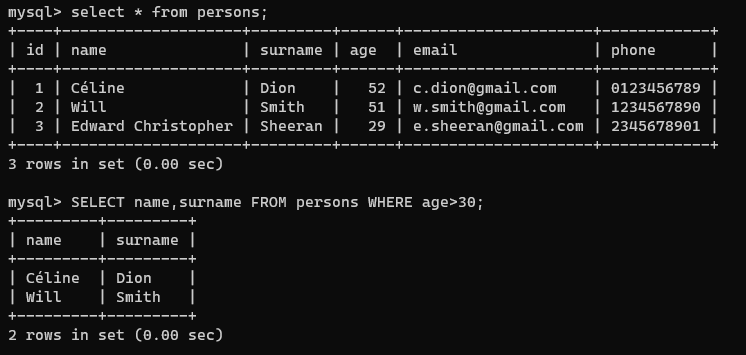
To view the data in a table, use the "SELECT" command followed by the fields to be displayed.
For example, to see all the data in the persons table, just type:
SELECT * FROM persons;
The symbol * means "ALL", i.e. it serves to view all the fields of the records. However, by setting filters, your search can also be limited to a specific number of fields.
Assuming, for example, that you only want to display the "name" and "surname" fields of users over 30, the query would be::
SELECT name, surname FROM persons WHERE age>30;
There are many other combinations that can be made on queries to search for data through the MySQL shell but, being more complex, they will not be covered in this introductory guide for beginners.
Editing a record
In case of data entered in a record incorrectly, change its value by using the UPDATE command.
For example, to change the user's "age" field with "id" = 3, type:
UPDATE persons SET age = 32 WHERE id=3;
This command updates the age field by setting the value 32, instead of the initially entered age of 29 years.
If for some reason you want to delete a certain record from your table, use the DELETE command . For example, to delete the third record of the "persons" table, the query to be run becomes:
DELETE FROM persons WHERE id=3;

Editing a MySQL table
In case a field (column) has not been indicated by mistake, the structure of the table can also be modified with, the ALTER TABLE command.
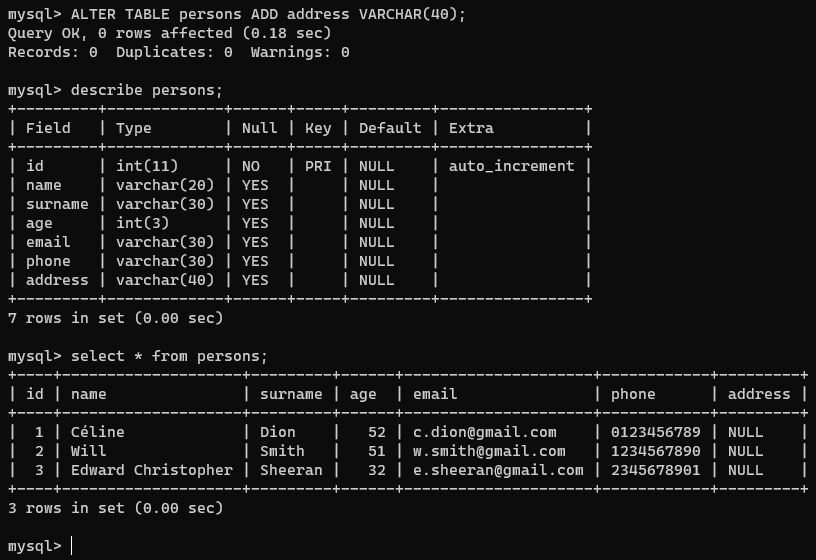
ALTER TABLE persons ADD address VARCHAR(40)
This instruction modifies the structure of the "persons" table by adding the "address" field of type VARCHAR which accepts input of up to 40 characters.
When making this type of change, all the data entered before this operation take the value NULL in ìthis field. However, its value can be changed individually, as shown in the previous step.
To specify where to insert the new column use the AFTER parameter
ALTER TABLE persons ADD address VARCHAR(40) AFTER email
In this case, the new "address" field will be inserted between the "email" field and the "phone" field.
A field can be deleted by running the DROP command.
ALTER TABLE persons DROP address;
Cleaning a table
In a table where there is a field where the value is automatically incremented with each entry, all records can be deleted by using the DELETE command and setting condition "id>0" in the WHERE filter..
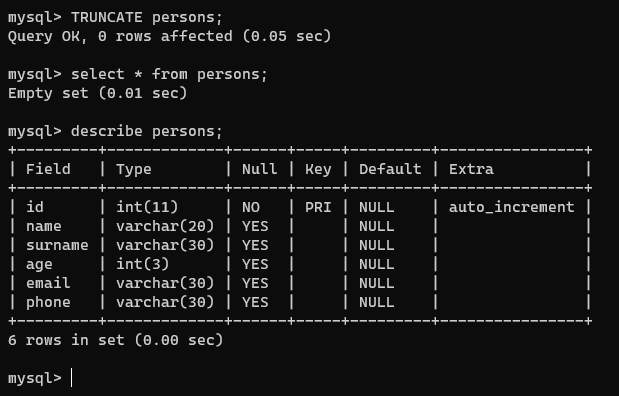
However, the quickest way to delete table content without affecting its structure is by using the TRUNCATE command.
TRUNCATE persons;
Conclusions
At this point you have all the basics to take your first steps in the world of MySQL.
As already mentioned, more complex combinations of queries that have not been shown in this tutorial can also be created. These combinations can useful for increasing productivity in database management.
To learn more, reading our tutorial on How to manage users and permissions with MySQL to learn how to set up different users and their privileges, so that they can perform certain actions on your databases or not is also recommended.