Introduction
MySQL is one of the most widely used open-source relational database management systems in the world, through which you can create databases, save and read the data stored inside.
After installing MySQL on your server, an administrator user with full control over all the databases on the system is created. For security reasons, creating different types of MySQL users with more or less privileges in order to limit their permissions and prevent unauthorized changes to the databases is recommended.
In this tutorial, you will find out how to install MySQL on your server, when not already installed, and how to create new MySQL users and grant permissions through the grant/revoke commands, on either databases or on some of their tables only.
To get started, connect to your server via an SSH connection. If you haven’t done so yet, following our guide is recommended. to connect securely with the SSH protocol. In case of a local server, go to the next step and open the terminal of your server.
Installing MySQL
If you haven’t installed MySQL on your server yet, follow the steps for installing and securing it on Linux Ubuntu 18.04. If, on the other hand, MySQL is already installed on your server, go to the next paragraph of the guide.
To make sure you download the latest version of MySQL, update the repositories of your Linux distribution first. If you have run this command previously, then skip this step.
Now, proceed with the installation of MySQL:
$ sudo apt install mysql-server
To verify its successful installation, check the MySQL version:
If the procedure was carried out correctly, the installed version of MySQL will be displayed on the screen.
Securing MySQL by running a script included with MySQL that will increase security and limit access to your databases:
$ sudo mysql_secure_installation
At this point, a wizard will guide through the configuration of the MySQL security level.
First, you will be asked whether you want to enable the password validation system. If enabled, when setting a user password, your password will be evaluated and, if it does not respect the minimum security criteria, it will be rejected with an error.
You will then be requested if you want to change the root password to one of your preference. If you enable the password validation system, password that respects the security criteria will be required.
Finally, choose whether to remove anonymous users, test databases and whether to disable remote login with the root user: to achieve acceptable security levels applying these changes is recommended.
At this point, confirm the update of the permit table to apply the new security criteria.
To verify the correct functioning of MySQL, authenticate yourself with the following command:
If MySQL successfully installed and configured, the MySQL shell will open.
To exit the MySQL console, type:
Creating a new MySQL user
How do I create a new user in MySQL?
Creating new users can only be done from within the MySQL shell.
Log in with your credentials by typing:
mysql
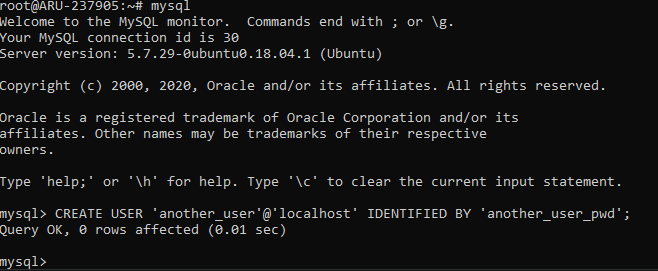
At this point, create the new user, by typing:
CREATE USER 'username'@'localhost' IDENTIFIED BY 'password';
N.B. Replace 'username' and 'password' respectively with the username and password for the user to access the MySQL server.
Granting and revoking permissions on MySQL
The MySQL user created does not have any privileges to access and modify databases at the moment. To grant permissions, specify which databases and which tables the user can interface with.
The command syntax is as follows:
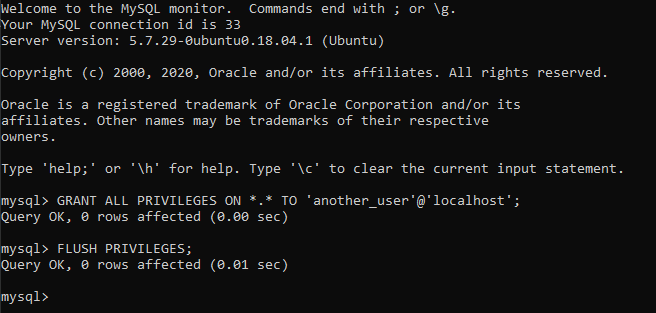
GRANT ALL PRIVILEGES ON *.* TO ‘username’@'localhost';
N.B. The first asterisk occupies the field indicating the database, while the second asterisk indicating the database tables.
In the case of the above command, access is granted to all the databases and related tables.
If, instead, the command says "db_users. *" full access is granted to the database called 'db_user' only. Similarly, if the command says "db_name.users" only the "users" table of the "db_users" database are granted access.
After this operation, an internal update of the privileges has to be be carried out. To do so, run the following command:
FLUSH PRIVILEGES;
With the previous instruction, the new user was granted all permissions. However, the type of user permissions can also be specified.
- ALL PRIVILEGES: allows full access to the database (or as indicated in the previous command, to the entire MySQL Server);
- CREATE: allows the user to create new databases and tables;
- DROP: allows the user to delete databases and tables;
- DELETE: allows the user to delete records from the tables;
- INSERT: allows the user to insert records into the tables;
- SELECT: allows the user to query the databases to read their contents;
- UPDATE: allows the user to modify the records present in the tables;
- GRANT OPTION: allows the user to add or remove privileges to other users.
In short, to grant permissions to a user, use the GRANT command with the following syntax:
GRANT permission ON database.table TO ‘username’ @'localhost’;
Where:
- permission: indicates the type of permission to grant to the user (choosing from those listed above);
- database: indicates the database on which the user can act;
- table: indicates the database table on which the user can act;
- username: is the name of the user to grant permission to.
To revoke certain permissions for a specific user, use the REVOKE command:
REVOKE permission ON database.table FROM ‘username’ @‘localhost’;
Deleting a MySQL user
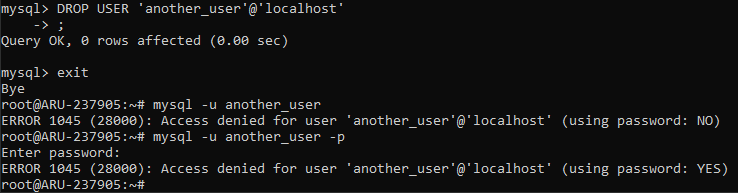
To delete a user so that he/she can no longer access the MySQL database, use the DROP USER command:
DROP USER ‘username’ @‘localhost’;
To verify that the user has no longer the permissions to log in, test the connection to MySQL with the command:
mysql -u ‘username’ -p
Where 'username' is precisely the name of the user previously deleted.
Conclusion
In this tutorial, after showing how to install MySQL on your Ubuntu 18.04 server, it has been illustrated how to create and delete MySQL users who can access databases and tables with different read and write privileges.
Remember that in case you have no backup, any change applied on the databases is irreversible. So, pay close attention to the types of permissions you provide, to each user through the grant and revoke commands to allow access to your MySQL Server.