Introduction
Do you have a Minecraft server and after several game sessions you no longer find the right challenge and motivation to continue playing it? Would you like always new updates introducing new features to make your explorations less boring?
If this is what you want, you will be pleased to discover that the Minecraft community is huge and made up of a large number of programmers, who take on the creation of "supplementary files" with the aim of enriching the game and breaking the monotony that inevitably affects Minecraft players. These files, called "mod", allow the user to modify the original version of the game. To be used, they need a specific software to load these files correctly every time the game server and, respectively, the clients are run.
In this tutorial you will learn how to install a mod loader to set up Minecraft mods on your game server running Linux Ubuntu 20.04. If you haven't installed Minecraft on your server yet and want to find out how to do it, first follow the tutorial on How to Install and Configure a Minecraft Server.
To get started, connect to your server via an SSH connection. If you haven't done so yet, following our guide is recommended to connect securely with the SSH protocol. In case of a local server, go to the next step and open your server terminal.
Installing ModLoader
To install Minecraft mods, first, download and install a mod loader. There are several Modloaders for Minecraft and each of them will be able to load certain mod files. Some mods have different versions and ensure compatibility with multiple modloaders.
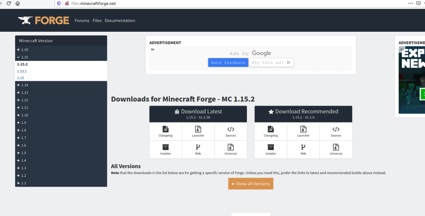
The modloader referred to in this guide, called ‘Minecraft Forge’ is the official one. To install Minecraft Forge connect to the Minecraft Forge website and find the modloader version that is right for you.
Then, select the desired game version and choose the modloader version you prefer. In this guide, for continuity with the server installation tutorial, it will be used Minecraft version 1.14.3 and the latest version of Forge available for that version of the game (Forge 1.14.3 - 27.0.60).
Once you have identified the necessary link, proceed with the download from the terminal using the "wget" command, as follows :
sudo wget -O minecraftforge_installer.1.14.3.jar https://files.minecraftforge.net/maven/net/minecraftforge/forge/1.14.3-27.0.60/forge-1.14.3-27.0.60-installer.jar
Generic command:
sudo wget -O <InstallerForgeName>.jar <Link>
Once the download is completed, allow the software to run using the "chmod" command:
sudo chmod +x minecraftforge_installer.1.14.3.jar
Generic command:
sudo chmod +x <InstallerForgeName>.jar
Then run it with the following command:
sudo java -jar minecraftforge_installer.1.14.3.jar
Generic command:
sudo java -jar <InstallerForgeName>.jar
At this point, a window for installing Forge will appear on the screen.
Among the three options displayed, select "Install Server" and indicate, by pressing the "Browse" button (three dots), the folder where the Vanilla server has been installed (i.e. the original, with no changes).
Press “OK” and wait for the installation to finish.
N.B. Don't worry about the red warning notifying the existence of files in the selected folder. This warning is present simply because the folder is not empty but contains the original server files.
Once the installation procedure is completed, a new file named ‘forge -...’ -reporting the chosen version (instead of the dots)- will be found in the folder, the version will. This new file is nothing more than the moddata version of the server.
To start the server with the mods, from now on, simply run this file and no longer the previous one, that is the original.
Warning: before starting the server with the modloader it is always advisable to make a backup of the game file so that, in case of accidental file corruption, the game world can be restored.
To save the backup copy, from the terminal on the server folder, copy the ‘world’ folder:
cp -r world backup
In this way the modded server can be started without any risk. Also in this case it will be necessary to allow it to run as a program using the “chmod” command. For example:
sudo chmod +x forge-1.14.3-27.0.60.jar
Generic command:
sudo chmod +x <FileForge>.jar
The command line to start the modded server is as follows:
sudo java -Xmx5G -Xms1024M -jar forge-1.14.3-27.0.60.jar
Generic: As you can see from the command line, more RAM has been kept for the server than for running a Vanilla server. In fact, a server, which requires the loading of a certain number of mods, needs a greater amount of memory to work correctly.
The choice of the RAM memory to be kept for the game server has also to be made in accordance with the RAM of the machine set up to run the server, remembering to always leave at least 2 GB of RAM free for the operating system.
Warning: it the Forge version may require a more accurate and restricted choice of Java versions to work unlike the Vanilla version of the server it would start without any problems.
This issue has also been covered in this guide. Therefore, if the server does not start after the procedure described above, follow the instructions shown in the next paragraph. If everything works correctly, the next paragraph “Compatibility with Java” can be ignored.
Compatibility with Java
If, once the procedure indicated so far has been followed, the server does not start, check the Java version.
It may happen that the version used is higher than that required and does not allow the server to function correctly. In this case, the 64Bit version of Java 8 must be used.
There are two possible solutions:
1) Uninstalling current Java and installing the required version;
2) Using a local copy of Java, unique to the server.
In order to guarantee the correct functioning of the server at all times, even if Java can be updated to run other programs, the solution of a local copy is the optimal one.
The installation procedure is indicated on the Java download page. The modded server startup command line will require changing according to the path where Java has been installed, by indicating the installation path instead of simply invoking the ‘java’ program..
Assuming that the desired version has been placed in the "usr" folder, the new command line will be as follows:
sudo usr/java/jre1.8.0_261/bin/java -Xmx5G -Xms1024M -jar forge-1.14.3-27.0.60.jar
Generic command:
sudo java -Xmx<MaxRAM> -Xms<MinRAM> -jar <FileForge>.jar
Inserting Mods on the game server
Although the server is fully modded, it will not actually run any mods, until the desired mods are entered in the appropriate path.
If, after adding Forge, the server has been run at least once, a new subfolder called -mods- can be located in the server folder -minecraftserver-.
Once the “.jar” files containing the desired mods have been downloaded, they have to be moved to the -/ minecraftserver / mods /- folder.
The mods can be downloaded from different websites. The most organized site is CurseForge , which divides the mods by category and game version. Once the mod files have been inserted in the aforementioned path, just start the server again, which, this time, will have already loaded the indicated mods and will be ready for its use.
Configuring Client
To log into a modded server and be able to play, all the clients who want to connect to that server should load exactly the same mods as the server.
Therefore, install "Forge" also for the clients and insert all the mods used by the server in the "mods" folder of the clients.
To install the modded client use the same program used to install Forge on the Server, this time by checking the “Install Client” item.
N.B. In this case, do not change the installation path, but keep the one already indicated.
Once the installation procedure is finished, start the Minecraft launcher by selecting the version you just installed labeled as "Forge".
Once the game has started, the correct execution of the modded client will be easily identifiable through the words at the bottom right of the menu reporting the version of Forge, the version of Minecraft and the number of mods loaded.
Logging into the Minecraft Server
The login on the server can be done as on a Vanilla server.
Just open the Minecraft client, enter multiplayer mode and click Add server. In this screen, enter the name and IP address of the Minecraft server, then click on DONE.

If the server accepts you and you can start moving around the game world, it means that the mods have been successfully loaded.
Otherwise, it will be necessary to carefully check that the contents of the "mods" folder of the clients are similar to that of the "mods" folder of the server, by inserting the missing mods. Remember that, if a new mod is inserted in the server, it must also be inserted in the clients so that you can continue to access the game server.