Introduction
When dealing with MySQL databases, you may need to avoid data loss, especially in case of a large database.
To export this information, use "dump" to keep a copy of the data in a backup file. This backup file can be used to restore the database in case of malfunction of the machine, or to transfer the same data from a machine to another.
In this tutorial you will learn how to export large MySQL databases (or MariaDB) and how to import them into another data structure.
Prerequisites
To carry out this operation, these 3 conditions must be met:
- Being able to access (directly or via SSH) the Linux server where MySQL (or MariaDB) is installed;
- Knowing the name of the database to export;
- Having access data to this database (if provided).
To get started, connect to your server via an SSH connection. If you haven’t done so yet, following our guide is recommended to
connect securely with the SSH protocol. In case of a local server go to the next step and open the terminal of your server.
Exporting the database
Both MySQL and MariaDB do not provide a tool that allows you to make a copy of a database directly. Hence, "acquire" the database by performing a database "dump". The "dump" operation of the database allows you to save all the contents of the tables in a .SQL file.
Precisely because the dump file could take up a lot of space on the disk, based on the amount of data to be saved, it is a good practice to compress its content within a zip archive.
Then, move inside the folder where you want to save the database:
cd /path/your_folder
NB Replace "/ path / your_folder" with the path of your folder.
Then, type the following command to start exporting your database:
mysqldump -u username -p my_big_database | gzip > backup.sql.gz
By doing so, the "mysqldump" client will be used. "mysqldump" client will extract the data stored in your database.
NB In the instruction, make sure you replace the "username" field with the username of the user who can access that database, "my_big_database" with the name of the database to be exported, and "backup" with the name to be associated with the backup file. Adding the date of backup in the backup file name is recommended.
Once the command is executed, you will be requested to enter the MySQL access password (or MariaDB) provided for the indicated user. The operation can take more or less time based on the amount of information to be exported.
Once the operation is completed, all the data will have been exported to the "backup.sql.gz" archive.
Database import
To import the previously saved database, unzip your archive. Similarly to before, go to the path where you intend to extract the archive and type:
gzip -d backup.sql.gz
NB In case of having replaced "backup" with another name, make sure you change it in order to indicate the correct archive.
At this point, all you have to do is enter MySQL (or MariaDB), create the new database and import its content. Then, type:
mysql -u user -p
NB Replace the "user" field with the name of the user authorized to access the shell and who has privileges for the creation of a new database. Alternatively, log in as root (if allowed) by:
sudo mysql
Now that you're inside the shell, start creating the new database to import the data into. Then type:
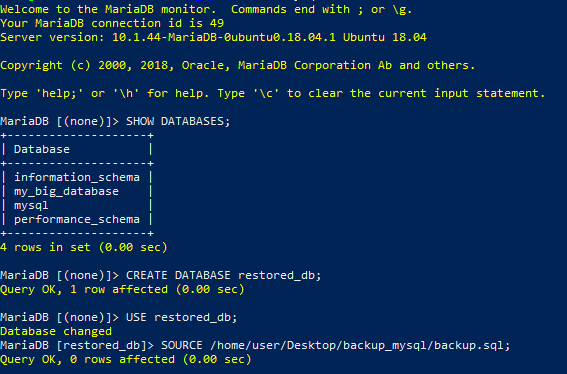
CREATE DATABASE restored_db;
This command will create the "restored_db" database: replace it with a name of your choice. However, no other database with that name should exist. In this case, an error message would be received and the all operation should be repeated by indicating a new name.
To check which databases are already present, use:
SHOW DATABASES;
Now, tell MySQL (or MariaDB) that all future operations will have to be performed within that database.
USE restored_db;
Finally, import the data via:
SOURCE /path/file.sql;
NB replace "/path/file.sql" with the exact path of the extracted file.
Verify that the data was copied correctly, by using the following commands:
USE your_old_db;
SHOW TABLES
USE your_new_db;
SHOW TABLES
NB Replace "your_old_db" and "your_new_db" respectively with the name of the source and destination database.
Notice how, without importing all the tables manually, the tables are present both in the old and in the new database.
Conclusions
If you went through all the steps of this guide, you've learned how to properly back up a MySQL database and import it into a new data structure.
A good rule of thumb is to make this type of backup regularly in order not to risk losing important data. In this case, the potential of Cron, the tool mentioned in the tutorial on How to manage scheduled operations with Crontab, could be used .