Introduction
Cron daemon is a Unix-based tool, which can be used on any Linux distro. Cron daemon allows you to automate various tasks (scheduling) for system maintenance or administration.
With Crontab, it is possible to plan activities, called Cron Jobs, at specific intervals. For example, a specific command or script can be repeated every day at a certain time, on a precise number of days or on a specific date.
In this guide you will see how to best install and use the Cron scheduling daemon on your Linux server with CentOS 8.
To get started, connect to your server via an SSH connection. If you haven't done so yet, following our guide is recommended to connect securely with the SSH protocol. In case of a local server, go to the next step and open the terminal of your server.
Installing Cron
Many Linux distributions have Cron already installed by default. If it is not pre-installed on your server with CentOS, install it by directly querying the official repositories.
First, update the packages on your machine using the command:
sudo dnf update
Then, proceed with the installation of Cron via:
sudo dnf install crontabs
Once the installation is completed, Cron will be installed on your system, but this does not mean that it is already running. In fact, the first time it has to be started manually, by typing:
sudo systemctl start crond.service
However, setting Cron at system startup so that it does not have to be started manually every time is recommended. As this tool allows you to plan certain tasks, it may be inconvenient to have to remember to start it every time the machine is restarted.
To do so, type the following command:
sudo systemctl enable crond.service
Planning an operation with Crontab
All the automations, later defined by the user, are called jobs and saved within a file called crontab .
There is a crontab for each user profile present on the system. When there is only one user, remember that the operations entered in the crontab file for the root user are not performed for the 'non-root' user and vice versa.
To edit your crontab file as a non-root user run the command:
crontab -e
A screen similar to a text editor where to set the characteristics of each job, will open. Cron follows a very precise syntax, which provides a list of parameters to be defined and then the command or operation to be timed.
It is better to clarify which are the parameters to be specified for each job in order to run them correctly:
- Minute: goes from 0 to 59 and indicates the minute the job has to be performed
- Hour: goes from 0 to 23 and indicates the time the job has to be performed
- DoM (Day of the Month): ranges from 1 to 31 and indicates the day the job has to be performed
- Month: runs from 1 (January) to 12 (December) and indicates the month the job has to be performed
- DoW (Day of the Week): ranges from 0 (Sunday) to 6 (Saturday) and indicates the day of the week the job has to be performed.
These parameters together create the structure accepted by Cron for the planning of the command. More precisely, the syntax to use is the following:
minute hour DoM Month Dow comando_da_eseguire
An example of a command accepted by Cron is the following:
15 18 5 * * curl http://www.google.com >> google_curl.txt
The job thus defined means:
- At 15 minutes
- At 18
- On day 5
- Of each month (*)
- Regardless of the day (*)
- Curl the site http://www.google.com and add the result to the file "google_curl.txt".
As you may have noticed, the special character "*", which means "all possible values for a field", has been inserted w.
However, it is not the only special character that can be used when defining your scheduled task. The others are:
- ",": To specify that the same job must be executed in different moments, instead of writing two identical jobs, the various moments can be defined in a single job. Consequently, to repeat a precise command both at 8.30 and at 8.45 write "30.45 8 * * * command".
- "-": To repeat one of your jobs 10 times after one minute, instead of creating 10 different jobs, use this character to define a range of values in the concerned field (in this case applied to minutes). In this case, the syntax of the command would be similar to the following: "1-10 * * * * command".
- "/": To repeat one of your jobs every time after a preset value of time, place this symbol next to the special character "*" so that the division between the value of the character "*" and the divisor returns a whole number. For example, to repeat a job exactly every 2 hours, define it following the syntax shown here: "* * / 2 * * * command".
NB For the hours the only allowed values are 1,2,3,4,6,8 and 12.
Now that you know how to configure all your possible jobs, here are some examples of jobs.
NB For convenience, each instruction has been collected under the name "command", which does not represent an actual command and will clearly be replaced with the operation you want to plan.
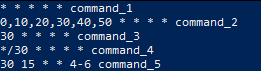
The figure above lists 5 examples of jobs inserted in the crontab file:
- command_1 runs every minute
- command_2 runs every 10 minutes of all hours of everyday
- command_3 runs everyday at every hour at 30 minutes
- command_4 is run everyday at every hour at an interval of 30 minutes (it is equivalent to the meaning of command_3)
- command_5 runs every Thursday, Friday and Saturday at 3:30 pm.
To add your jobs to the crontab file run the crontab -e command as specified above .
NB Keep in mind that, on CentOS, the crontab file would be opened with the Vi editor, which is a very powerful but equally complicated tool to use for a beginner. To learn how to use this text editor, reading our tutorial on How to use Vim is recommended.
To start editing the crontab file, after executing the crontab -e command, press the "i" key and then enter the instructions for your jobs. At the end press ESC and then type ": wq" to save the changes and close the editing of the file.
Restricting access to Crontab
As explained above, each user on your system can define their own jobs since there is a dedicated crontab file for each of these users.
However, it is possible to set to which users this type of operation is allowed, by acting on the cron.allow and cron.deny files, which respectively represent a white list and a black list for accessing Cron.
To adopt this restriction policy, first add all your users to the cron.deny file and then allow each user to access individually by indicating their name in the cron.allow file .
To deny to everyone access to your crontab, type:
sudo echo ALL >>/etc/cron.deny
To authorize a user, just type:
sudo echo user_name >>/etc/cron.allow
NB Replace the "user_name" field with the name of the user to be authorized.
A user with administrative privileges can edit another user's crontab file on the system. To make this type of change, run the command:
sudo crontab -u user_name -e
NB Replace the "user_name" field with the name of the user whose crontab file you want to edit.
If the user whose crontab file you are trying to edit is present in the cron.deny file, but has not been added to the cron.allow file, an error message, which warns you that the user is not enabled to use Cron, is returned.
Cron shortcuts
The Cron daemon has some shortcuts that can simplify the definition of jobs.
In particular, there are words (followed by the symbol "@") that take on a precise meaning and therefore make the writing of the jobs faster because they can be used in the syntax in place of the five-column date specification. Cron's shortcuts are as follows:
- @hourly: executes the command at the beginning of each hour. It is equivalent to "0 * * * *"
- @daily: executes the command every day at midnight. It is equivalent to "0 0 * * *"
- @weekly: executes the command every week at midnight on Sunday. It is equivalent to "0 0 * * 0"
- @monthly: executes the command every month at midnight on the first day of the month. It is equivalent to "0 0 1 * *"
- @yearly: executes the command every year at midnight on January 1st. It is equivalent to "0 0 1 1 *"
- @reboot: executes the command every time the system is restarted.
Conclusions
If you are a sysadmin and manage one or more servers, Cron is definitely a very useful tool in your daily life. With this guide, you have learned how to plan operations with Crontab at a set date and time.
Cron can be used in the most varied ways. For example, if you need automatic backups on the machine you manage, Cron could be a valid alternative to other systems, if you define the jobs for copying and synchronization manually.