Git is a distributed version control software that was developed in 2005 as a tool to simplify the development of the Linux kernel, by facilitating coordination between programmers. Today Git has become one of the most popular version control softwares in the world.
Git can be used from the command line interface and allows to track the changes in any set of data. The advantages of Git software are its high speed, data integrity and workflow support. With Git every data folder placed on any device is a real ‘repository’ complete with history and possibility of tracking all the changes.
This guide will explain how to install and use Git on major Linux distributions, mainly referring to Ubuntu 18.04.
First, connect to your server via an SSH connection. If you haven’t done so yet, following our guide is recommended to connect securely with the SSH protocol. In case of a local server, go to the next step and open the terminal of your server.
Installing Git
Update the distribution repositories and start installing Git via apt-get:
$ apt-get update && apt-get install git
Once the procedure is finished, Git will be installed. To verify its successful installation and the software version, use the "--version" argument:
Finally, to start using ‘Git’, configure the user information (name and email address) that will be associated with each package you create:
$ git config --global user.name "Name Surname"
$ git config --global user.email "[email protected]"
From now on, this guide will focus on explaining the various features of the software, reporting the syntax of each command. These different features have been tested on Ubuntu, although they are valid for any other Linux distribution.
Initializing the workspace
The main purpose of Git is to encourage collaboration among multiple workflows on a given project. The first thing to do, therefore, is to initialize a workspace, creating an empty local ‘repository’ or obtaining one remotely.
In the first case, to create or re-initialize a new ‘repository’, use the "init" command:
This command will create a ‘.git’ folder that will contain all the files necessary for the ‘repository’. The folder will contain all the files that make up the project to be tracked. All the new files will initially be untracked’that is to say that they are not tracked. This means that they will not be taken into account when loading the snapshot.
If you want to start tracking the files use the ‘add’ command, followed by a "commit", or a brief indication of what you are including:
$ git add <FilePath/FileName>
$ git commit -m ‘<Description>’
In Fig. 1 an example of the initialization of a new ‘repository’ and an inclusion of the ‘FileTestA’ file, as well as,. the output from the terminal reporting the success of the operation, are shown.
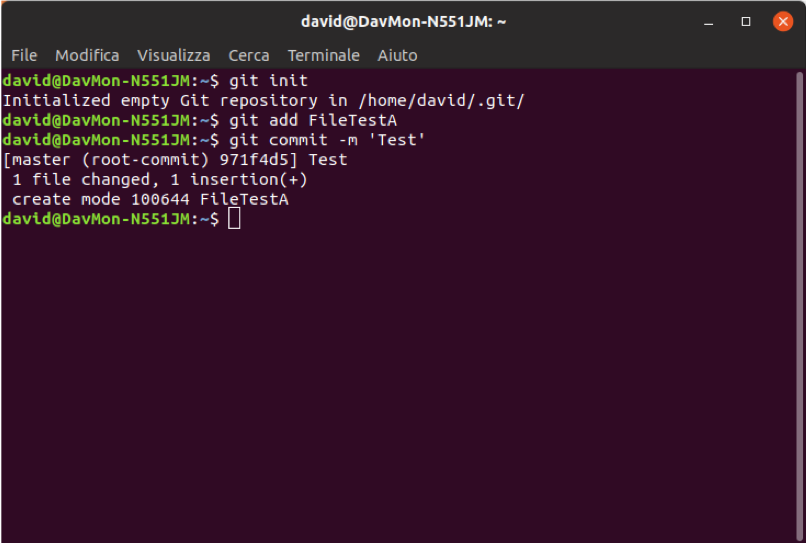
Fig. 1 - Initialization Example and Tracking Git on Ubuntu Terminal 18.04
If, however, you want to contribute to an already existing "repository" use the "clone" command. With this command, Git receives a copy of all the project file versions present on the indicated server:
$ git clone <URL> <Destination_Folder>
Instead of <URL> specify the address from which to download the package. While, instead of <Destination_Folder> indicate, where appropriate, the path and folder where to save the downloaded files. If you do not specify anything, these files will be saved in the ‘Home’ folder.
As for the URL, , there are multiple transfer protocols that can be used by Git to download the ‘repositories’:
· Git protocol (git: //);
HTTP protocol (http: // or https: //);
SSH protocol (ssh: //);
User and Server (username @ server: /path.git).
Saving and Staging
Each file in the workbook can have the status of ‘untracked’, ‘tracked’, ‘unmodified’ and ‘modified’. As shown in the previous paragraph, the files with the ‘untracked’ status are all the files in the working directory that are not present in the snapshot ( when creating a new "repository").
When cloning an existing ‘repository’, on the other hand, the basic status of all the files downloaded is "tracked". These files, therefore, may also be ‘unmodified’ where not edited after the download, or ‘modified’ where changed since the last commit.
To check the status of a file, use the ‘status’ command:
The following image shows a screenshot of the terminal where a new project has been initialized, a file has been added and a first commit has been created. By using the "status" command, the terminal specifies that there is no modified file to update. From the green line onwards, after modifying the file, the ‘status’ command is executed again.
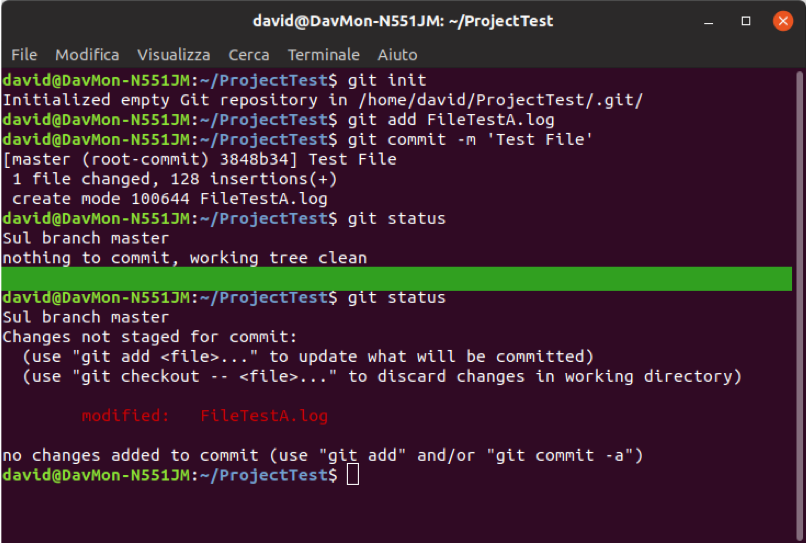
Fig. 2 - Example Initialization, Tracking and Editing Git File on Ubuntu Terminal 18.04
The newly modified file now appears under the heading "Changes not staged for commit", which means that a tracked file has undergone a change in the workbook but is not on the stage yet.
It will therefore be possible to proceed in two different ways:
-
Update the file on the stage (repeating the tracking procedure, i.e. to the ‘git add’ command will be necessary);
-
Discard the changes (using “git checkout <File_Path>).
Suppose we wanted to stage the file just edited by running the ‘git add’ command and repeating ‘git status’ to evaluate its status.
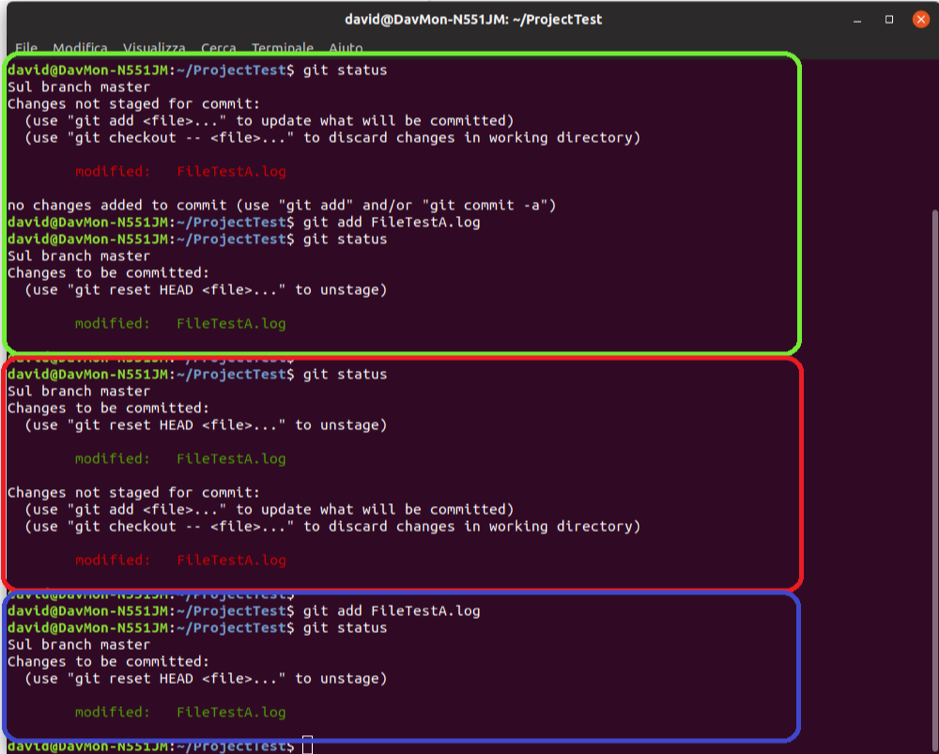
Fig. 3 - Stage of Modified Files on Ubuntu Terminal 18.04
The file will then be modified but ready for the commit (green rectangle in figure 3). If, before the commit, a further modification to the file is made and its status is checked, both will be indicated as a ‘ready-to-commit’ file and as a file not on stage yet (red rectangle in figure 3).
This happens because the file on stage is the one with no modifications ( the one that will be committed, if the "commit" command is executed now), while the external one is the one just modified. To commit this further modification, add it once again (blue rectangle in figure 3).
Ignoring the files
If you don't want certain files to be added automatically, for example the ‘log’ files, create a ".gitignore" file with a list of the files you want to exclude inside.
To automatically include a certain type of pattern, not to list all the individual files to ignore, include all the folders and use special characters. The rules for the patterns are:
- Blank lines or lines starting with "#" are automatically ignored;
- Slashes "/" can be used to indicate a subfolder;
- Use “!” Character to refuse a pattern;
- Glob patterns can be used.
A glob pattern is a syntax used to represent a set of strings. The most common are:
- the asterisk (*) indicating any string (often used to mark all files of a certain extension);
- the question mark (?) which indicates any character and the square brackets ([…]) for specifying a series of characters or numbers.
Change Commit
Once the files are placed on the stage (via the "git add" command) commit the changes. The commit is used to record the snapshot saved in your stage area.
Anything that is not placed on stage,, will not be in the commit but will remain as modified in the local folder of course.
The easiest way to commit is to use the following command:
By doing so, the text editor that showing the last output of the ‘git’ status command with the first line blank, will be opened: here it is possible to enter your commit message, so as to indicate appropriately what changes you are making.
You have just created your first commit! Before concluding the guide, the procedures for further removals or modifications of the files will be shown.
Removing files
To remove a Git file, not only remove it from the tracked files, but repeat the commit again to save your changes. In fact, by simply deleting the file from the folder, the resulting file will appear as a file not on stage .
By using the command ‘git rm’ followed by the path and name of the file, the removal of the file will be staged and completely disappear after the next commit:
If you have already modified and added the file to the index, you can force its removal by adding the "-f" option:
If, however, you want only to remove a file mistakenly inserted on stage while keeping it on the disk, you can use the "--cached" option:
Moving and renaming files
Another thing you may want to do is to move or rename the files. This is not an automatic operation, as Git does not explicitly keep track of the file movements, i.e. no metadata is generated to keep track of the "rename" option.
This operation could be performed with the known commands, by changing the name first, and removing the ‘previous’ file (git rm) from Git, and then adding the ‘new’ (git add).
To avoid performing this series of commands for each rename/move, Git has its own specific command, "git mv", which provides the same result as the three listed above at once.
The complete syntax is shown below:
$ git mv <OldPath/OldName> <NewPath/NewName>
This command provides the exact same result as the following three:
$ mv <OldPath/OldName> <NewPath/NewName>

$ git rm <OldPath/OldName>

$ git add <NewPath/NewName>
By doing so, the file will be renamed and / or moved and already on stage, ready to commit.To verify the success of the operation run the ‘git status’ command that will release a section called ‘renamed’ in the list of changes to commit, where all the files that have changed their name or path will be listed. For each file, specify, both the previous and the current name / path.