Git is one of the most widely used distributed version control software on Linux among developers to facilitate coordination on the same project.
If not familiar with Git, reading this introductory guide on installing and getting started with Git is recommended. So far, only the basic functions have been shown. These include the preparation of the workspace and the creation of the various repositories, through file "stage" and "commit" of the changes, as well as any possible file removal or renaming.
The next step is to understand how to move across the different versions of the project. As the nature of the software suggests, in fact, the possibility of creating new and infinite repositories, starting from a pre-existing work, inevitably creates a chain of different paths, all deriving from the same project.
The purpose of this guide is to explain, therefore, how to manage the versioning of a project correctly, by moving between across the various branches (branching), while merging different branches and restoring previous versions. This guide is valid for major Linux distributions and has been tested on Ubuntu 18.04.
Using Git Branches
Branching is one of Git's most powerful features. Branches are used to implement different and independent functions from each other starting from the same root. The main branch of a project is generated when a "repository" is created and is labeled as "master".
The first thing to do to learn how to move across the various branches of a repository is to use the "git checkout" command, followed by the branch to work on:
$ git checkout <branch>
For example, to move and work on the main branch, use the command followed by "master", as shown below:
$ git checkout master
Once the branch for creating your repository is indicated, the files will be taken to the last stage of the chosen branch in the working folder. Then, any future changes made, will create a new project version for that particular branch.
Creating a new Branch with Git
To create a new branch with Git, just use the "git branch" command followed by the name to be given to the branch created:
$ git branch <nome_ramo>
Moving to the newly created branch is not automatic. So to work on the newly created branch resort to the "git checkout" command:
$ git checkout <nome_ramo>
At this point, each commit will refer to the newly created branch.
In Figure 1 the following operations are performed:
- Move to the "master" branch;
- Creation of a new branch (Test0);
- Move to the newly created branch;
- Adding a file (BranchTest);
- Commit of changes;
- Return to the "master" branch.
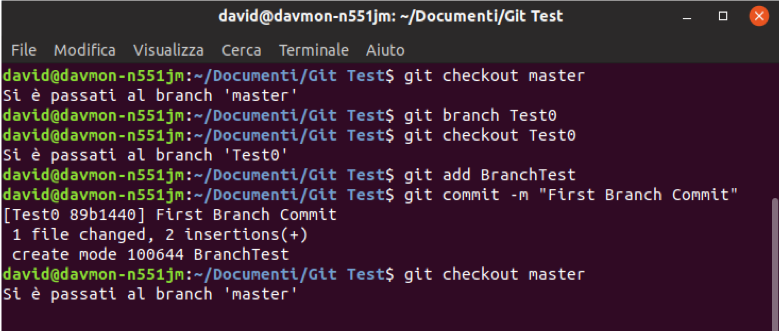
Fig. 1 - Example of Branch and Commit Creation on Ubuntu 18.04
Finding and deleting Git Branches
The "git branch" command with nothing followed will simply release a list of all the existing branches.
$ git branch
To delete a branch use the "git branch" command, in this case followed by the "-d" argument and the name of the branch to remove :
$ git branch -d <nome_ramo>
Figure 2 shows an example of a list of branches and of the deletion of the newly created branch (Test0).
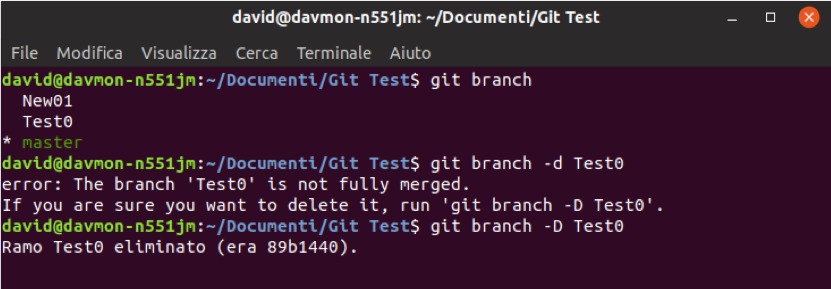
Fig. 2 - Example of List of Branches and Elimination on Ubuntu 18.04
As shown in the figure, when trying to delete a branch on which changes were made, Git will return an error. Since the branch has not been joined (branch merge), to avoid losing all the work done by mistake, it will avoid its elimination.
It will still be possible to delete the branch using the "-D" argument:
$ git branch -D <nome_ramo>
Merging Git Branches
The purpose of the branches is to create parallel and independent workflows in order to experiment with new functions without affecting the main project (for example "release", "beta" or "fix" versions).
For this reason, the branches are designed to have a short life, which culminates in the merger with another branch.
Branches can be merged by using the "git merge" command followed by the name of the branch to be merged.
$ git merge <ramo_da_unire>
Obviously, the merger has to take place between two branches. The "git merge" command merges the branch indicated in the syntax with the one you are currently on. So, to perform the "merge", make sure, through "git checkout", to be on the branch you want to merge with.
Hence, the "git merge" command indicated will leave no trace of the merge in the "repository" history.
Very often it may be necessary to keep track of the merge so that it simply using the argument "--no-ff" will suffice. In this way, Git will automatically make a new commit to identify the "merge" in the future:
$ git merge --no-ff <ramo_da_unire>
The merge of two branches does not imply the elimination of the branch that has been merged with the one indicated. It will, instead, continue to exist. To permanently remove it, proceed with the elimination using the "git branch -d" command.
In Figure 3 an example of the merge between branches is shown. In particular, the operations performed are:
- Move to the "master" branch;
- List of branches;
- Merge of the "Br01" branch;
- Cancellation of the "Br01" branch.
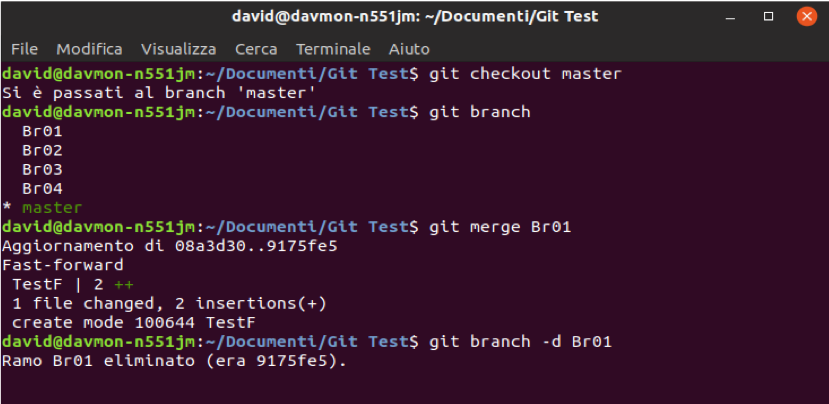
Fig. 3 - Example of branches merged on Ubuntu 18.04
To get a list showing only the branches not merged with the current one, use the "git branch" command followed by the "--no-merged" argument.
$ git branch --no-merged
Conflict Resolution
When two branches are merged, Git automatically determines which of the two parent commits is the best and merges with it.
Git might not be able to automatically decide which version of the files to preserve during this operation and will therefore notify a conflict.
If this situation occurs, sort out the conflict manually and commit the changes made. Alternatively, the merge of the branches will not take place.
The following example best shows this occurrence. Since it considers two different branches where two different versions of the same file are saved, once merged, Git will display the following warning:
    CONFLICT (content): Merge conflict in <filename>

   Automatic merge failed; fix conflicts and then commit the result.
To solve the problem, go to the folder where the conflicting file is, modify it and make a subsequent "add" with "commit". In case of text file, Git will report the offending sections in the file by inserting the section present only in the first branch and between "=" between "<<<<<<<" and "=======" ====== "and" >>>>>>> "the one present only in the second.
By manually modifying the file and executing the "git add" command followed by the "git commit" command, the two branches will finally merge, as shown in figure 4.
In the example shown in figure 4, the non-joined branches were also controlled to be sure that the "merge" was correctly performed.
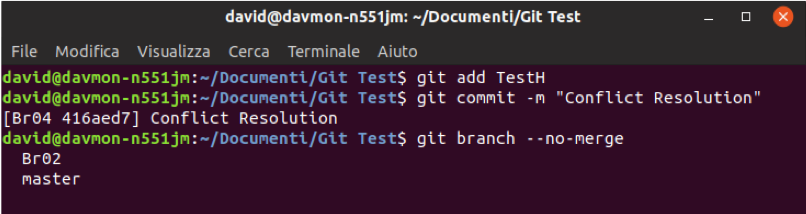
Fig. 4 - Example of Conflict and Merge Resolution on Ubuntu 18.04
Indeed, after the commit, the "Br03" branch no longer appears in the list of the disconnected branches, proving that the merger with the "Br04" branch has been successful.
Git Tags management
"Tags" are nothing but labels to attach to the various "commits" in order to report useful information on the version and on the project you are working on.
To view the tags in a "repository", use "git tag" command:
$ git tag
There are two different types of tags in Git: "annotated" and "lightweight". The first ones are used to indicate the complete version information, such as "checksum", the developer name, date / time and any comment. The second are simple pointers to a commit.
The "git tag" command followed by the version identification text will create a "lightweight" tag. The syntax is shown below:
$ git tag <Nome_Versione>
Using the argument "-a", instead, leads to the version of an "annotated" tag:
$ git tag -a <Nome_Versione> -m <Commento>
Finally, to view a tag, use the "git show" command as shown below:
$ git show <Nome_Versione>
The commands just examined allow you to add "tags" only to the last commit. To add a tag to an older commit, indicate after the "git tag" command also the identifier (Checksume) of the commit to refer to. The complete syntax is shown below:
$ git tag -a <Nome_Versione> <Checksum_Commit>
To track the "checksum" of the various commits made, use the "git log" command.
$ git log --pretty=oneline
Once the command is launched, a list in chronological order of the various "checksums" of the commits will be displayed on the terminal followed by the comment entered during the "commit" phase of the changes.