Introduction
At the base of any Cloud Server there is always a protection tool that, by relying on some rules, allows the communication of the server to and from the outside. This software component is called Firewall and represents the first security barrier to prevent unauthorized users from accessing your server or simply to make sure that a certain service cannot be reached from outside your machine.
UFW, acronym for Uncomplicated Firewall, is one of the most used softwares to manage a firewall on Linux, from the command line, in a simple and intuitive way.
In this tutorial you will learn how to properly set up and configure UFW on your Ubuntu 18.04 server.
To get started, connect to your server via an SSH connection. If you haven’t already done so yet, following our guide is recommended to connect securely with the SSH protocol. In case of a local server, go to the next step and open the terminal of your server.
Installing UFW Firewall
UFW is a pre-installed software in most Linux distributions. If not already on your system, it can be installed by typing the command:
sudo apt-get install ufw
UFW can work managing both IPV4 addresses, enabled by default, and IPV6 if necessary. If you need to also enable IPV6, modify this option from the file "/ etc / default / ufw".
In order to apply this change, open the file with the nano editor:
sudo nano /etc/default/ufw
Then set the item "IPV6" to "yes".
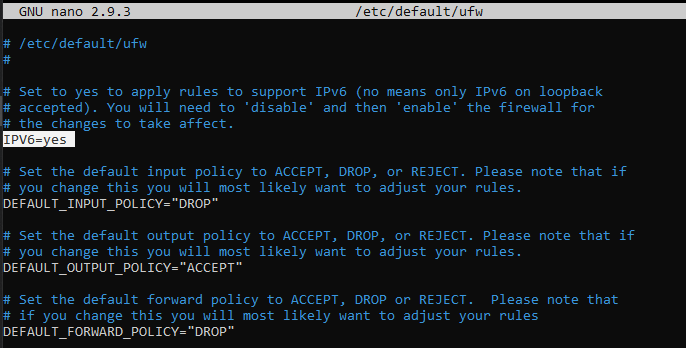
Once done editing, save and close the document (CTRL + X / Y / Enter).
The change will be effective from the next UFW restart. To immediately restart the firewall and make the changes operational, type:
sudo ufw reload
Basic configuration of the firewall
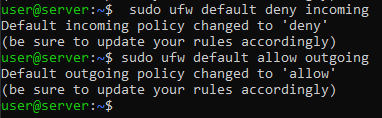
At an early stage all types of communication from the outside to the cloud server should be blocked. By blocking them, unblocking communications with other machines, identified by their IP, or on certain ports or services will later be easier.
In the same way, enable outgoing traffic for the server to make sure that the applications that run on your server can query external services.
To block any form of communication TOWARDS the server, type:
sudo ufw default deny incoming
To allow any form of outgoing communication FROM the server, type:
sudo ufw default allow outgoing
Enabling SSH communication
Interaction with your server is often done via an SSH connection. However, this is one of the incoming connections that have been blocked, precisely because there is an attempt to communicate TOWARDS the Server.
Hence, adding this type of connection between the UFW rules, which allow you to overwrite the standard policies previously defined for the firewall, is necessary.
To enable SSH connections to the server, type one of the two commands:
sudo ufw allow ssh
sudo ufw allow 22
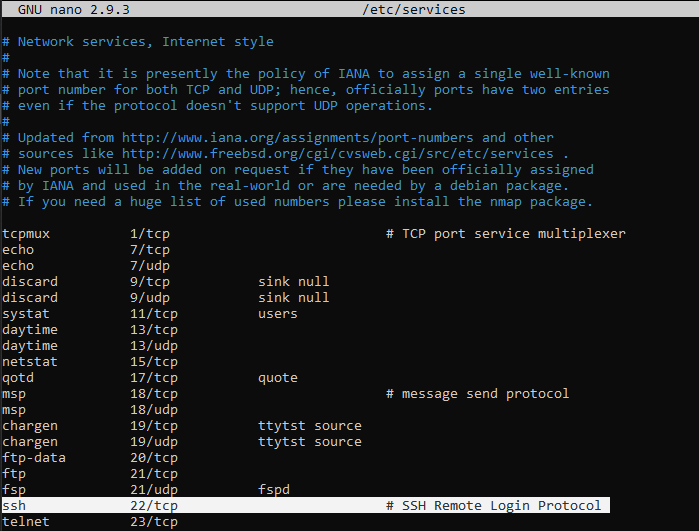
The reason two different commands can be used to obtain the same identical effect is due to the fact that in an UFW configuration file there is an association between the word "ssh" and its relative port (22). The list of all these associations can be seen by opening the file "/ etc / services" t .
nano /etc/services
Enabling a port or connection from an IP
There is no default service associated with each port. Consequently, to allow traffic on a port other than the standard ones, just type:
sudo ufw allow port_number
NB Replace "port_number" with the number of the port to unlock.
You may also want to enable traffic BETWEEN your server and another machine (bidirectional communication) by adding an ad hoc rule.
To accept all traffic from an IP address, regardless of the communication port, just type:
sudo ufw allow from ip_address
If you want to limit the communication of that machine to a single port on your server, use the following command:
sudo ufw allow from ip_address to any port port_number
NB Replace the "ip_address" parameter with the IP of the machine to be authorized and "port_number" with the port to be 'unlocked'.
For example, to enable a machine with IP "87.197.5.125" for the SSH connection to your server, type:
sudo ufw allow from 87.197.5.125 to any port 22
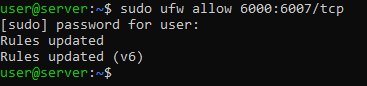
To enable a range of ports, defining the type of communication (TCP or UDP), the command to execute respects the following syntax:
sudo ufw allow start_port:end_port/tcp
sudo ufw allow start_port:end_port/udp
NB Replace "start_port" with the port number to start the interval with and "end_port" with the number of the last port granted.
If all went well, UFW will notify via message that the rule was successfully added.
Enabling UFW Firewall on startup
Precisely because it is the first security tool between your Server and the rest of the Internet, it is important that UFW is always executed at system startup.
To enable automatic firewall execution, just run the command:
sudo ufw enable
NB This command could cause a temporary SSH disconnection. Therefore, before executing it, make sure you enable the SSH connection between the firewall rules, as shown above.
Once the command is executed, you will be notified of what has been reported by means of a message. Type "y" anyway and hit "Enter".

Allowing HTTP, HTTPS and FTP requests
HTTP and HTTPS are protocols that communicate on specific ports: just as SSH needs port 22, HTTP uses port 80, while HTTPS uses port 443.
To allow HTTP communication, type one of two commands:
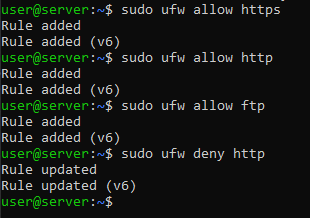
sudo ufw allow http
sudo ufw allow 80
Similarly, for HTTPS, type:
sudo ufw allow https
sudo ufw allow 443
FTP is instead a file transfer protocol based on port 21. To enable this type of communication, execute either one or the other of the following commands (with no difference):
sudo ufw allow ftp
sudo ufw allow 21/tcp
Denying an existing connection
If, as recommended at the beginning of the guide, all connections to your server have been denied, at this point it will be possible to communicate with your Server only through the specific ports added between the rules.
However, sometimes denying specific connections on a specific port or based on an IP address may be useful, as your server may be attacked from there. In this case, use the same syntax used to enable a communication, however replacing the allow option with deny .
Assuming that you want to deny the HTTP connection, for example, just type the command:
sudo ufw deny http
Similarly, in order not to allow communication from a specific machine, just deny its access by:
sudo ufw deny from ip_address
NB Replace "ip_address" with the IP of the machine to be blocked.
Viewing and deleting existing rules
To view a summary of the rules defined for UFW on your Server, just call the command:
sudo ufw status numbered
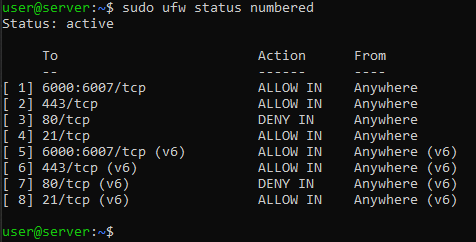
This command shows the list of rules created for your firewall, each identified by a unique number.
To delete a rule, just use the delete command.
For example, to delete the rule for HTTPS communication (number 2), the command to be executed would be the following:
sudo ufw delete 2
You will be requested for confirmation before it is deleted. If certain, type "y" and then "Enter". In case of a mistake, type "n" to cancel the operation.
This operation will cancel the HTTPS communication for IPV4, but not the one for IPV6 (which in the previous screenshot is represented by rule number 6). In fact, all the rules previously created have been generated for both IPV4 and IPV6: where laws "(v6)" are rules for IPV6.
To delete the rule for IPV6, consult the list of existing rules again, since its identification code will be changed.
Enabling, disabling or restoring UFW
It was previously shown how to enable UFW to start the Server using the command:
sudo ufw ufw enable
To remove it from the automatic start, just use the disable command :
sudo ufw ufw disable
If you need to reset the UFW settings and then remove any connection acceptance / denial rules and policies, use the reset command
sudo ufw ufw reset
UFW Firewall log
For security reasons, it may be necessary to enable UFW data logging, so as to check which connections have been made to your Server and verify the correct definition of the rules.
To enable data logging, the command to be performed is:
sudo ufw logging on
On the contrary, to disable logging type:
sudo ufw logging off
The UFW logs can be consulted from the file "/var/log/ufw.log"
nano /var/log/ufw.log
Conclusion
The Firewall is a very important component when it comes to managing and securing your Cloud Server. By enabling UFW, all communications to and from your Ubuntu Linux server pass through this tool, which can therefore protect you from unwanted attacks and connection attempts by unauthorized users.
It is advisable to pay particular attention to the configuration of the UFW Firewall as the security of the server and the correct functioning of its services may depend on the rules set.