Introduction
The cron module, belonging to node, allows you to schedule processes and define how many times and when they should be repeated within your Node.js server.
To use cron, all you need is a module called node-cron. - This module will use a particular syntax, called crontab, which you may already be familiar with if you have used the application on Unix systems.
In the examples of this tutorial, you will be shown how to perform scheduled tasks typical of a web server, such as deleting log files, backing up a database or sending scheduled emails.
First, connect to your server via an SSH connection. If you haven't done so yet, following our guide is recommended to connect securely with the SSH protocol. In case of a local server, go to the next step and open your server terminal.
Pre-requisites
The only requirement to proceed with this guide is to have a Node.js development environment installed and configured. If you haven't already set up a Node.js environment, follow our guide on How to install Node.js on Ubuntu 18.04.
Creating a Node application and installing dependencies
The first step is to create a new application. To do so, start by creating a new project folder and move into it, using the commands:
$ mkdir cron-node

$ cd cron-node
N.B. The name used in the example was chosen for explanatory purposes only, but any name can be chosen.
To initialize the directory and prepare it for the project, use another command to create the package.json file :
$ npm init -y
Next, install the web framework called express and the node-cron module to start up the web server and schedule tasks respectively.
$ npm install express @4.17.1 node-cron @2.0.3
Specify the desired version by typing the " @ " character followed by the version number.
At this point, the initial setup of the project will be completed.
Creating the backend server and scheduling a Cron Job
To start working with the web server and planning the first steps, start by creating an index.js file :
$ nano index.js
Within the file just opened, enter some instructions, to request express and cron :
const cron = require('node-cron');
const express = require('express');
Right after that, add the instructions to declare a new Express instance and add a little scheduling function.
app = express();

cron.schedule('* * * * *', function() {
 console.log('Process running every minute');
});

app.listen(3000);
At the end of these operations, a completed file will appear as shown:
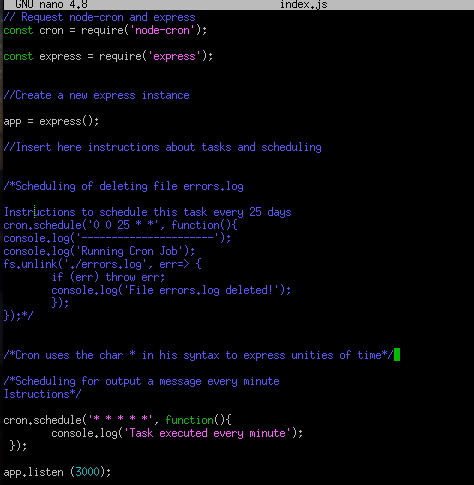
Note that in cron 's scheduling function there are some asterisks. These asterisks are called cron.schedule.
The function takes as input as follows:
- A specification on the time interval considered, declared with asterisks;
- A function defined by you, which will be repeated with the frequency specified in the first input parameter (in this case, the simple printout of a message).
The asterisk notation is part of the crontab syntax, which represents units of time in the following way:
 * * * * * *
 | | | | | |
 | | | | | day of the week
 | | | | month
 | | | day of the month
 | | hour
 | minute
 second (optional)
Going back to the example, in case of five asterisks, cron is being requested to repeat the (print on screen) function every minute.
Asterisks, however, are not the only values that can possibly be entered for scheduling frequency specifications. In fact, those characters can be replaced by some values in order to create more complex schedules.
A very useful tool to understand how to enter these values, according to your needs, is the online tool Crontab.guru.
Now, check if the just specified instructions return the requested output with the specified frequency.
$ node index.js
If everything went well, an output similar to the following should be shown on the console:
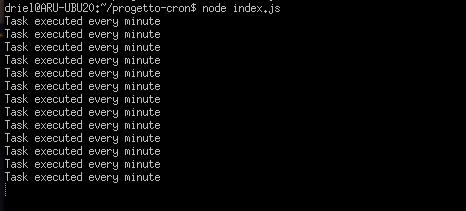
With the combination CTRL + C, stop the execution of the file.
Regularly clearing a log file
Imagine you want to eliminate an error log file on the server every 25th day of the month. Such a scenario can be safely implemented with the cron features.
As a first step, create a sample log file named, for example, errors.log :
$ nano errors.log
In the editor, enter any text, such as:
This text is an example of a log file to be deleted every 25th day of the month..
Next, go to edit the index.js file, as seen before:
$ nano index.js
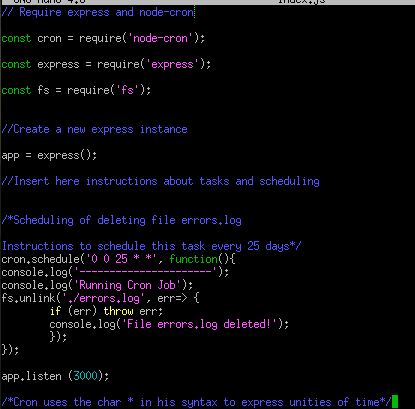
This time use fs to unlink a file. Add it to the initial declarations:
const cron = require('node-cron');
const express = require('express');
const fs = require('fs');
Next, in order not to lose the changes made earlier, use the characters / * and * / to enclose the block of instructions specified before in a comment and not to lose them.
/* cron.schedule('* * * * *', function() {
 console.log('Process running every minute');
}); */
Now that that piece of code is disabled, enter the new instructions to clear the log file.
//Delete the errors.log file on the 25th day of the month
cron.schedule('0 0 25 * *', function() {
 console.log('---------------------');
 console.log('Running Cron process');
 fs.unlink('./errors.log', err => {
 if (err) throw err;
 console.log('File errors.log successfully deleted!');
 });
});
At this point, theindex.js file should look as follows:
In the file, in the function that indicates the schedule ( cron.schedule ), there will be both the * character and other values.
Analyzing the values given in input to the function:
- The two 0's will indicate the hour and minute (in this case, 00:00);
- The 25th will indicate the day of the month in which to carry out the procedure;
- The characters * will indicate undefined values for the month and week.
The combination of these parameters tells cron that the procedure for clearing errors.log and printing a confirmation message should be performed at the beginning of the 25th day of the month.
To run the script on the server, simply execute the command again:
$ node index.js
To test if the new instructions work, simply change the values of the scheduled time and verify that the output indicated in the instructions appears and, above all, that the errors.log file disappears after the specified time.
Backing up your database regularly
Among the many uses of scheduling through cron, it may be very useful to associate this feature with the backup of a possible database connected to the server.
Imagine, for example, having a SQLite database connected to your server and having to make a backup copy every day at 12:32.
N.B. For simplicity, the example below shows a locally configured database, without going into details on how to create it.
Imagine, then, a possible SQLite backup statement :
$ sqlite3 database.sqlite.dump > dump_data.sql
The above instruction will take the database.sqlite database and execute the .dump, outputting the backup file dump_data.sql.
Next, install the shelljs module for executing the backup instruction specified above.
$ npm install [email protected]
The next step is, as before, to edit the index.js file.
$ nano index.js
In the declarations part, add the string:
const shell = require('shell.js');
In the part dedicated to the instructions to be specified, insert the following lines of code instead:
// Back up the database at 12:32.
cron.schedule('32 12 * * *', function() {
 console.log('---------------------');
 console.log('Running Cron process');
 if (shell.exec('sqlite3 database.sqlite.dump > dump_data.sql').code !== 0) {
 shell.exit(1);
 }
 else {
 shell.echo('Database backup completed!');
 }
});
Analyzing the values given in input to the planning function:
- The first two numbers will indicate the minutes and hours of the schedule (12:32);
- The other characters * will indicate that the action must be repeated every day, without other distinctions other than the time.
Instead, the rest of the code should back up or, in the event of an error, return a message.
The final result of the index.js file will not be shown this time as you have already seen in the previous examples how to structure it the first time and how to modify it in case you want to change the schedule and instructions.
Finally, by executing the command:
$ node index.js
Notice that, every day at 12.32, the server will display a message to notify that the backup has been successfully completed. Within the directory, the dump_data.sql file should now be found.
Scheduling the server to send emails
It may also happen to automatically send an email on a frequent basis. The node-cron package allows you to schedule it too.
N.B. It is important, in the test phases of the guide, and especially on the production servers, to avoid using a personal email account. To avoid risks, use a separate account, instead.
The first step is to install a module, called nodemailer, to manage the sending of emails:
$ npm install [email protected]
As with the previous steps, now is the time to edit the index.js file.
In the declarative section of the file, add the declaration:
const nodemailer = require('nodemailer');
In the instructions section to define the procedure, enter the following code instead:
//...

let transporter = nodemailer.createTransport({
 host: 'smtp.example.com',
 port: SMTP_PORT_NUMBER,
 secure: true,
 auth: {
 user: '[email protected]',
 pass: 'your_password';
 }
});
This block of instructions will be helpful to specify some basic characteristics of the email address from which the emails will be sent. Remember to use an SMTP protocol.
Next, enter another instruction packet:
// Send emails every Monday.
cron.schedule('0 0 * * 1', function() {
 console.log('---------------------');
 console.log('Running Cron Process');

 let messageOptions = {
 from: '[email protected]',
 to: '[email protected]',
 subject: 'Scheduled Email',
 text: 'Hello user! This email has been scheduled to be automatically sent out, every Monday'
 };

 transporter.sendMail(messageOptions, function(error, info) {
 if (error) {
  throw error;
 } else {
  console.log('Email sended!');
 }
 });
});
This second block is the real planning and execution part. In fact, the planning function and its input values can be observed:
- The first two 0s indicate that the email must be sent at 00:00
- The two characters * indicate that there is not a specific day of the month and a specific month in which to send the email.
- The number 3 indicates that the email must be sent every third day of the week, ie Wednesday
Next, find the instructions that specify the sender, recipient, subject and body of the email. All fields have been filled in with examples to show the respective values to be entered.
Finally, a message output will confirm the successful sending.
Remember, the instructions have to be entered in this order:
-
app = express();
- use case instructions
-
app.listen (3000);
Finally, as for the previous examples, it will be sufficient to run the index.js file :
$ node index.js
In this way, every Wednesday, the confirmation of sending the scheduled email will be sent.
Conclusions
At this point, you have been shown several common use cases where Cron can be helpful in managing the scheduling of certain operations on your web server.
Remember you can explore many other tools available for Node and combine them with Cron to automate your processes using Cron Jobs.