Introduction
When you install your Linux-based Cloud Server for the first time, a 'root' user with administrator privileges is automatically created. This means that the user has full control over the resources and commands that can be executed on the machine.
Often, also other collaborators may need to access the server. Certainly, providing all users, who need the access to the root user, with login credentials can be extremely risky, as they could apply unwanted changes to the server or, in the worst case scenario, determine an overall system malfunction.
For this reason, it is essential to know how to manage users and grant them different levels of permissions. In this tutorial you will learn how to add new users, delete system users and grant them administrative privileges, using a Linux Ubuntu 18.04 server.
To get started, connect to your server via an SSH connection. If you haven’t done so yet, following our guide is recommended to securely connect with the SSH protocol. In case of a local server, go to the next step and open the terminal of your server.
Creating a new user in Linux
How do you add a user in Linux? First, add a new user to the system, then define the type of group the user should belong to. A group aims to gather users that have the same privileges.
Each user can belong to only one Primary group, which is automatically generated when the user is created, and the files created by this user will be assigned to the corresponding Primary group. Optionally, a user can also belong to one or more Secondary groups to define further privileges in their possession.
Assuming that you want to create a new user, first, create the group and then add the users.
To create the group that the future user will be part of, type:
sudo addgroup my_group
N.B. Replace 'my_group' with the name you want to assign to the group.
Then, create a new user and grant him access to the server by typing:
adduser first_user
N.B. Replace 'first_user' with the name of the user you prefer.
The user can be added to either one or more groups with the command:
sudo usermod -a -G group1,group2 first_user
N.B. Obviously, replace "group1, group2" with the names of the groups that the user should be added to and 'first_user' with the name of the user to be added.
You will be requested to specify the password that the user should log in to the server with. You will also be requested for other optional information. If you don't want to enter it, simply press enter for each item. At the end, a summary will be shown: answer with Y to accept, N to refuse.
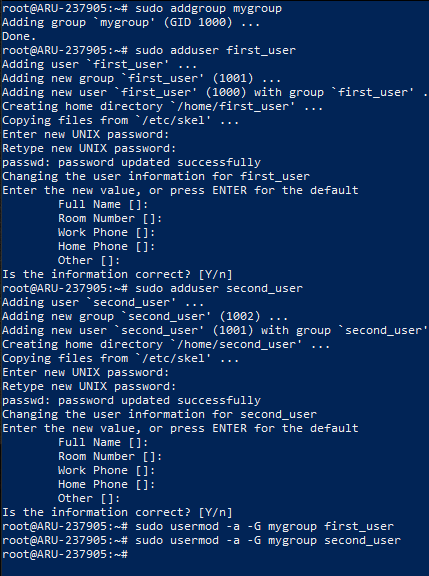
The following screen shows the instructions needed on Ubuntu to create the new group "my_group", the next creation of the users "first_user" and "second_user", and finally the addition of the two new users to the group "my_group":
Verifying the user creation
To verify the correct creation of the user, close the SSH connection and try to connect again to your server with the new user created, in our example 'first_user'. You will notice the user name (highlighted in green on the next screen) is exactly that of the account previously created.
This newly created user does not have access to root privileges. Just run any command with 'sudo' to get the related error message:

To view the users associated with the created group, use the “getent group” command by adding the “grep” command to limit the visibility of the results only to those who have the group name to be verified. Then, type:
getent group | grep mygroup
Similarly, to see the groups the new user is associated with, just type:
getent group | grep first_user
N.B. Replace 'mygroup' and 'first_user' respectively with the names of the group and user to be searched.
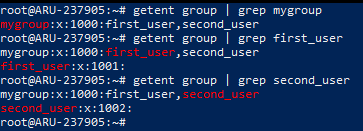
The following screen shows the output of the two commands, which has the syntax "group: password: GID: users" whose fields correspond respectively to the name of the group, its password (in this case "x" is indicated because the password is in the / etc / gshadow file), the Group ID and the list of users who are part of the group.
Grant sudo privileges to user
How do I add a user to sudo privileges in Linux?
To let the previously created user have administrative rights, that is sudo privileges, log in to the server again with the root user and add the "first_user" account to the "sudo" group.
Once logged in as root (or sudo-enabled user), type:
sudo usermod -aG sudo first_user
N.B. Replace "first_user" with the username set previously.
From this moment, access to the 'sudo' command and execution of the instructions as administrator will be allowed, even by logging in to the server with the new user, as shown in the following screen:

Deleting a user
Certainly, just like they were created, users can also be deleted.
Deleting a user can only be done by another user who has administrator privileges. To delete a user follow this command:
sudo deluser --remove-home first_user
N.B. Replace "first_user" with the name of the user you want to delete.
Please note that in this way also the / home / folder, where the files of this user can be, as well as the Primary group of the user will be deleted. The user will also be automatically deleted from all subgroups that the user was associated with.
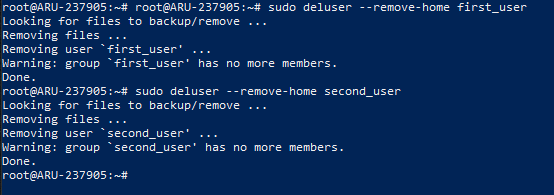
In the example shown in the following screen, the users "first_user" and "second_user"previously created, are now deleted.
Conclusion
Adding and removing groups and users to your Cloud Server with Linux Ubuntu is a very simple, but also potentially dangerous, operation.
Hence, it is important to always keep in mind which type of user you are creating and to pay attention to the user you want to grant administrator privileges to.