Introduction
Each web service is accessible on the Internet through a specific URL, which represents a sort of "substitute name" to identify the IP address and port of the server that provides that service. The same machine can offer different services on different ports at the same time.
For security reasons, it may be necessary to mask the port number of a web service, and therefore to show a port number outside that does not correspond to the one the service is actually listening on.
Thanks to this tutorial, you will be able to manage your server ports, configuring the UFW firewall integrated in Ubuntu. In particular, by following the instructions of the guide, you will learn to forward the requests coming from a certain port to another port (port forwarding), while using service provided on the latter.
There is currently no service on port 70 of our server. On the other hand, a service is active on port 8600 that, in the example used for this guide, returns a simple writing.
Therefore, the objective of the tutorial is to configure UFW so that users can connect to port 70, but the service offered on port 8600 is returned to them by the server.
Prerequisites
In order to test the example shown in this tutorial you will need:
- A Linux Ubuntu 18.04 server;
- UFW, which is installed by default on Ubuntu (unless already uninstalled).
To start, connect to your server via an SSH connection. If you haven’t done so yet, following our guide is recommended to connect securely with the SSH protocol. In case of a local server, go to the next step and open the terminal of your server.
Configuring UFW Firewall
Originally, there are no commands that allow port forwarding, that is, to redirect the traffic received on a given port to another port of your choice. However, this operation is possible by acting on the configuration rules on which UFW is based, the default application for configuring the firewall on Ubuntu.
First, make sure that the destination port is enabled for TCP traffic, otherwise UFW will block all the requests towards that port. Do it by using the command:
sudo ufw allow port_number/tcp
N.B. Replace 'port_number' with your destination port you want traffic to be directed to.
As previously said, there is no direct command to type. So, edit the UFW configuration file in the "/etc/ufw/before.rules" directory manually :
cd /etc/ufw
sudo nano before.rules
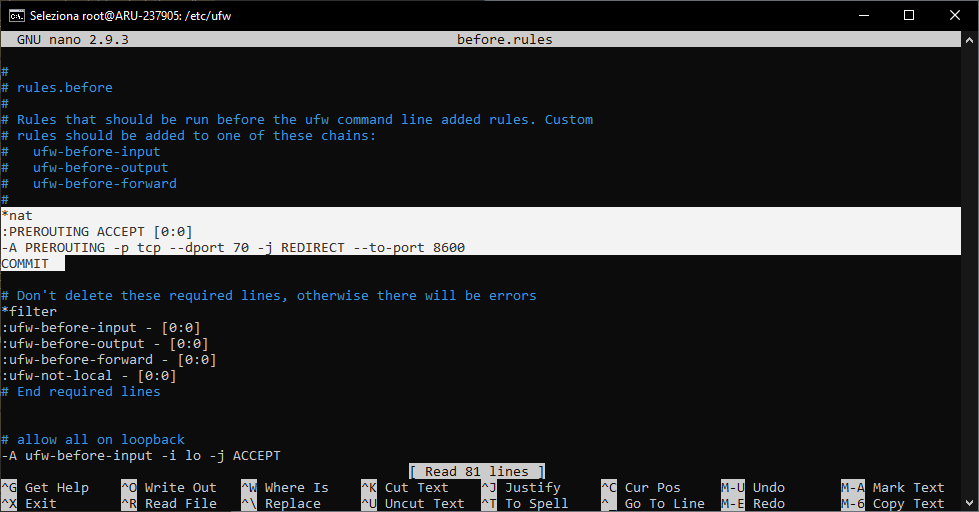
Before * filter section, insert these instructions, modifying respectively the parameters "exposed_port" and "effective_port" with the port number on which to enable the requests from outside and that of the port that the service is actually listening on.
*nat
:PREROUTING ACCEPT [0:0]
-A PREROUTING -p tcp --dport exposed_port -j REDIRECT --to-port effective_port
COMMIT
The image below shows an example of configuration, through which all the requests that have been made on port 70 will be redirected on port 8600.
Now, add the rule for the SSH connection and restart UFW Firewall using the command:
sudo ufw allow OpenSSH
sudo ufw allow in ssh
sudo ufw enable
If a SSH connection is used, you will be requested whether to proceed with the operation, since this could eventually terminate the connection. Then, type Y and press Enter.
Conclusion
At this point, all the traffic passing through port 70 will be redirected to port 8600 and vice versa.
As in the image below, at the same address and on the same port shown initially, you are now listening to the service provided on what was previously the 8600 port.

This can be done multiple times and for each service, according to your needs, in order to mask the real port number and secure your server.