Apache Tomcat is a web server used to manage web applications based on Java technology. In this tutorial you will find all the necessary instructions to install Tomcat on Linux Ubuntu 18.04.
First, connect to your server via an SSH connection. If you haven’t done so yet, following our guide is recommended to securely connect with SSH. In case of a local server, go to the next step and open the terminal of your server.
Java installation
Check whether Java is already installed on your system using the command:
If Java is installed, go to the next step. Otherwise, proceed with its installation.
Update the apt repositories and then proceed with the installation of the Java Development Kit:
$ sudo apt-get update && sudo apt-get install default-jdk
Tomcat installation
First, create a new user and a new group that will launch the Tomcat service.
Create the "tomcat" group:
And create the related user "tomcat" that, for security reasons, will not have access to the terminal:
$ sudo useradd -s /bin/false -g tomcat -d /usr/local/tomcat tomcat
Once the user and group are created, proceed with the actual installation of Tomcat.
Move to the /usr/local directory:
Visit https://tomcat.apache.org/download-90.cgi to make sure you downloaded the latest version of Tomcat. To date, the latest version released is 9.0.30. So, download the package:
$ wget http://it.apache.contactlab.it/tomcat/tomcat-9/v9.0.30/bin/apache-tomcat-9.0.30.tar.gz
Unzip the downloaded file and change the name of the folder just extracted into "tomcat":
$ tar xzvf apache-tomcat-9.0.30.tar.gz && mv apache-tomcat-9.0.30 tomcat
Continue by configuring the permissions of the aforementioned folder for the user and the "tomcat" group created previously:
$ sudo chgrp -R tomcat tomcat

$ sudo chmod -R g+r  tomcat/conf

$ sudo chmod g+x  tomcat/conf

$ sudo chown -R tomcat tomcat/work/ tomcat/logs/ tomcat/webapps/ tomcat/temp/
At this point, the installation of Tomcat is completed, so continue with the creation of a service to start it.
First, mark the path relative to your Java installation that you can obtain using the command:
$ update-java-alternatives -l
As you can see from the following image, the Java installation path necessary to create your service will be printed.

Create the tomcat.service file in the / etc / systemd / system / directory
$ sudo nano /etc/systemd/system/tomcat.service
T The following content has to be included in the file and the previously installed Java pathway has to be carefully replaced in the designated spot:
[Unit]

Description=Apache Tomcat

After=network.target
                [Service]

Type=forking
                Environment=JAVA_HOME=PERCORSO_JAVA

Environment=CATALINA_PID=/usr/local/tomcat/temp/tomcat.pid

Environment=CATALINA_HOME=/usr/local/tomcat

Environment=CATALINA_BASE=/usr/local/tomcat

Environment='CATALINA_OPTS=-Xms512M -Xmx1024M -server -XX:+UseParallelGC'

Environment='JAVA_OPTS=-Djava.awt.headless=true -Djava.security.egd=file:/dev/./urandom'
                ExecStart=/usr/local/tomcat/bin/startup.sh

ExecStop=/usr/local/tomcat/bin/shutdown.sh
                User=tomcat

Group=tomcat

UMask=0007

RestartSec=10

Restart=always
                [Install]

WantedBy=multi-user.target
For example in this case the file will have the following content:
[Unit]

Description=Apache Tomcat

After=network.target
                [Service]

Type=forking
                Environment=JAVA_HOME=/usr/lib/jvm/java-1.11.0-openjdk-amd64

Environment=CATALINA_PID=/usr/local/tomcat/temp/tomcat.pid

Environment=CATALINA_HOME=/usr/local/tomcat

Environment=CATALINA_BASE=/usr/local/tomcat

Environment='CATALINA_OPTS=-Xms512M -Xmx1024M -server -XX:+UseParallelGC'

Environment='JAVA_OPTS=-Djava.awt.headless=true -Djava.security.egd=file:/dev/./urandom'
                ExecStart=/usr/local/tomcat/bin/startup.sh

ExecStop=/usr/local/tomcat/bin/shutdown.sh
                User=tomcat

Group=tomcat

UMask=0007

RestartSec=10

Restart=always
                [Install]

WantedBy=multi-user.target
At this point save and close the file.
Firewall
If there is a firewall on the system, allow traffic to the default Tomcat port or the 8080. To do so, type the following command:
end the installation by starting Tomcat:
$ sudo systemctl daemon-reload && sudo systemctl start tomcat
Check the status of the service through the command:
$ sudo systemctl status tomcat

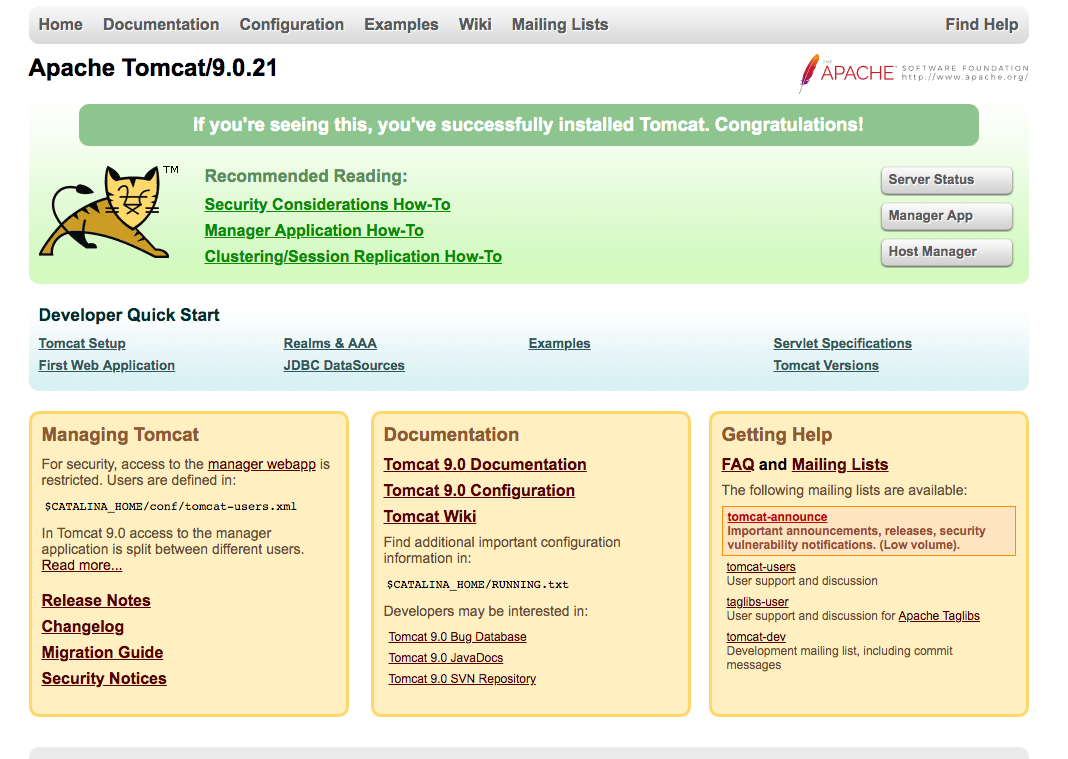
If the service is active, visit http://<SERVER.IP>:8080 or in case of a local server http://localhost:8080 .
If the Tomcat welcome page is displayed, the installation was successful.
Automatic Start
To start the Tomcat service automatically when the system starts, all you need to do is enable it using this command:
$ sudo systemctl enable tomcat
Management Interface
To use the Tomcat management interface, first configure the user data to be used for the log in.
Open the tomcat-users.xml file located in the Tomcat conf folder:
$ sudo nano /usr/local/tomcat/conf/tomcat-users.xml
Then add the following line before the closing tag </tomcat-users>:
<user username="MYUSER" password="MYPASSWORD" roles="manager-gui,admin-gui"/>
in this way:

replacing MYUSER and MYPASSWORD with the authentication data you want to use, as in the following example:
<user username="ADMIN" password="ARUBA123" roles="manager-gui,admin-gui"/>
At this point the user has been configured to access the management interface.
If you are installing tomcat on a remote server to access the management interface from your browser, you will have to disable some security restrictions:
Open the context.xml file:
$ sudo nano /usr/local/tomcat/webapps/manager/META-INF/context.xml
and replace its content with the following :
<Context antiResourceLocking="false" privileged="true" >

</Context>
Save and close the file.
Finally, restart the Tomcat service:
$ sudo systemctl restart tomcat
Now visit http://<SERVER.IP>:8080/manager/html or in the case of a local server http://localhost:8080/manager/html . Access the Tomcat management console, by entering the previously set credentials.
At this point the Tomcat configuration is completed.