Introduction
MQTT, acronym for Message Queue Telemetry Transport, is a lightweight communication protocol based on the publisher/subscriber concept. It represents an alternative to the classic client/server architecture, widely used in the Internet of Things. MQTT is often used for receiving parameters measured by sensors installed inside connected objects in houses, vehicles or other physical spaces.
In this tutorial you will see how to install Mosquitto software, an MQTT Broker widely supported by the community, easy to install and configure, on your Ubuntu 20.04 Cloud Server, and to use it to test the exchange of messages between Publisher and Subscriber.
First, connect to your server via an SSH connection. If you haven't done so yet, following our guide is recommended to connect securely with the SSH protocol. In case of a local server, go to the next step and open the terminal of your server.
Installing Mosquitto MQTT Broker
Starting from Ubuntu version 18.04, Mosquitto is already inside the official repositories.
To proceed with the installation, type the following commands, through installmosquitto and mosquitto-clients will be installed :
sudo apt update -y && sudo apt install mosquitto mosquitto-clients -y
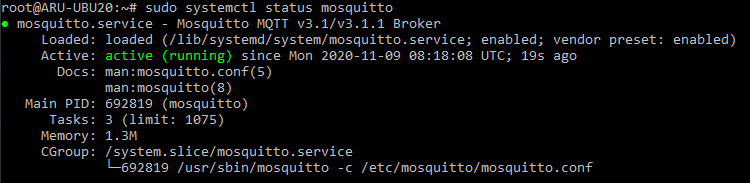
At the end of the installation Mosquitto should already be active.
To check its status:
sudo systemctl status mosquitto
If Mosquitto isn’t already active, enable it manually by typing:
sudo systemctl start mosquitto
The messages transit through the MQTT network on Topics, the identification paths of the messages. Often, these paths are also organized hierarchically (ex: /home/sensors/temp/kitchen - /home/ sensors/temp/bedroom).
Due to the type of service that this software offers, it may be useful to run it at each system start (so that it is not necessary to start it manually, should the Server shut down for some reason).
sudo systemctl enable mosquitto
Test of sending and receiving messages
The MQTT network provides for the presence of 3 main fundamental components: Broker - Publisher - Subscriber. Mosquitto itself acts as a Broker, i.e. the one in charge of redirecting messages between the relevant senders and recipients.
To test this type of communication, open 4 different terminals:
- Terminal 1: Publisher
- Terminal 2: Subscriber on topic "/ home / sensors / temp / kitchen"
- Terminal 3: Subscriber on topic "/ home / sensors / temp / bedroom"
- Terminal 4: Subscriber on topic "/ home / sensors / temp / #"
Terminal 4, unlike Terminals 2 and 3, has subscribed to all the topics that have "/ home/ sensors/ temp/" as root thanks to the wildcard "#": in this way it will receive all messages published on topics starting with the given root.
The ‘mosquitto-clients’ package previously installed is not essential for the correct functioning of the service, but it is needed to instantiate publishers and subscribers to verify the correct sending and receiving of messages.
To subscribe to a topic, respect the following syntax:
mosquitto_sub -h address -t topic
N.B. Replace the "address" parameter with the IP address of the Broker and the ‘topic’ parameter with the topic the user wants to subscribe to. In the following example the tests are run directly on the Cloud Server (address: localhost).
- Terminal 2:
mosquitto_sub -h localhost -t /home/sensors/temp/kitchen
- Terminal 3:
mosquitto_sub -h localhost -t /home/sensors/temp/bedroom
- Terminal 4:
mosquitto_sub -h localhost -t /home/sensors/temp/#
Once the various commands shown have been executed, no message will appear on those terminals until one is sent on the topics indicated.
On Terminal 1 try to send a message on the topic "/ home/sensors/temp/kitchen". The syntax to respect is:
mosquitto_pub -h address -t topic -m “message”
N.B. The ‘address’ and 'topic' parameters have to be replaced as described above, while "messages" represents the actual message to be sent.
Terminal 1:
mosquitto_pub -h localhost -t /home/sensors/temp/kitchen -m "Kitchen Temperature: 26°C"
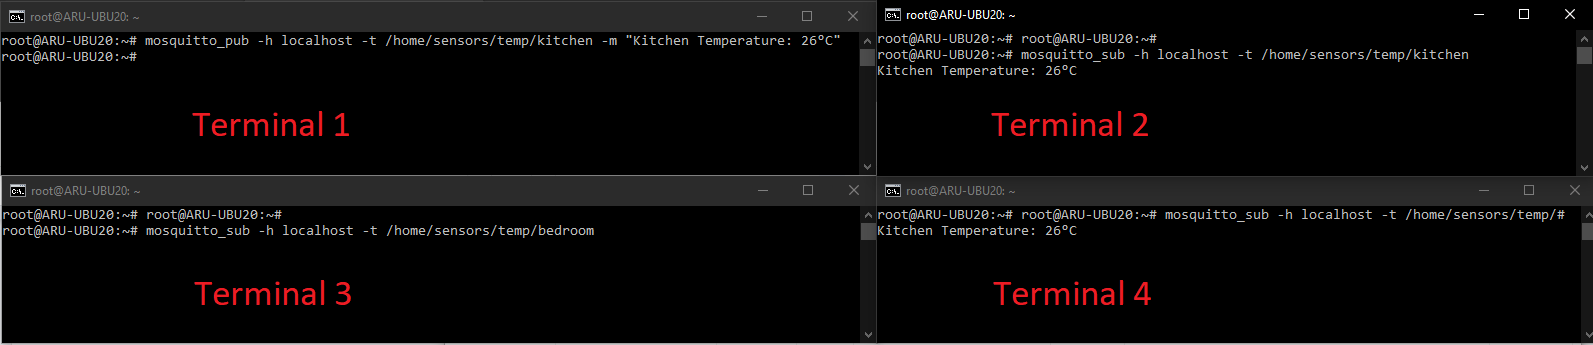
The message sent from Terminal 1 was received by Terminals 2 and 4, but not by 3.
Similarly, by changing the topic to the same as in Terminal 3 (/ home / sensors / temp / bedroom) the message is received by Terminals 3 and 4, but not by 2.
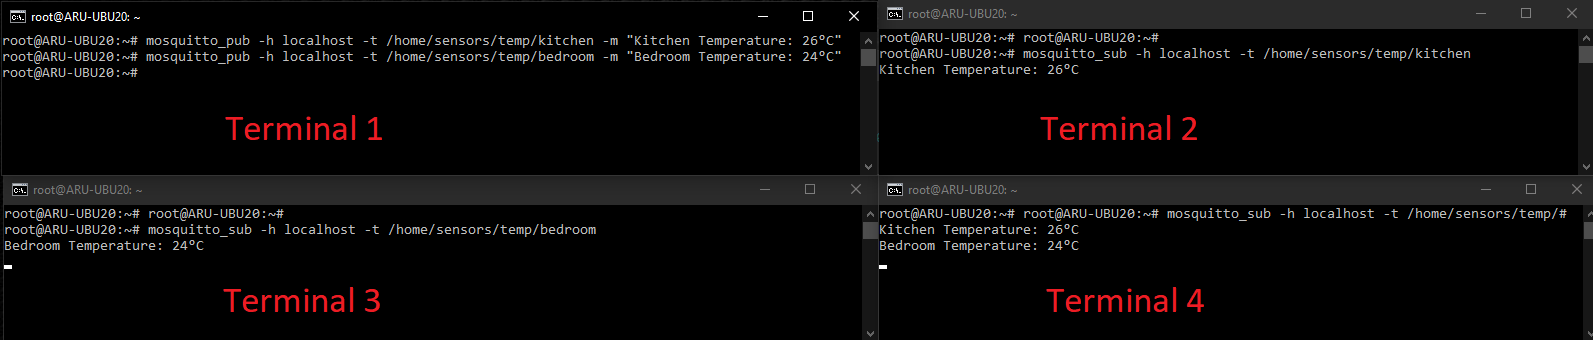
In fact, the broker addressed the message received only to the components interested in those topics.
Configuring MQTT Password
At this point, your Broker is working and your MQTT network is ready.
However, at this moment anyone who knows even just the Server IP address with your Broker could send messages. To deal with this security problem, indicate a set of users, with username and password, enabled to send messages.
Mosquitto includes a password encryption tool for the users you want to add. Assuming you want to add the "mark" user, the command to execute is the following:
sudo mosquitto_passwd -c /etc/mosquitto/passwd mark
You will be requested to type the password to be encrypted twice.

This operation overwrites the "/ etc /mosquitto/passwd" file each time.
To add multiple users, make sure you copy the contents of the file each time before proceeding with adding a new user. After adding the new user, paste the previously copied content onto a different line of the file.
Now that the user has been created, update the Mosquitto configuration file to make sure that only the users entered in the '/ etc/ mosquitto/passwd” file can participate in the MQTT network.
Then, type:
sudo nano /etc/mosquitto/conf.d/default.conf
Inside the newly opened text editor paste the following instructions:
allow_anonymous false
password_file /etc/mosquitto/passwd
Then, close the text editor (CTRL + X / Y / Enter) and restart Mosquitto via:
sudo systemctl restart mosquitto
To republish the same message on Terminal 1 an error message will be shown as you are not authenticated to the network.

From this moment, the login data, both for the publication and for the subscription to the topics have to be specified.
To do so, use the following syntax:
- Publication: mosquitto_pub -h address -t topic -m "message" -u "username" -P "password"
- Subscription: mosquitto_sub -h address-t topic-u "usurname" -P "password"
N.B. According to the operation you intend to perform, replace address and topic as previously specified, "username" and "password" with the previously indicated login data.
Conclusions
At the end of this tutorial Mosquitto Broker will be correctly installed and secured on your Server with Ubuntu 20.04.
As the login data for posting and subscribing to the various topics have been specified, make sure you indicate these data in any application you want to use for sending or receiving messages.
In the MQTT network, the broker is the fundamental component for the exchange of messages as each communication passes through this component.
Finally, remember that the Broker also has no memory Consequently a Subscriber who subscribes to the network will only receive messages sent on that topic from that moment on. If messages were previously sent on those topics, they would not be sent to the new Subscriber as the Broker would not memorize them