VSFTPD stands for ‘Very Secure File Transfer Protocol Daemon’. VSFTPD is a software for transferring files between client and server through the FTP network protocol.
In this tutorial you will learn how to install, configure and use VSFTPD software on an Ubuntu 18.04 server for transferring files between client and server quickly and securely via the FTP protocol.
To get started, connect to your server via an SSH connection. If you haven’t done so yet, following our guide is recommended to connect securely with the SSH protocol. In case of a local server, go to the next step and open the terminal of your server.
Installing VSFTPD
First, update the repositories and install the tool. To do so, use the following command:
sudo apt-get update -y && sudo apt-get install vsftpd -y
Once the VSFTPD installation is completed, change some parameters of the configuration file. For security reasons, create a backup copy of the original configuration to be restored in case of need. To do so, type:
sudo cp /etc/vsftpd.conf /etc/vsftpd.conf.orig-y
At this point, create the folders to be shared with the users and assign each of them to their respective owners.
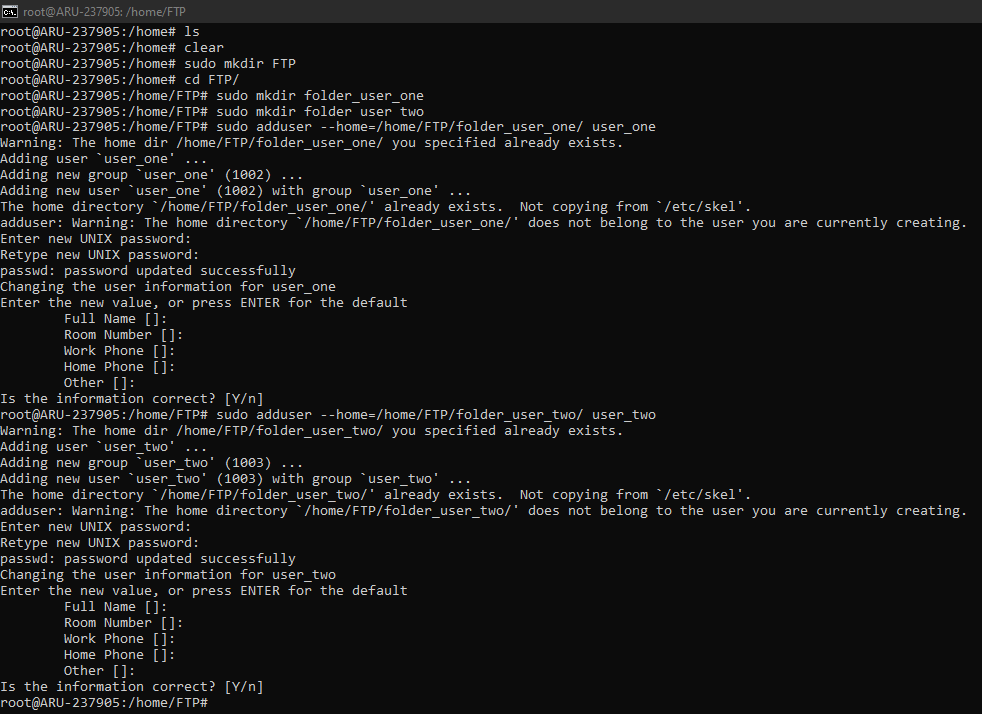
Create the root folders for each user by typing:
sudo mkdir path/folder
Then, create a user that can access this folder with the command:
sudo adduser --home=path/folder test_user
N.B. Replace 'test_user' with the username you wish to log in with and 'path/folder' with the path to the folder you created earlier.
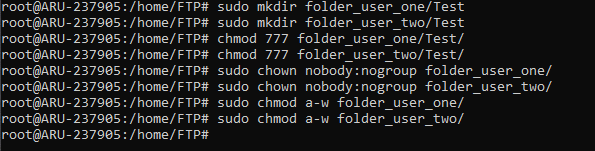
At this point, create subfolders where to save the files. Remember to grant the folder permissions. Repeat this operation for each folder assigned to a user.
sudo mkdir path/folder/subfolder
sudo chmod 777 path/folder/subfolder
N.B. Replace 'path/folder' with the path and the folder created previously and 'subfolder' with the name of the folder accessible only to the user.
At this point, set the owner and remove the write permission with the following commands:
sudo chown nobody:nogroup path/folder
sudo chmod a-w path/folder
Configuring VSFTPD software
Open the VSFTPD configuration file with the following command:
sudo nano /etc/vsftpd.conf
To allow users to upload files to their folders, uncomment the write_enable = YES line by removing the # symbol.
To allow FTP users to access the folder assigned to them, uncomment the lines containing chroot_local_user = YES and chroot_list_enable = NO.
Also, remove the # symbol in front of the lines chroot_list_file = / etc / vsftpd.chroot_list to provide the path for users. Apply all these changes, save and exit (CTRL + X - Y - Enter).
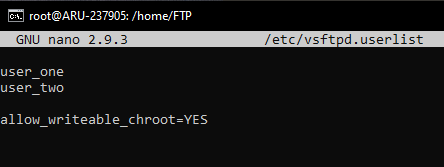
Finally, add users to VSFTPD. To do so, edit the vsftpd.userlist file:
sudo nano /etc/vsftpd.userlist
N.B. If you created multiple users as in this guide, add the names of each user on different lines. Also, insert the following command at the end of the file:
allow_writeable_chroot=YES
Save and exit (CTRL + X - Y - Enter).
Restart the service at this point to apply the changes:
sudo systemctl restart vsftpd
Use an FTP client like Filezilla to finally access your FTP server with the different accounts created and start transferring files.