Magento is a CMS for e-commerce with more than 10 years of history behind it, able to efficiently manage from simple online store to large e-commerce. In addition to paid services, Magento also offers an Open Source solution that is highly appreciated by the community for its sophistication. In this tutorial we will see how to install and configure Magento 2 on your Apache server.
First, connect to your server via an SSH connection. If you haven’t done so yet, following our guide is recommended to securely connect with SSH. In case of a local server, go to the next step and open the terminal of your server.
Installation and configuration of Apache / MySQL
Before proceeding with the installation of Magento proper, prepare the environment by installing the web server and the database, two basic requirements for the platform to work. If you have not done so yet, follow our guide to create a LAMP configuration.
Once the environment is configured, create the database and the MySQL user that will be used by Magento:
$ mysql -u root
mysql> CREATE DATABASE magento2;
mysql> CREATE USER 'magento2'@'localhost' IDENTIFIED BY 'PASSWORD';
mysql> GRANT ALL PRIVILEGES ON magento2.* TO 'magento2'@'localhost';
Query OK, 0 rows affected (0.00 sec)

mysql> FLUSH PRIVILEGES;
Query OK, 0 rows affected (0.00 sec)

mysql> exit
Bye
By executing the above commands, you are creating a database named "magento2" and a user, named the name "magento2, which can read and write on it,". Remember to change the default password into a stronger one, containing alphanumeric characters and symbols.
Continue by editing the default virtual host configuration file /etc/apache2/sites-available/000-default.conf (or the virtual host you're using for this Magento installation) and add the AllowOverride directive inside the <Directory> section (if this section is not present, add it manually):
<Directory /var/www/html>

AllowOverride All

</Directory>
Save the changes you have just made and continue by enabling the apache rewrite module:
Apply all the changes you have just made by restarting the Apache service:
$ sudo service apache2 restart
Magento installation
To download and install the latest version of Magento, you need an account. To get an account, register on the following website: Magento Marketplace: if you don’t have an account, please register, as it will be useful in the future if you want to download updates or install new plugins.
After completing the registration, in the "Account" section enter the access keys management panel.
Then, create a new access key and indicate a name of your choice , if required:
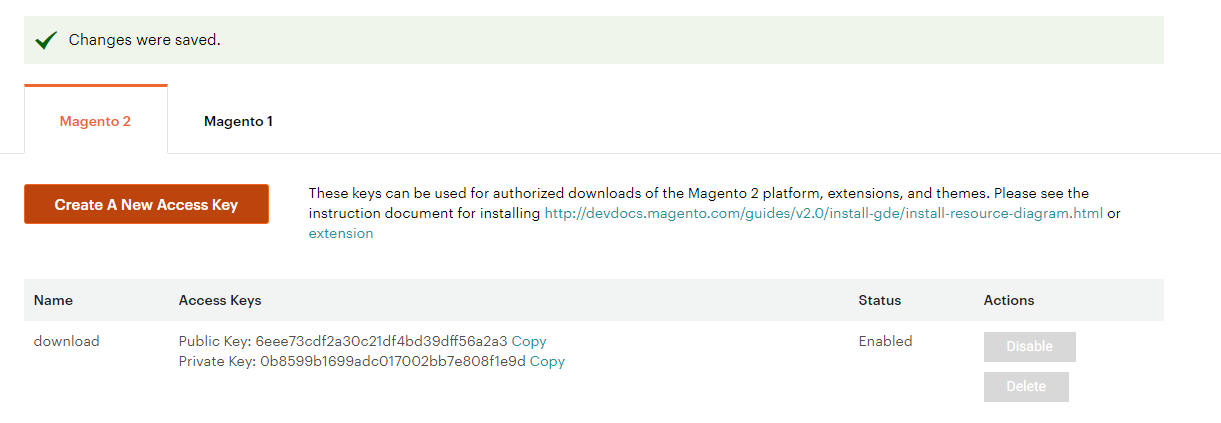
At this point, you will have a public key (Public Key) and a private key (Private Key). This public key will be later used as a username, while the private key will be used as a password.
Once you get the access keys, continue with the installation, all the contents in the Apache folder:
$ cd /var/www/html/

$ sudo rm ./* -R
Then start downloading the sources with the command:
$ sudo composer create-project --repository=https://repo.magento.com/ magento/project-community-edition ./
Before starting the download, you will be asked for your credentials: use the keys obtained from the Magento Marketplace. Downloading the sources, and all their dependencies may take several minutes.
Once completed, assign the Apache service user to the the newly downloaded files. For most of the installations it is “www-data”. To check the user, execute this command:
$ ps aux | grep apache
root      4431 0.0 0.4  73964 4672 ?     Ss 12:05 0:00 /usr/sbin/apache2 -k start

www-data  4433 0.0 0.4 826260  4536 ? Sl 12:05   0:00 /usr/sbin/apache2 -k start

www-data  4434 0.0 0.4 826260  4536 ? Sl 12:05   0:00 /usr/sbin/apache2 -k start
As you can see from the first column of the output, the Apache user is www-data.
Then proceed by correcting the permissions:
$ cd /var/www/html/

$ find var generated vendor pub/static pub/media app/etc -type f -exec chmod g+w {} +

$ find var generated vendor pub/static pub/media app/etc -type d -exec chmod g+ws {} +

$ sudo chown -R :<web server group> .

$ sudo chmod u+x bin/magento
After completing the above mentioned operations, continue the Magento configuration by visiting the URL of your server, and add / set up in the final part: for example, http://www.mymagentostore.com/setup
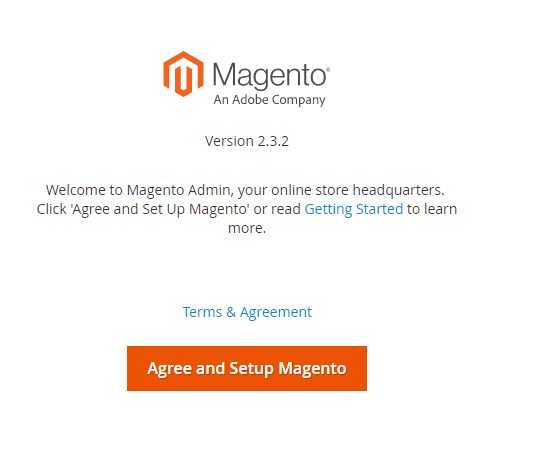
If everything works correctly, a wizard to guide you step by step to the configuration of Magento appears. Continue by clicking on "Agree and Setup Magento":
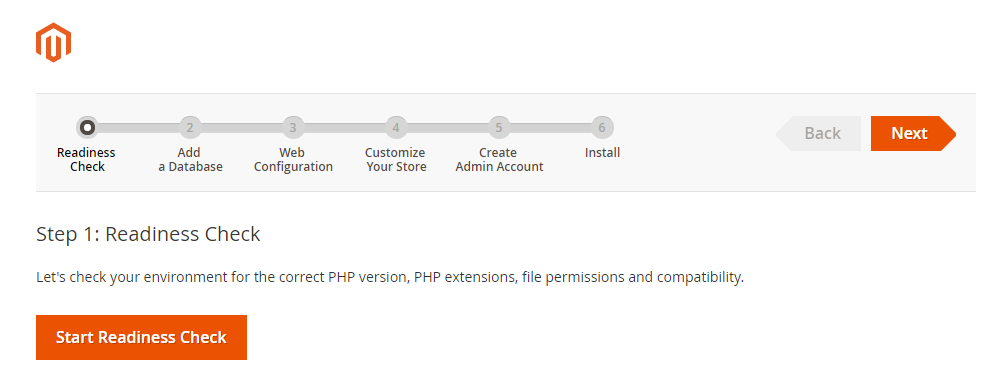
In this first phase, the wizard will carry out checks to verify that all the necessary Magento functions are correctly installed and configured: continue by clicking on "Start Readliness Check":
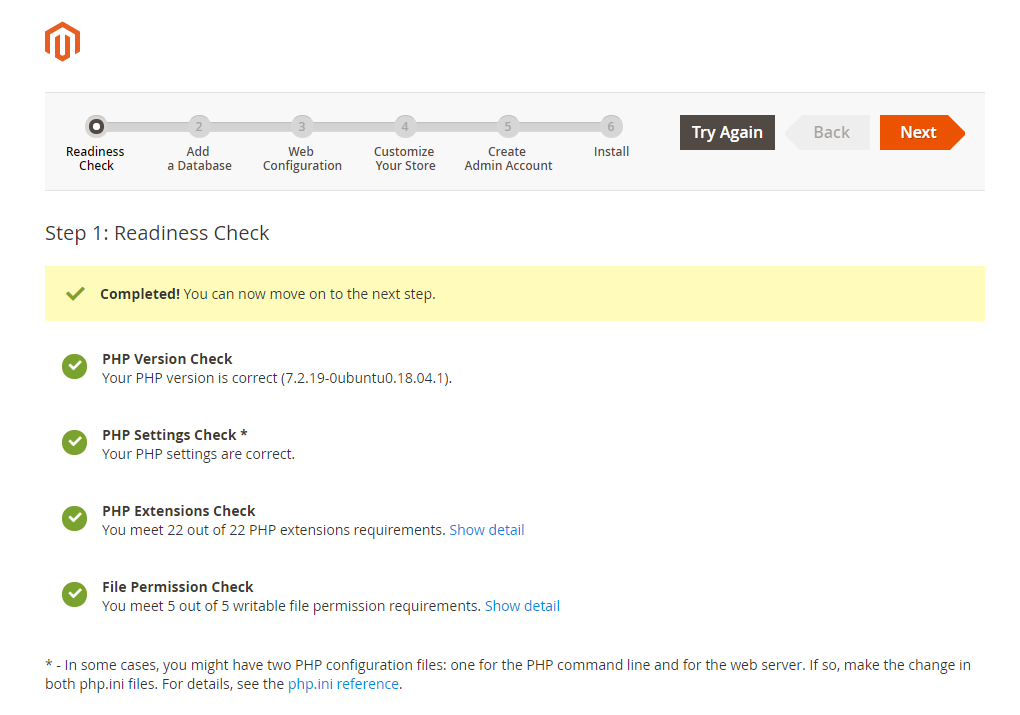
After completing the checks, continue by clicking on "Next":
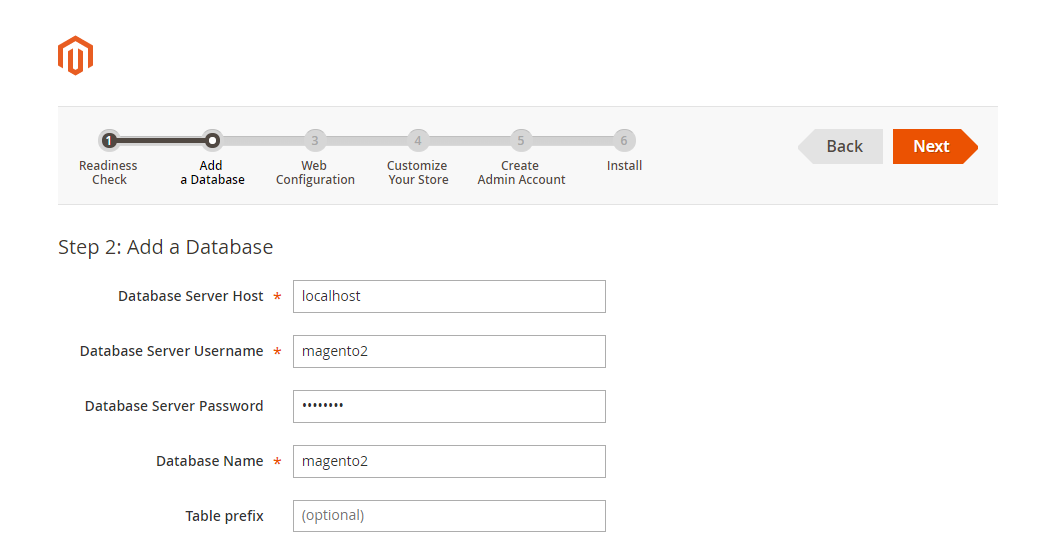
In this second phase, specify the database connection parameters. Enter the same values used during the MYSQL server configuration for the user name and database. After entering all the data, click on Next.
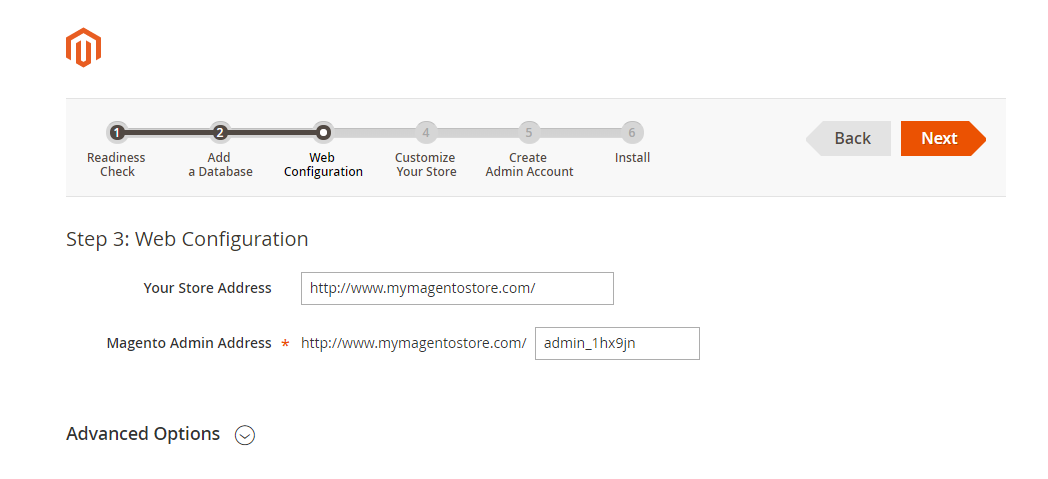
Proceed by entering the URL of your store, and save the address indicated as "Magento Admin Address". it is a random url that will allow you to access the management panel of your store. Press next to continue.
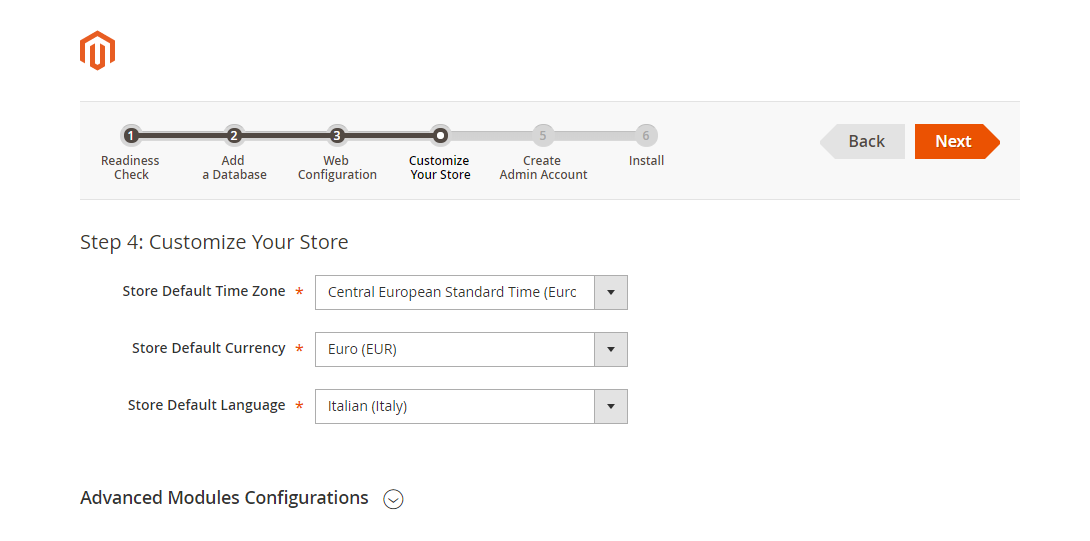
Configure the default currency and time settings for your store, as above, and click Next.
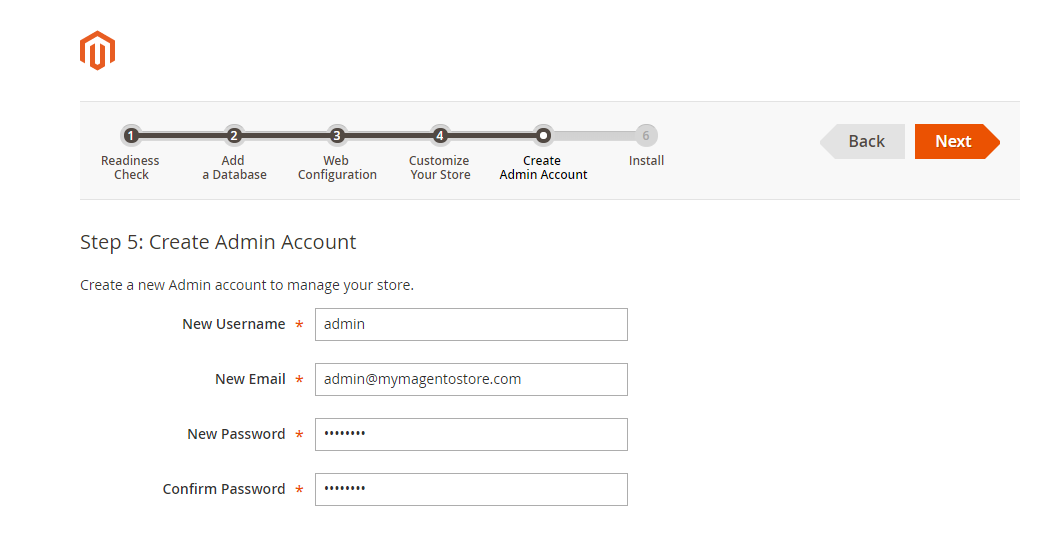
Finally, create an administrator account to access your store's backend.
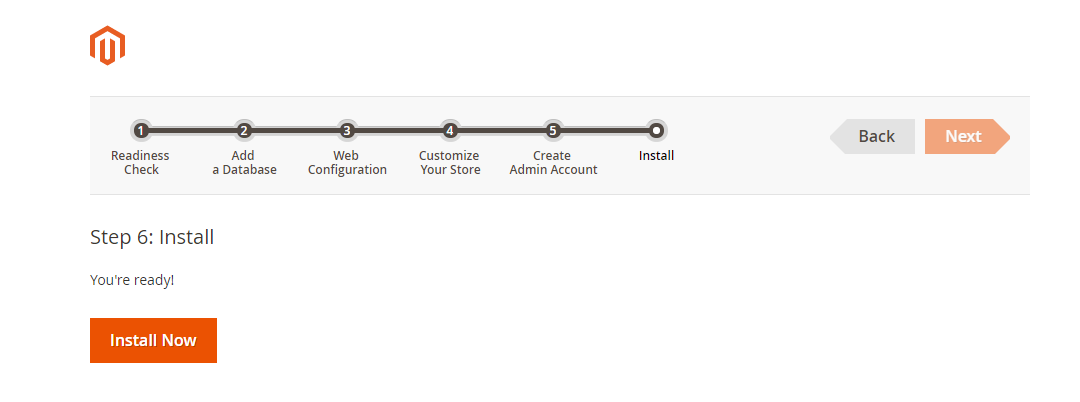
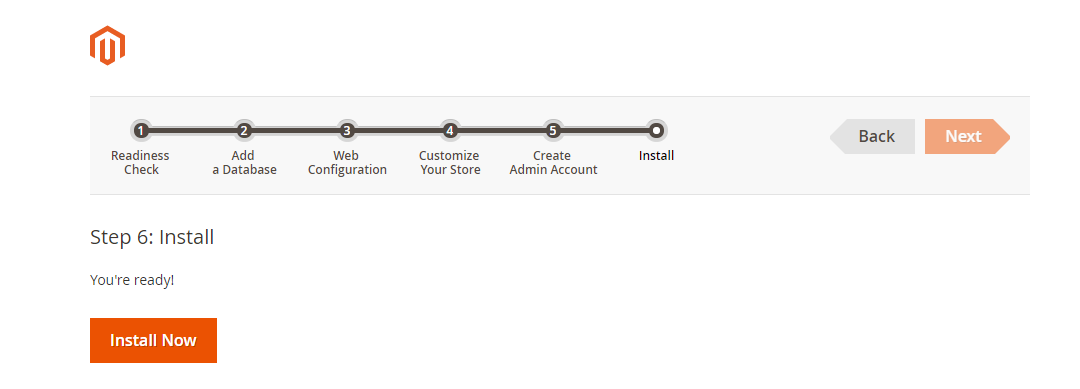
After entering all the data, complete the installation by clicking on the "Install Now" button. After completing the installation process, your store will be online at the specified URL . To access the management and configuration panel, use the previously auto-generated address , such as: http://www.mymagentostore.com/ admin_1hx9jn
Cron jobs configuration
To work properly, Magento performs scheduled operations, such as indexing articles or generating cache data. To activate the scheduling, connect to the server via SSH and execute the following commands:
$ cd /var/www/html

$ sudo php bin/magento cron:install
Crontab has been generated and saved