Node.js is an open source Javascript platform used for running server-side Javascript code. In the following tutorial you will learn how to use it to create a simple Web App with Node.js and how to publish it online on your Linux Ubuntu 18.04 server.
You will also see how to use the React framework to create a web interface that uses our Web App. "Express" will be used as a framework to manage web requests, and SQLite for saving information.
The sample application will respond to REST calls, allowing the client to save and read a book archive.
To get started, connect to your server via an SSH connection. If you haven't done so yet, following our guide is recommended to connect securely with the SSH protocol. In case of a local server go to the next step and open the terminal of your server .
Installing Node.js
Install Node.js via apt making sure to download the latest version available. To do so, first update your repositories, as follows:
$ sudo apt update && apt install nodejs
Before proceeding, update node to the latest stable version by running the following commands:
$ sudo npm cache clean -f
$ sudo npm install -g n
$ sudo n stable
Then, verify the correct installation of Node.js using the command:
$ nodejs -v
If successfully installed, then the installed version will be displayed on the screen.
Now let's move on to the installation of npm or the ‘Node Package Manager’, necessary to install additional modules for Node.js
$ sudo apt install npm
Creating the server application
To create an application compatible with the standards provided by Node.js, first initialize a basic configuration of npm.
Then, create a folder for the project, here, called "books", and move into it.
cd /var/
  sudo mkdir books
  cd books
Run the following console command in the newly created folder:
npm init
A wizard will start to create a package.json file with all the basic information about the project and its dependencies.
Use the suggested values to move forward, as shown below:
This utility will walk you through creating a package.json file.
  It only covers the most common items, and tries to guess sensible defaults.

  See `npm help json` for definitive documentation on these fields
  and exactly what they do.

  Then, use `npm install ` to install a package and
  save it as a dependency in the package.json file.

  Press ^C at any time to quit.
  package name: (books)
  version: (1.0.0)
  description:
  entry point: (index.js)
  test command:
  git repository:
  keywords:
  author:
  license: (ISC)
  About to write to package.json:

  {
    "name": "books",
    "version": "1.0.0",
    "description": "",
    "main": "index.js",
    "scripts": {
      "test": "echo \"Error: no test specified\" && exit 1"
    },
    "author": "",
    "license": "ISC"
  }

  Is this OK? (yes) yes
Answer ‘yes’ to complete the procedure.
Then, proceed by installing the two main modules:
$ npm install --save express sqlite3
- express: a framework capable of handling incoming HTTP requests;
- sqlite3: a client module that allows you to manage small databases, where to save your books.
By adding the --save parameter, npm is told to update package.json, adding these two dependencies to the project.
Then it is possible to proceed with the creation of the entry point for your application by originating the index.js file in the same directory as package.json.
Use your favorite text editor to paste the following content into the newly created file:
/**
   * First, include the two previously installed modules
   */
  var express = require('express');

  var sqlite3 = require('sqlite3').verbose();

  /**
   * At this point create a database in memory ( i.e.
   * not saving it on disk ) where to save your
   * our data


   */
  var db = new sqlite3.Database(':memory:');

  /**
   * Then create a new table with only two fields:
   * - title : Book title
   * - author : Full name of the author
   */
  db.run("CREATE TABLE books (title TEXT, author TEXT)");

  /**
   * Initialize a new express application
   */
  var app = express();

  /**
   * Use the main server root to
   * list all the books
   */
  app.get('/', function (req, res) {

      db.all(`SELECT * FROM books` , (err,rows) => {

          /**
           * Send all the lines in the “book” table
           */
          res.send( rows );
      });

  });

  /**
   * Use this path to save, instead:
   * /save/ followed by title and author
   */
  app.get('/save/:title/:author', function (req, res) {

      /**
       * Prepare the INSERT instruction in our table
       */
      var stmt = db.prepare("INSERT INTO books VALUES (?, ?)");

      /**
       * And run the query above, moving the data in the url
       * nell url
       */
      stmt.run( req.params.title, req.params.author , (err,rows) =>{

          /**
           * Finally, send a ‘true’  status to show that
           * saving has been successful
           */
          res.send(true);
      });

      stmt.finalize();

  });

  /**
   * Therefore , run the listen server on port 80
   */

  app.listen( 80, function () {
      console.log('Books server ready');
  });
Complete it by installing the project dependencies, starting the command:
$ sudo npm install
Starting the service
To start the Web App in a persistent way, use forever: a software capable of running and keeping scripts alive, even in the event of a server shutdown.
Install it using npm:
$ sudo npm install -g forever
Then, start your Web App:
$ forever start index.js
If everything works correctly, by visiting your virtual machine at its IP address, it will respond with:
[]
Then, use your browser to save the first 3 books by visiting the following URLs:
http://SERVER_IP/save/Il%20Decamerone/Giovanni%20Boccaccio

  http://SERVER_IP/save/Il%20fu%20Mattia%20Pascal/Luigi%20Pirandello

  http://SERVER_IP/Il%20barone%20rampante/Italo%20Calvino
P.S. Don’t forget to always replace the IP address with that of your instance.
So, make sure the books have been saved by navigating to the server's main URL:
http://SERVER_IP/
The server should return the following content:
[{"title":"Il Decamerone","author":"Giovanni Boccaccio"},{"title":"Il fu Mattia Pascal","author":"Luigi Pirandello"},{"title":"Il barone rampante","author":"Italo Calvino"}]
Creating Frontend with React
Then, proceed with the creation of the frontend of your React application to be able to interface with the newly created Web App, starting from its installation.
Make sure to be in the main "books" directory. Then, continue by typing the following commands:
$ npx create-react-app react-books
$ cd react-books
Once completed, the ‘react-books’ directory just created by the React tool will contain as follows :
/react-books
        /node_modules
        /public
        /src
The most important directory is definitely "src" as it contains the source of your application. Replace the content of the file "App.js" present in "src" with the following listing listed below.
Start by importing all the necessary modules:
import React from 'react';
  import './App.css';
  import superagent from 'superagent';
Then, continue creating a class to manage the insertion of new books:
class InsertForm extends React.Component {

   constructor(props){
     super(props);

     // Set a basic status of the component
     this.state = {
       title: '', // Titolo del libro Book title
       author: '' // ed autore Author
     };

     this.onSubmit = this.onSubmit.bind(this);
   }

   // Function call to save the book
   onSubmit( se ){
     se.preventDefault();

     //Collect all the information inserted by the user
     const title = encodeURIComponent(this.state.title);

     const author = encodeURIComponent(this.state.author);

     // Reset all the  input fields
     this.setState({
       title: '',
       author: ''
     });

     // Do the Ajax call to save the book
     superagent.get( `http://SERVER_IP:8080/save/${title}/${author}` ).then( msg => {

       // Notify the container component of the saving
       this.props.onSave();
     });

   }

  render(){
     return <form onSubmit={this.onSubmit}>

       <div>
         <label>Title</label>
         <input type="title" value={this.state.title}
           onChange={se=>{this.setState({title: se.target.value})}}/>
       </div>

       <div>
         <label>Author</label>
         <input type="author" value={this.state.author}
           onChange={se=>{this.setState({author: se.target.value})}} />
       </div>

       <button onClick={this.onSubmit}>Salva</button>

     </form>;
   }

  }
Then, define the main class to be called from the main file automatically created by create-react-app:
class App extends React.Component {

   constructor(props){
     super(props);

     //Set an empty list to start with
     this.state = {
       data: []
     };

     this.reloadData = this.reloadData.bind( this );
   }

   // Function to load again data from the server through Ajax
   reloadData(){
     superagent.get( 'http://SERVER_IP:8080/' ).then( msg => {

       // Set the data read by the server as status
       this.setState( {data: msg.body} );
     });

   }

   // Once the component is reloaded, load the data on the server
   componentDidMount(){
     this.reloadData();
   }

   render(){
     return <div style={{margin: '20px'}}>

       <div >

         <h2>Books list</h2>

         <ul> {/* Itero tutti i libri ricevuti dal server e genero dei <li /> */}
           {this.state.data.map( book => {
             return <li>{book.title} ({book.author})</li>
           })}
         </ul>
       </div>

       <h2>Save book</h2>

       {/* Insert the component defined above and, in case of saving update the book list  */}
       <InsertForm onSave={this.reloadData} />

     </div>;
   }
  }
P.S. Make sure you change the IP address used in this tutorial with that of your server.
Finally, finish writing the file by exporting the "App" class:
export default App;
Once the export is completed, from the ‘react-books’ directory run the following command to compile your application:
$ npm run-script build
The command above will prepare a new "build" folder containing a compact version of the Javascript source ready to be used by a common web server or, as in this case, by the Express library used by the Web App.
Before concluding it, make a small change to the server, by modifying the listening port, previously indicated with:
app.listen( 80, function () {
      console.log('Books server ready');
  });
with a new port, the 8080:
app.listen( 8080, function () {
      console.log('Books server ready');
  });
Then, add the following piece of code to serve the static React files present in the "build" directory:
var reactApp = express();

  reactApp.use( '/' , express.static( 'react-books/build' ) );

  reactApp.listen( 80 , function() {
    console.log( 'React app ready' );
  } );
Finally, restart everything by running the command:
$ forever restartall
Running and testing the application
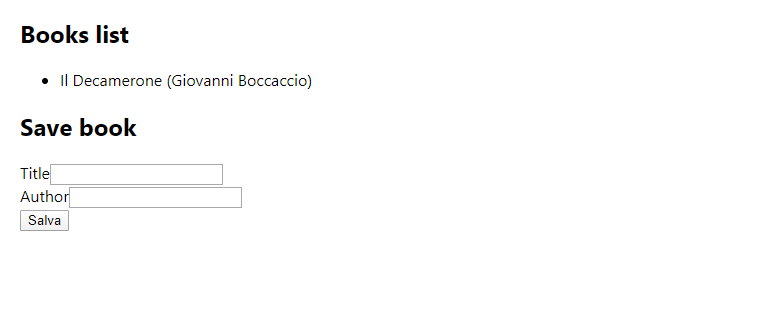
Proceed using a browser of your choice and visit the URL of your server, for example "http: // SERVER_IP /"
If everything works correctly, the following screen should be seen:

Then, proceed by inserting a book:

And press the "Save" button:
Perfect! If everything works correctly, you have successfully created your first Web App with Node.js and Redis.
Consult the official React documentation to learn more about its use. Also, consider using a more powerful web server, such as NGINX, to serve React static files and API requests.