Introduction
To prevent permanent data loss, Plesk offers a Backup feature on the contents of your website or on the entities interacting with it (database, e-mail).
Through this guide, you will be shown how to manage backups with Plesk.
N.B. The example images in this tutorial are for an English language Plesk instance with a ‘Web Admin’ license, so they may differ from the instance you installed. The visualization of the domains is set to ‘Active List’ which differs, for some functionalities, from the other visualization modes.
You can change the interface view in Plesk by clicking the Change View button or the wrench icon on the right.

Creating a backup
Plesk offers the ability to create a manual backup and also to schedule an automatic backup.
Creating a manual backup
To create a manual backup, use the following procedure:
- Access the ‘Websites and domains’ section, set the domains display mode in ‘Dynamic List’ and search for ‘Backup and restore’.
- Access the ‘Websites and Domains’ section and search for ‘Backup Manager’
- Click on ‘Backup’. Now it is possible to select the contents associated with the domain to be backed up, using the corresponding checkboxes.
- Select your preference for the ‘Archive in’ item: choose the directory to save the backup file in. By default, backups are saved on the Plesk server.
- Select the type of backup:
- Full - A backup file including all the previously requested data
- Incremental : A backup file with only files that have changed since the last created backup. This feature will give you the ability to save disk space and save only the differences with previous backups, re-creating the system from scratch. (note: the first backup will necessarily be of the ‘full’ type!)
- If a remote archive and not the Plesk server have been chosen to save the backup, decide whether or not to split the backup file into volumes
- Express some simple final preferences, before proceeding with the creation:
- Enter a comment related to the backup
- Exclude log files from backup
- Exclude specific files or directories from backup
- Receive an email notification when the backup creation is complete
- Confirm your choices, and the backup will be created.
Creating an automatic backup
Automatic backups in Plesk are called ‘scheduled backups’.
To set up a scheduled backup, follow these steps:
- Search for the ‘Backup Manager’ section, within ‘Websites and Domains"ì’
- In the "Schedule" section, check the "Activate this Backup task" box
- Again, choose whether to schedule the creation of incremental or full backups. A "mixed" mode is also selectable, if incremental backups are preferred but having full backups created over longer periods too.
- Express a preference on how to keep full backups. Plesk can periodically manage the removal of full backups that would be ‘out of date’
- Select the contents of your web space to be backed up.
- In ‘Archive to’, choose where the backups will be saved (Plesk server or remote storage).
- if the remote storage in the previous step has been selected, choose to split the backup into volumes.
- Set the latest preferences before confirming the backup schedule. As in the case of creating a manual backup, the following may be chosen:
- Exclude log files from backup to save space
- Exclude specific files or directories from backup
- Receive email notifications for any errors in creating backups
- Confirm the last settings, and Plesk will manage the creation of your backups.
From now on, according to the specified frequency, Plesk will manage the creation of automatic backups for you.
Backing up the entire server
A backup of your entire system may be needed, i.e. of the saved data and configurations owned by the hosting machine.
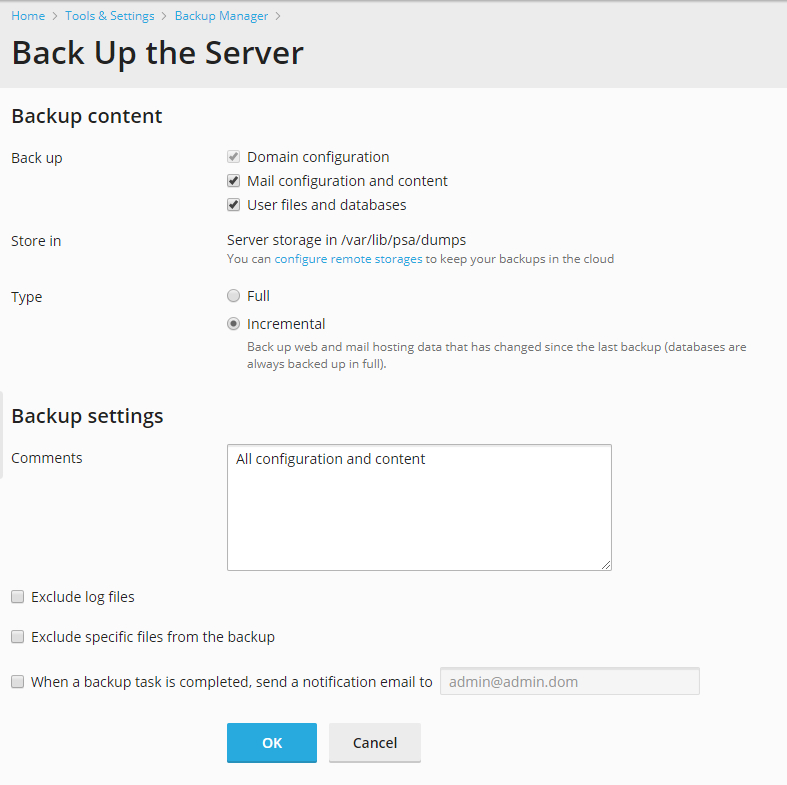
To create a backup of the entire server, follow these steps:
- Go to tools and settings and select "Backup Manager"
- Click on ‘Back up’ and select ‘Backup server’
- At this point, provide the following information:
- Data to be backed up: the server settings and / or all user data can be selected.
- The location to save the backup file in
- Backup type (full or incremental)
- Backup comments
- Choice to exclude log files
- Preferences on specific files to exclude. In this regard, we point out the notation to be used for cases of multiple files to be excluded:
- Separate files by inserting a new line or by using commas to separate names
- Using the wildcard "*", any directory can be specified in the relevant path. For example, with miscellaneous / * / userpic.png, the exclusion will be for the userpic.png file in any subdirectory of the directory named miscellaneous.
- Using the double wildcard "**", you can specify a sequence of various subdirectories in a path. For example, ** / pics will refer to the pics directory in a sequence of subdirectories of the parent.
- Preference of receiving an email notification when a backup is complete.
- After specifying everything, confirm the execution of the procedure.
Once the process is completed, the backup file will be in your archive.
Configuring the remote storage
Although Plesk provides a server where to save your backups, the risk is that an external failure will cause your data loss. For this reason, it is also recommended to save your backups in a remote archive.
Remote storage can be managed with different modes, which are presented in this section of the guide.
The covered methods are:
- FTP archiving;
- Backup storage with Aruba Cloud Cloud Object Storage.
For remote archives, repeat saving the backup file for each archive chosen to store it.
FTP archiving
The File Transfer Protocol allows the user to use internet connection to store files in a specific directory external to the Plesk server.
To use the FTP protocol, follow this procedure:
- Set up a server that works as an FTP repository. The server has to be reached through an FTP connection from the Plesk server. To learn more about how to configure an FTP Server, follow our guide ‘Install and configure an FTP Server with VSFTPD on Ubuntu 18.04’.
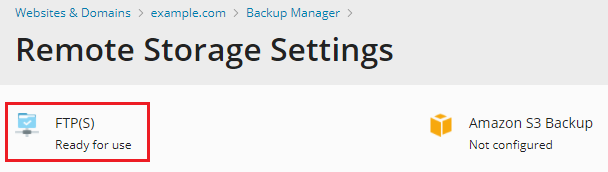
- Access the section ‘Websites and domains’ - ‘affected domain’- ‘Manager Backup’
- Click on ‘Remote Storage Settings’ and select ‘FTP (S)’
- Keep the selection in the ‘Use FTP (S) archive’ box
Specify the remote server information:
- Host name OR IP address
- Path to the directory where to save the backup
- FTP credentials
If the Plesk firewall is set to reject external FTP connections, check the ‘Use passive mode’ option and make sure that the external server also supports Passive FTP connection.
Check the ‘Use FTPS’ box to use an encrypted connection when transferring the backup data to the remote storage. This makes the passage of this important data safer.
Confirm the selected configuration to complete the procedure.
Now a FTP archive is configured and you can choose it for saving a manual or scheduled backup.
Backup storage with Aruba Cloud Object Storage
Aruba Cloud provides you with a flexible S3 compatible Cloud Object Storage solution.
To configure it, follow these simple steps:
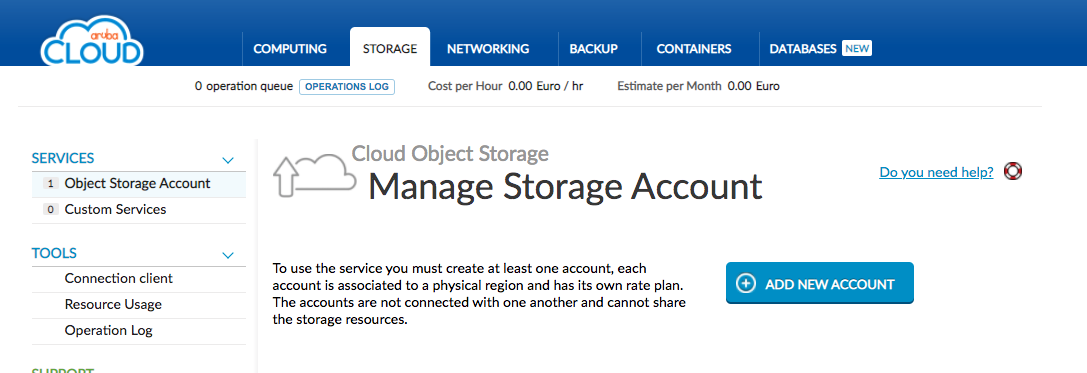
In your Aruba Cloud control panel, click on the ‘Storage’ tab and then on ‘Add New Account’.
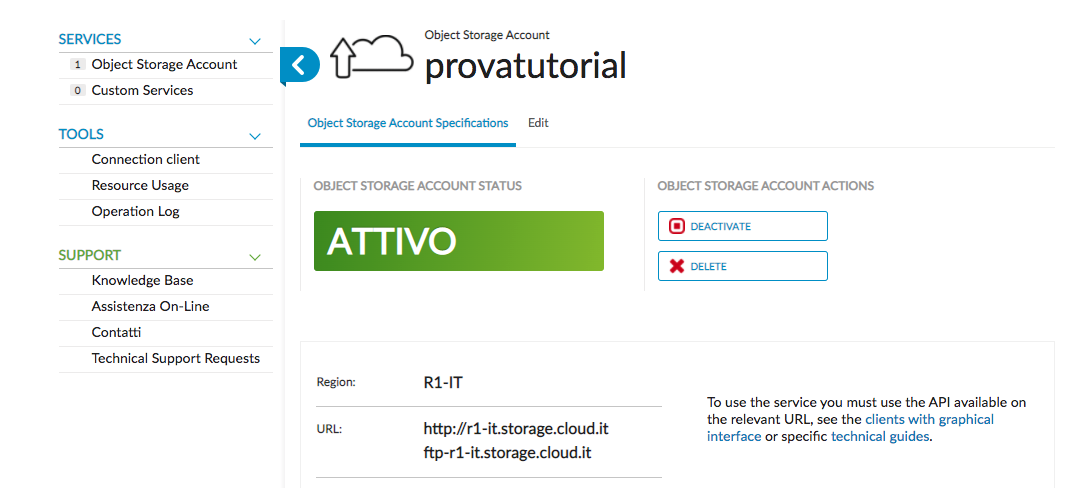
After creating the account, click on the ‘Manage’button to view the connection information to the newly created storage.
At this point within your Plesk panel, first install the ‘Amazon Backup S3’ extension, which can be found in the Extensions menu.
On Plesk go to the ‘Websites and domains’ section, set the domain display mode in ‘Dynamic List’ and search for ‘Backup and restore’. Click on ‘Remote Storage Settings’ and then Amazon S3 Backup.
Under "Service Provider", select "Custom".
Compile, with particular attention to those referring to the bucket (container) and the path where the backup files created will be saved.
Finally confirm the configuration.
To test the compatibility of the newly linked archive, try uploading or downloading a file from the archive, via the AWS bash. If the operations are successful, it means that Plesk will be compatible with the external archive configured.
Protecting a remote archive with password
Plesk offers the possibility to encrypt the passwords in the backups, to prevent an attacker from obtaining your clear-text credentials in case he/she manages to get one of your backup files.
If you have configured a remote archive on Plesk, a new section dedicated to backup security should now be visible.
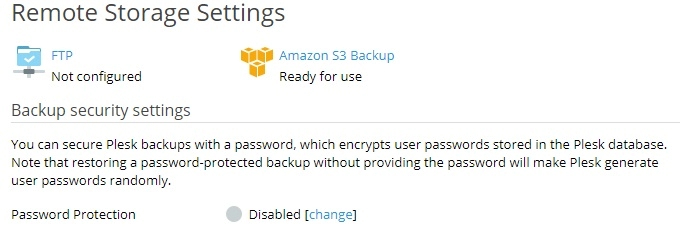
Under ‘Password Protection’, enable encryption of your backups and choose a password to protect it.
Once the procedure is finished, all the backups saved in that particular remote archive will be protected.
Conclusions
Thanks to this guide, you have been shown many aspects about Plesk's backup management features and options that are sometimes left out.
You should now have some knowledge of the different types of backups available in Plesk and how to archive and protect them.