Introduction
In this second tutorial of the Plesk series you will learn how to create and configure a domain on your Plesk panel.
Plesk offers, if you have purchased a hosting package with this function, the ability to manage multiple domains for your server.
Through Plesk, a second or third level domain can be set up, providing several features. Given that a top-level domain represents the extension or TLD (e.g. .cloud) a second-level domain (e.g. mysite.cloud) or a third-level domain (e.g. product.mysite.cloud) can be set.
For second level domains:
- A unique domain name
- Domain alias
- Subdomains
- FTP account to access your site directories
- Quick implementations of common applications such as management systems, tunnels, trolleys etc..
- Mail service
- SSL/TLS security protocols
- Statistical data collection on the site.
For third level domains, or subdomains, there’s a more minimalist package with dedicated services available.
In this guide, the Plesk server has been used as the domain Name Server, so the DNS zone update will be done automatically by Plesk. If this is not your case, the DNS in the DNS zone control panel of your domain will have to be changed manually.
N.B. The example images in this tutorial are for an English language Plesk instance with a ‘Web Admin’ license, so they may differ from the instance you installed.
The visualization of the domains is set to ‘Active List’ which differs, for some functionalities, from the other visualization modes. The display mode of the domains list can be changed by clicking on the wrench icon on the right side of the view.

Purchasing a domain
Before continuing with the following tutorial you will need to purchase a domain, if you don't have one.
If you already have your Cloud Server on Aruba, you can quickly and easily purchase a domain directly from your Aruba Cloud control panel.
Access the panel and click on the ‘Networking’ tab. At this point you will be shown the interface in the following image where to click on the ‘Add new domain’ button to continue with the configuration and purchase of your new domain.
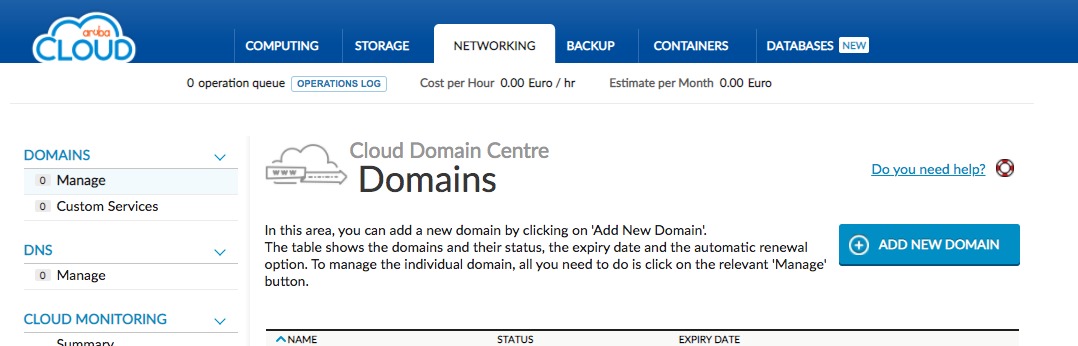
From the Domain Center, it is both possible to register new domain names and to transfer your domain from another provider. In addition, for all domains, new or transferred, in Domain Center the transfer can be protected through the simple procedure of’ Lock and Unlock’, or associate to the domain the optional additional services of ‘Automatic Renewal’ and ‘Whois Privacy’.
Enter the desired domain name in the next screen and click on the ‘Verify’ button.

If the domain is available, proceed to its configuration and, if needed, add the Whois Privacy service to ensure the confidentiality of the data of the domain owner. If the domain is already taken, proceed to its transfer to Aruba Cloud by entering the Auth Code of the domain.

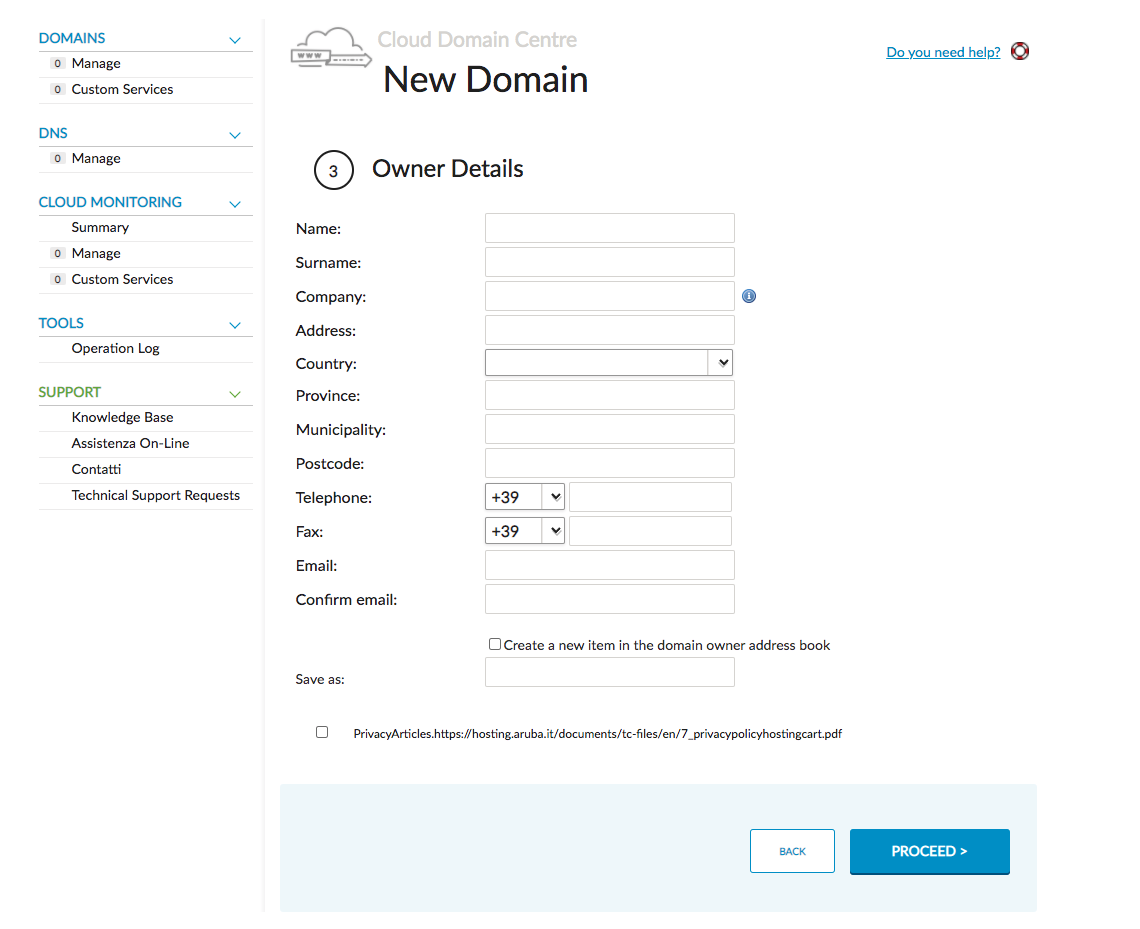
Insert, then, the data of the owner of the domain, checking that the information entered is correct.
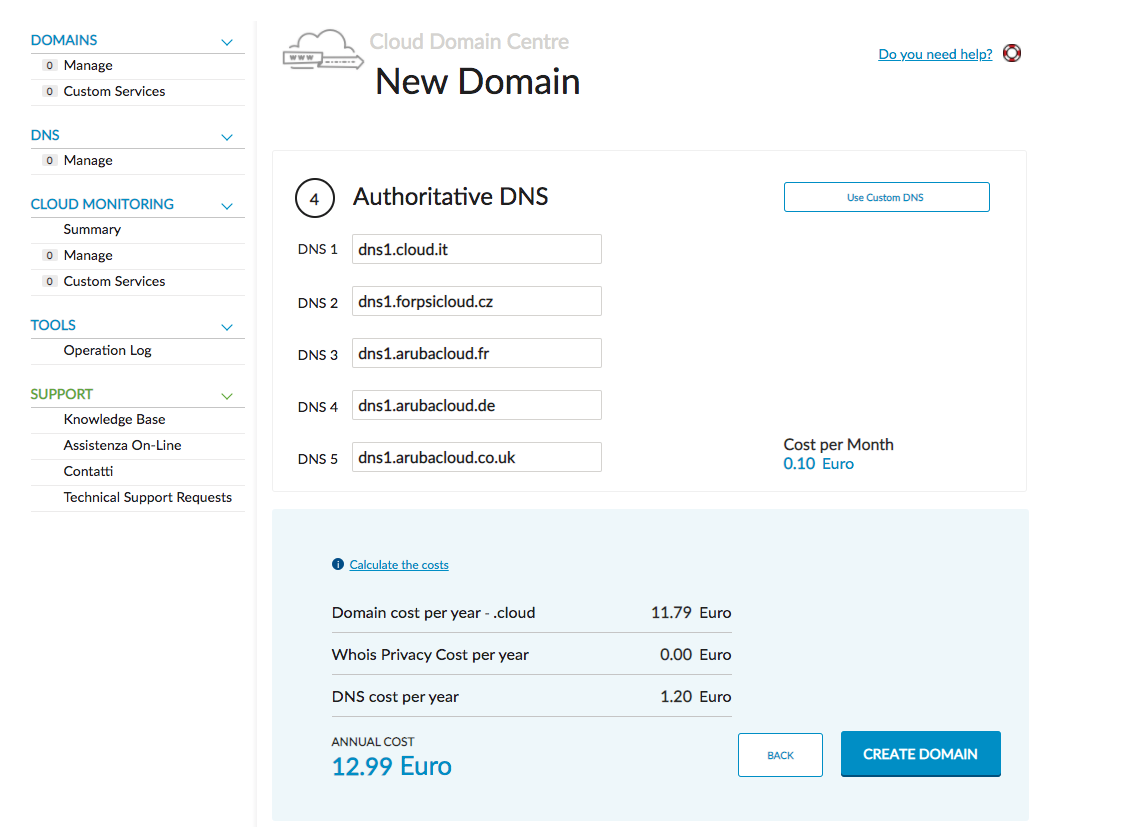
Finally, choose the name servers of the domain that will manage the DNS zone. Instead, to have the DNS zone managed by external servers, such as a Plesk server, enter their addresses here.
N.B. In this guide the Authoritative DNS chosen for the domain is that of the Plesk server, used to take advantage of the Plesk feature of the DNS zone automatic update.
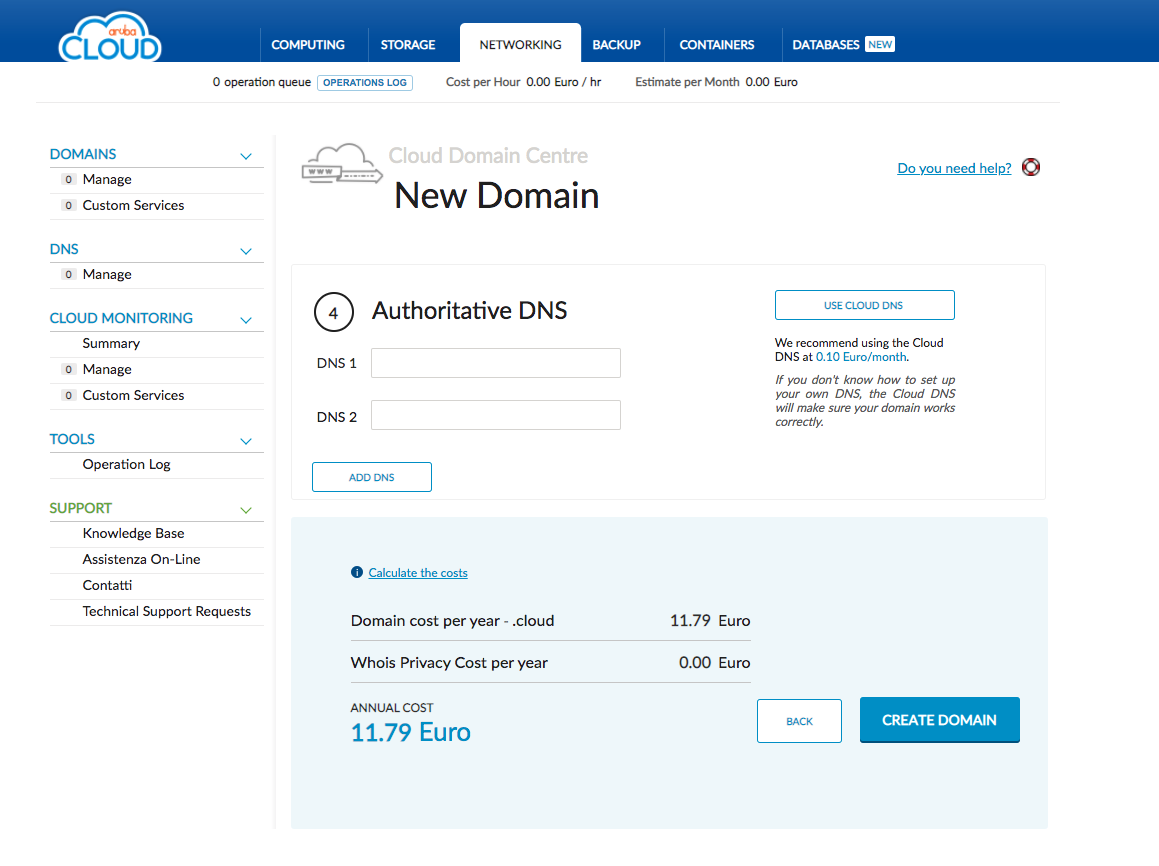
The DNS service associated with the domain can be purchased by clicking on ‘Use DNS Cloud’. By doing so, synergy with the Aruba Cloud platform is used, because every time changes to a record are needed, changes can be applied from the Aruba Cloud panel in real time.
If everything has been done correctly, at this point, the system will start to create the domain. To check its status, see the list of domains in the ‘Networking’ tab.

Adding a domain to Plesk
Once your second-level domain has been registered, it can be managed through the Plesk control panel.
To do so, go to the ‘Websites & Domains’ section and click on the ‘Add Domain’ item.
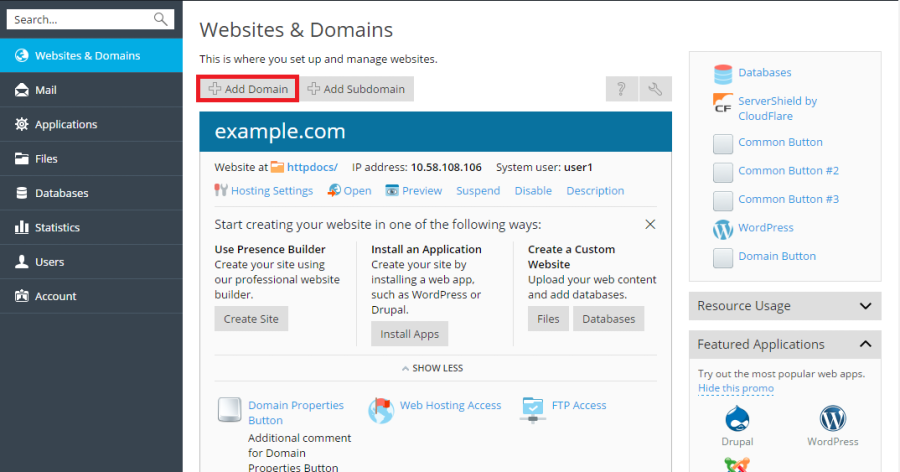
Confirm the information about your domain.
The new domain will be added to the list and the hosting settings can be changed.
Moving domains
To move some of your domains between hosting subscriptions in Plesk, use this service through a Plesk feature that will allow you to transfer all the contents connected to your domain.
To perform this domain transfer from one subscription to another:
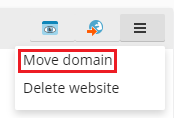
- Access the ‘Websites and domains’ section
- Select the item ‘Move domain’, next to the name of the domain to be transferred
- Select one of the subscriptions to transfer your domain to.
Once the procedure is completed, the domain in the new subscription will be selected.
There are some limitations to be aware of when transfering domains.
You will not be able to transfer:
- The default domain (the domain created first in the subscription).
- A subdomain without its main domain.
- A domain alias without the corresponding primary domain.
- A domain versus a subscription without hosting
- A domain with mail service in a subscription without email service
- A domain in a subscription that already owns a domain with the same document root directory
Removing domains
To completely remove all data from a site from the server, simply delete the corresponding domain from Plesk.
To do so, the procedure below should be followed:
- Access the ‘Websites and Domains’ section
- Once the domain you want to remove into the list is found, click on ‘Remove website’ or ‘Remove subscription’ to complete the procedure
Adding subdomains
If a license that includes adding subdomains is purchased, taking advantage of this Plesk functionality to create third-level domains will be possible.
A third level domain will allow you to host additional websites on the same web server.
A practical example of how this feature can be useful is the possibility to create, in a site with a user area, a small site, hosted on the same server, which is dedicated to exchanging messages among users, or viewing the various profiles.
As mentioned in the introduction, third-level domains have some services inherited from second-level ones.
To add a subdomain, follow these steps:
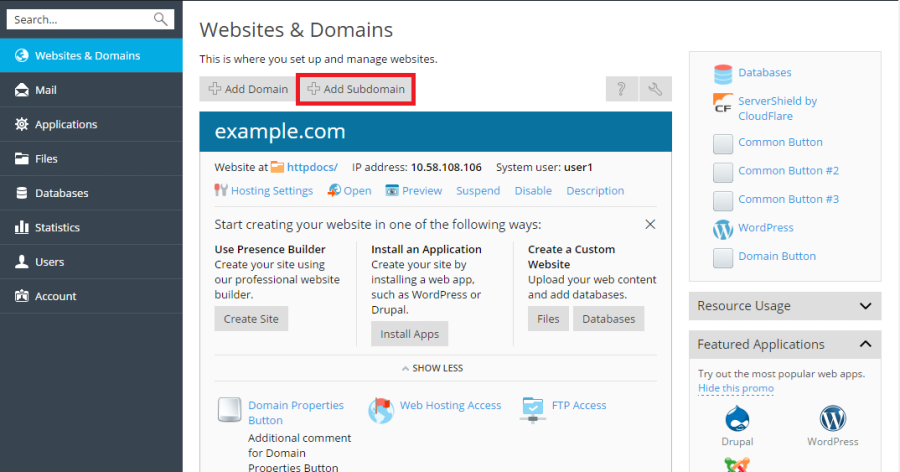
- Go to ‘Websites and Domains’
- Click on ‘Add subdomain’
- Now enter the information regarding the Subdomain Name, which will be added to the main domain name.
- Enter the directory path where the subdirectories of this site are meant to be saved. If there is no preference, use the root directory, htdocs
- Once the decision has been confirmed, your subdomain will be created and will appear in the list of your domains
On Plesk wildcard subdomains can also be managed: to learn more about this topic, use the appropriate section in the Plesk Documentation
Adding domain aliases
Domain aliases allow you to customize your web space by adding different domain names that refer to the same site.
Plesk offers a wizard to add aliases. To carry out the procedure:
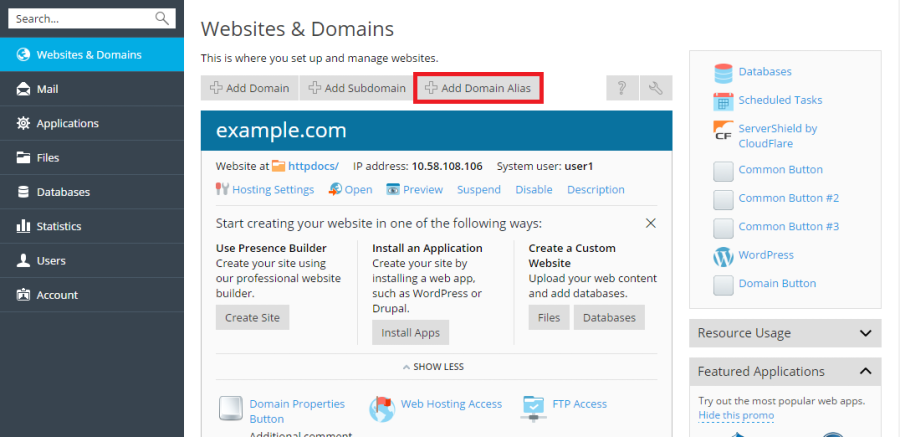
- Go to ‘Websites and Domains’
- Click on ‘Add Domain Alias’
- Specify the domain you are adding the alias to and the domain name of the alias
- Follow the instructions to configure the elements associated with the alias:
- Synchronization of the DNS zone with the primary domain: By enabling this feature, the DNS zone of the domain alias will be synchronized with that of the principal. Any changes made to the Plesk DNS zone for the main domain will cascade to the alias DNS zone. If the Name Servers of your domain are not addressed to your plesk server, then the DNS zone set in Plesk will not match the one actually used by the domain. To learn more about how DNS works, follow our guide ‘What is DNS and how to use it’.
- Mail Service: Mail service is offered for aliases by referencing the mailbox of the main domain
- Web Service: By activating the option, the URL of the alias will be available for connection through the browser
- Redirect with HTTP 301 code: By default, Plesk considers the alias a separate site for both visitors and search engines. This does not allow you to associate the contents of the alias with those of the main domain, causing a loss of points in the rankings of search engines. The option ‘Render with HTTP 301 code’ can be enabled to allow only the main domain that is in the search engine rankings.
- Java web applications: if your hosting service is based on Linux and if you want to make Java applications on your site available for aliasing, select the ‘Java Web Applications’ item.
Conclusions
After following the different steps in this guide, you have now configured your first domain on your Plesk panel.
Now you have to generate a SSL certificate for your domain using Plesk in order to enable the HTTPS protocol. We will see how to do in the next episode of this series.