After creating a Cloud Server with Linux Ubuntu 20.04, there are some simple configurations that it is recommended to modify to prepare the environment and secure it.
To get started, connect to your server via an SSH connection.
Let's assume that, at the time of its creation, the server provides a password-based "root" login and the SSH service uses the default port for listening to the connection, which is 22. In this case the command that may be used to connect via SSH from your terminal is the following:
$ ssh [email protected] -p 22
PS Of course you will have to replace "IP.SERVER" with the IP address of your server.
The SSH service represents the main access point to your Cloud Server and, at the same time, one of the services that can be more under attack than others. The next steps in this guide will help you improve SSH security through different techniques and tricks.
Changing the listening port
As previously mentioned, the default port for listening to the SSH connection is 22. Changing this setting will allow you to obfuscate the service and make the connection more secure.
To avoid conflicting with other existing services on the machine, it is advisable to check which ports are currently in use, using the netstat command:
 $ netstat -n -l

 Active Internet connections (only servers)

 Proto Recv-Q Send-Q Local Address           Foreign Address State
 tcp        0 0 127.0.0.1:3306          0.0.0.0:* LISTEN
 tcp        0 0 127.0.0.53:53           0.0.0.0:* LISTEN
 tcp        0 0 0.0.0.0:22              0.0.0.0:* LISTEN
 tcp6       0 0 :::80                   :::* LISTEN
 tcp6       0 0 :::22                   :::* LISTEN
 udp        0 0 127.0.0.53:53           0.0.0.0:*
Force it to print all the connections that are in the LISTEN status through the -l parameter passed to netstat. In this example the following ports are used:
-
3306 MySQL Service
-
22 SSH
-
80 Apache2 / HTTP
-
53 DNS
To change the port, just edit the configuration file in / etc / ssh / sshd_config, uncommenting the Port directive:
Then set a new value, possibly high, to prevent it from being intercepted by automatic port scanning software (for example 2200, 5574, 1022):
To apply the change, top up the service via:
$ sudo service sshd reload
Using reload, keep the connection alive, so that any errors can be fixed and the new login with another SSH client checked.
Once the change has been applied, connect to your server by specifying the new port. For example, when using the command line SSH client:
Using keys for authentication
A type of access widely used for its security, as an alternative to password-based login, is RSA keys. In this type of authentication, the client generates a private key and the relative public key, which is installed on the server machine, in order to uniquely authenticate the client.
To install the public key, the client has to first generate the key pair using the ssh-keygen command:
 $ ssh-keygen
 Generating public/private rsa key pair.
 Enter file in which to save the key (/root/.ssh/id_rsa):
 Enter passphrase (empty for no passphrase):
 Enter same passphrase again:
 Your identification has been saved in /root/.ssh/id_rsa.
 Your public key has been saved in /root/.ssh/id_rsa.pub.
Before proceeding with generation, ssh-keygen asks for an optional passphrase that can be used for authentication. In the following example the field was left blank for the purposes of easier access.
Once finished, the software will save two files in the given locations:
-
id_rsa: the client's private key, not to be shared with anyone.
-
id_rsa.pub: the public key, easily distributable.
To prepare the server environment, create a file named authorized_keys in the .ssh folder inside the user folder with which you will log in:
 $ sudo mkdir ~/.ssh
 $ sudo touch ~/.ssh/authorized_keys
 $ sudo chmod 600 ~/.ssh/authorized_keys
Make sure that the file has the permissions as indicated above.
Then, proceed by pasting the public key previously prepared by the client machine:
 $ sudo nano ~/.ssh/authorized_keys
 ssh-rsa AAAAB3NzaC1yc2EAAAADAQABAAABAQCoTzd9RnqT0yioQG1klsLEK/VG9myo7CQ47aRXu7hnPit6Lgw5kAjC7vzNWYLTy2oIlsrVI7R/tvWmVNISGkWDp9U3fONbSLp+vgBKDzRUVAIqP/AIJ2THanyZxj2b8XU/4s2uzGoTLSR3ViX0JU6zTc+IkaBp1o3W3OolvO15E10/VYJCKN3TkxPsSSGE3QReXnCcnIZYAnrPf9f1DPP1Lo+VUCIzZ7IzcZajAWQ53hC71mTYNHkUgIlWxpRyEhnsRfmqEfUSFbTwpNEarv7vGlK686C4xVxlVfKbqlNa3/g2Vrae4ArVBM958JPZ6aa+7KDZfH5TDgPPtlFCIGkd root@testclient
Save the file and reload the SSH service:
$ sudo service sshd reload
At this point you should be able to access the server without being requested for a password via:
If everything works correctly, proceed to disable password access from the server machine, by editing the / etc / ssh / sshd_config file, with the following parameters:
 ChallengeResponseAuthentication no
  PasswordAuthentication no
Remember that you can add other public keys by simply saving them at the end of the ~ / .ssh / authorized_keys file on the server machine.
Creating a new user
When performing the first installation of your Linux-based Cloud Server, a "root" user is automatically created. It has administrator privileges, namely, full control over the resources and commands that can be executed on the machine.
Often, it may be necessary to allow other employees to access the server. Obviously, providing all users with the login credentials of the root user can be extremely risky as they could make unwanted changes to the server or, in the worst case scenario, lead to an overall system malfunction.
For this reason, it is essential to know how to manage users and assign to them different levels of permissions.
Before a new user can be added to the system, the type of group he or she belongs to has to be defined. A Group is intended to collect all users who have the same privileges.
Each user can only belong to one Primary group, which is automatically generated when the user is created, and files created by this user will be assigned to their respective Primary group. Optionally, a user may also belong to one or more Secondary groups to define his or her further privileges.
Assuming you want to create a new user, as it can be imagined, the first thing to do is to create the group and then add the users.
To create the group that the future user will be part of, type:
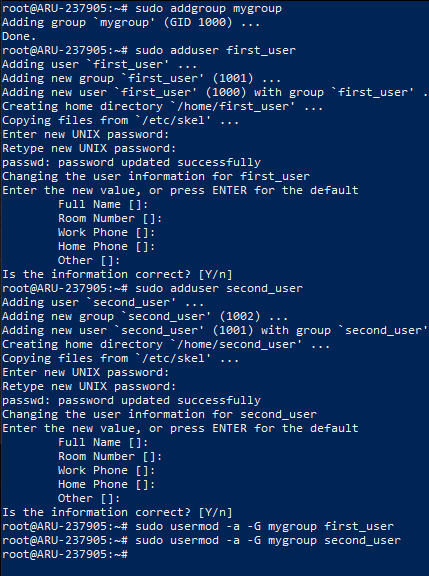
sudo addgroup my_group
N.B. replace 'my_group' with the name you want to give to the group.
To create a new user and grant access to the server type:
adduser first_user
N.B. Replace 'first_user' with the name of the user of your choosing.
The user can be added to one or more groups using the command:
sudo usermod -a -G group1,group2 first_user
N..B Clearly replace "group1, group2" with the names of the groups to which you want to add the user and 'first_user' with the name of the user to be added.
You will be requested to specify which password the user should use to log in to the server. In addition, you will be requested for other optional information. If you do not want to enter it, simply press enter on each entry. At the end, a summary will be shown. Answer with Y to accept, N to refuse.
The following screenshot shows the necessary instructions for creating the new group "my_group" on Ubuntu, the subsequent creation of the users "first_user" and "second_user", and for finally adding the two new users to the "my_group" group:
Verifying the created user
To verify the correct user creation, close the SSH connection and try to connect to your server again with the newly created user, in the following example 'first_user'. Notice that the user's name (highlighted in green on the next screen) is exactly the same as the previously created account.
This new user thus created does not have access to root privileges. Just run any command with 'sudo' to get the related error message:

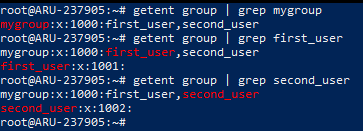
To view the users associated with the created group, use the "getent group" command, adding the "grep" command to limit the results to only those in which the name of the group to be verified appears. Then, type:
getent group | grep mygroup
Similarly, to see which groups the new user is associated with, just type:
getent group | grep first_user
N.B. Replace 'mygroup' and 'first_user' respectively with the names of the group and user to search for.
The following screen shows the output of the two commands, which presents the syntax "group: password: GID: users" whose fields correspond respectively to the name of the group, its password (in this case "x" is indicated because the password is contained in the file / etc / gshadow), the Group ID and the list of users who are part of the group.
Assigning administrator privileges
To allow the previously created user root rights, i.e. administrator privileges, log in to the server again with the root user and add the "first_user" account to the "sudo" group.
Once logged in as root (or user enabled for the sudo command) type:
sudo usermod -aG sudo first_user
N.B. Replace ‘first_user’ with the username set above.
From now on, even logging into the server with the new user will allow you to access the 'sudo' command and execute the instructions as an administrator, as shown in the following screenshot:

installing Firewall
At the base of any Cloud Server there is always a protection tool which, relying on some rules, allows the server to communicate to and from the outside. This software component is called Firewall and represents the first security barrier to prevent access to your server by unauthorized users, or simply to make sure that a particular service cannot be reached from outside your machine.
UFW, acronym for Uncomplicated Firewall, is one of the most used software to manage a firewall on Linux, from the command line, in a simple and intuitive way.
UFW is pre-installed software in most Linux distributions. If not already installed on your system, install it by typing the command:
sudo apt-get install ufw
UFW can work by managing both IPV4 addresses, enabled by default, and IPV6 if necessary. If you need to enable IPV6 as well, change this option from the “/ etc / default / ufw” file.
To make this change open the file with the nano editor:
sudo nano /etc/default/ufw
Then, set “ìIPV6 to yes’.
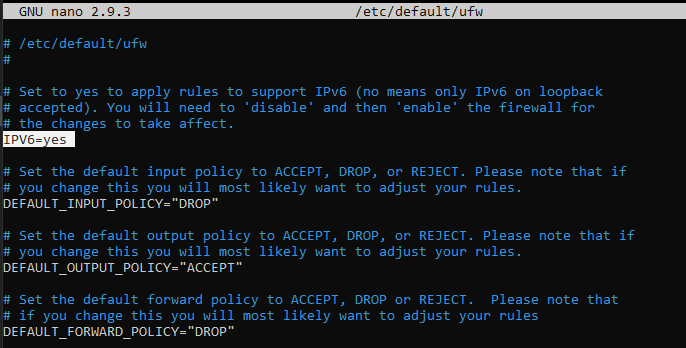
After editing, save and close the document (CTRL + X / Y / Enter).
The change will become effective from the next UFW restart. To immediately restart the firewall and make the changes become effective , type:
sudo ufw reload
Configuring Basic Firewall
Initially, any type of external communication with the cloud server should better be blocked. This will make it easier to later unblock communications with other machines, identified by their IP, or on certain ports or services.
Similarly, outgoing traffic has to be enabled for the server, to ensure that applications running on its own server can query external services.
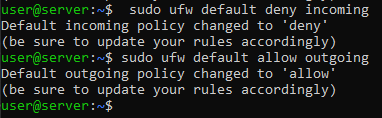
To block any form of communication TO the server, type:
sudo ufw default deny incoming
To allow any form of communication from the server, type:
sudo ufw default allow outgoing
Allowing SSH communication
Interaction with your server often takes place via an SSH connection. However, this is one of the incoming connections that have been blocked, precisely because there is an attempt to communicate WITHthe Server.
It is therefore necessary to add this type of connection between the UFW rules , which allows you to overwrite the standard policies previously defined for the firewall.
To allow SSH connections to the server, type one of two commands:
sudo ufw allow ssh
sudo ufw allow 22
The fact that two different commands can be used to obtain the exact same effect is due to the fact that in a UFW configuration file there is an association between the word "ssh" and its relative port (22). By opening the file "/ etc / services"the list of all these associations can be viewed.
At this point you will have correctly prepared and secured your Linux Ubuntu server and you will be ready to use it.