Introduction
Docker is an open-source software platform developed to facilitate the deployment of applications based on the concept of containers. The platform can be used to create, test and distribute applications by collecting them in standardized units, called containers. In each container, Docker allows you to host different versions of specific software such as MongoDB or Redis.
Plesk is a hosting management panel, available for both Windows and Linux operating systems, which allows you to easily administer the various features of your web space.
hanks to its components, Plesk offers Docker as an extension, allowing its use on both a local host and a remote machine. In this tutorial you will learn how to enable the use of Docker with Plesk and how to set proxy rules with NGINX.
Requirements
The basic requirements to use Docker with Plesk are as follows:
- Docker can only run on an x64 system;
- The extension is supported on the following operating systems:
- CentOS7
- RedHat 7
- Debian 9
- Ubuntu 18.04
- AlmaLinux 8.x
- To use the extension ‘Docker’ through Plesk an additional license has to be purchased, in case it is used on a remote machine (the license is not required in the case of a local host).
Note that the Docker Remote Node Management module is among the extensions included in the Power Pack license, which can be purchased at a good price on Aruba Cloud together with a Plesk license.
Using Docker
Plesk offers a catalog of extensions, within which there are several add-ons that may be integrated on your Cloud Server, including the Docker extension.
To add the Docker extension, login to the Plesk Control Panel and open the ‘Extensions’ tab. Then, search for the Docker extension and add it.
Once the extension is installed on Docker, the Plesk navigation panel will provide an entry to access it.
Docker images
In the catalog, Plesk displays several images, some of which are recommended. It is, of course, possible to search for specific images using the search function.
For each application, as mentioned earlier, several versions available can be found, electable using the appropriate field.

To run a Docker container:
- Access the Docker Image Catalog
- Search the applications you need in the catalog
- Select and Confirm a version by clicking on "Run" or, in case of using the latest version, avoid the selection and click only on confirm.
- Specify some settings to create an initial configuration of the container created
At this point, the list of containers available can be seen at the top of the Docker Catalog.
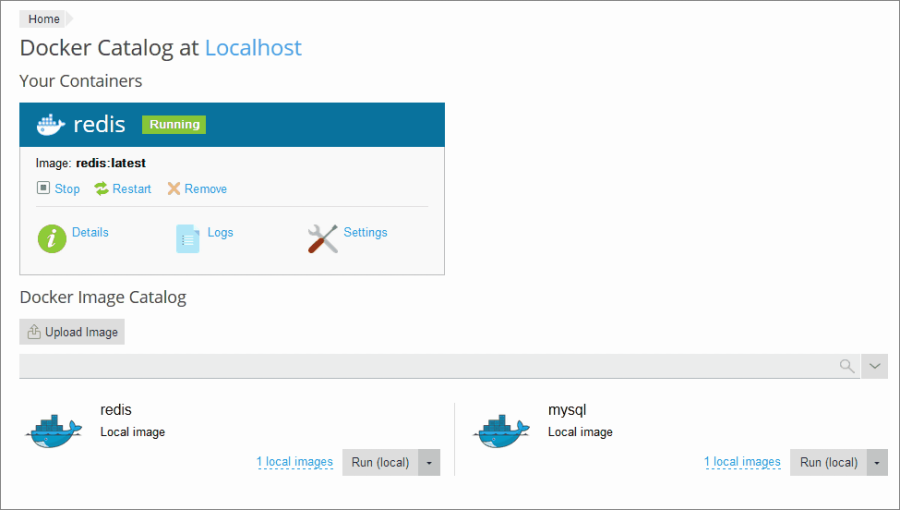
Container settings
To change the configuration of a container, go to the "Settings" section.
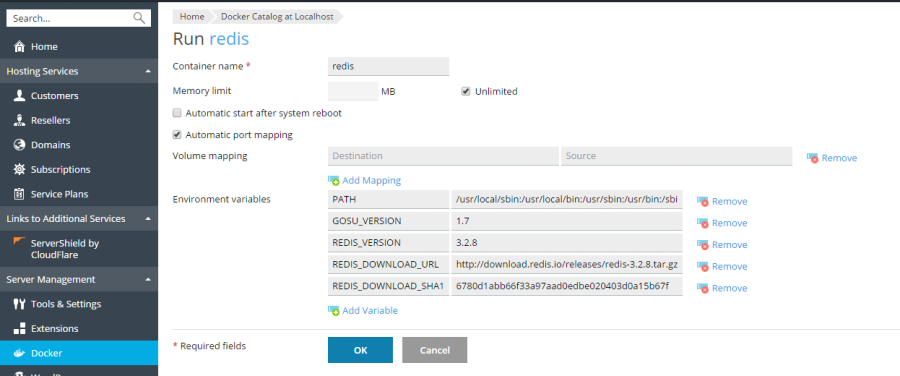
Memory limitation
At present, Docker only provides the ability to limit a container's RAM consumption.
To do so, simply uncheck the checkbox with the ‘Unlimited’ item and manually specify a limit value for Megabytes in the appropriate field.
Automatic start
It is advisable to keep this configuration active as it will ensure that, regardless of the system reboots, the container will start and run without requiring any intervention.
Port Mapping
By default, an Automatic Port Mapping feature to a host system port is enabled on Docker.
Of course, it is possible to switch to the manual entry of a door.
Volume mapping
Docker volumes are directories of the server mounted in the container. In this way, there will be permanent storage space for the host system in each web application.
backups of these persistent data can be created and kept even in case of cancellation of the container they are dedicated to.
To add a volume mapping, specify two entries:
- Destination - the absolute path to a directory in the container
- Source - the absolute path to a directory on the server where the container is mounted
Specifying environment variables
Environment variables are variables to be specified in the application but that can be used in the containers to be created. Plesk allows you to add as many variables as needed.
Operations with containers
There are several possible operations with Docker containers:
- Restart or Stop a container. On reboot, the container is recreated with the same configuration but, if not saved in the mounted volumes, data will be lost
- View logs and resource consumption of a container
- Change the settings of a container
- Rename a container
- Re-create a container using another version of an image
- Save a container image to use it in creating new containers but with the same configurations
- Take a snapshot of the container
- Remove a container
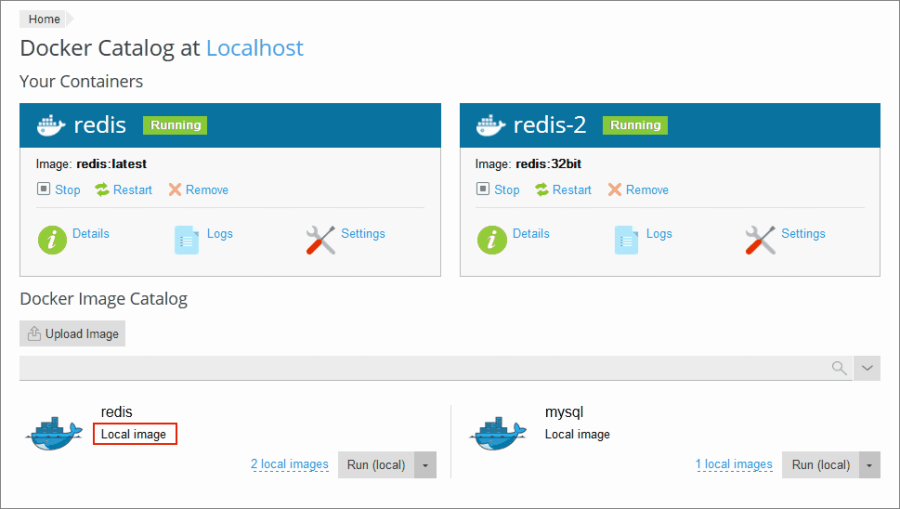
Re-creating a container
Sometimes a different version of the application may also be needed inside your container.
Rebuilding the container entails keeping the configuration for the new container but losing data when not previously stored in volumes.
To perform the re-creation, just click on the item that defines the details of the container and locate the item ‘Recreate’. From here, specify the new version of the image to mount on the container, as well as the environment variables to insert.
Using Remote Docker
To use remote Docker, an add-on with a Plesk license key is needed.
The license for ‘Docker Remote Node Management’ can be purchased individually or within one of Plesk's packages, such as the Power Pack. This module has several extensions, including Docker Remote Node Management, to manage Docker on a remote machine.
In case you have your own Cloud Server on Aruba, Power Pack can be added at a good price when purchasing your Plesk license, by going to the ‘Plesk Licenses’ section within the control panel of your server on Aruba Cloud.
Once purchased the license, follow the procedure in the next paragraphs to manage the servers for Remote Docker.
N.B. Without purchasing any license, the Docker service can be tested only on your local host.
Using remote services
To run Docker on a remote server, follow these steps on Plesk:
- Go to ‘Tools and settings’ and click on ‘Docker’, in the ‘Server management’ section
- Click on ‘Add Server’ and specify the new remote server configuration for Docker.
- Once the configuration is complete, click on ‘Set as active’
Switching from server to another is also possible simply by viewing the list of servers to be used and clicking on ‘Set as active’, after selecting the relevant server.

Management of customized images
To create a new image of a container configured with custom settings, use the ‘Save as image’ command. Through this feature, a snapshot of the container can be taken at that moment and then made available in the image catalog. The image will save the custom settings and the chosen environment variables.
To create an image from one of the containers, follow these steps:
- Select the ‘Details’ item under the name of your container
- Select the item ‘Save as image’
Now a snapshot of your container with a unique ID and label to specify its version is available. Obviously, this information can be modified according to your preferences.
Local image management
Local images are saved by Docker on a local disk, so there is no need to download them from the catalog.
An image becomes local in several ways, some of which include uploading an image to Plesk or creating it from a container.
To access the local image catalog, simply search for the ‘Image catalog on Docker’ section.
By opening the catalog, easily apply the ‘local’ filter to search for images saved on the disk.
local images (and some information about them) can also be viewed for each specific product by clicking on its name.
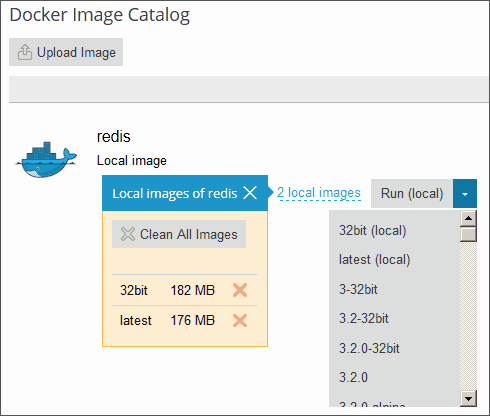
Obviously, the image management functions also include the removal of a single or all images on Docker.
Setting nginx as a proxy for requests from domains to a container
Some Docker containers make ports available to users so that they can access the applications contained in the containers.
However, specifying the port to connect to, when writing the URL to access the service contained in Docker, usually becomes a quite inconvenient activity.
For this reason, the nginx proxy offers a redirect service for requests that come from domains and are routed to the standard port. This feature will allow you not to have to repeat the specification of the port to connect to each time.
Requirements
First of all, to follow the proxy configuration procedure, a particular configuration on Plesk and Docker is necessary:
- The nginx tool must be running on Plesk
- Automatic port mapping must be disabled
- A port has to be mapped manually on a container and referred to a port on the host system
If these requirements are met, proceed with the nginx configuration.
Enabling nginx and setting proxy rules
You will now be able to enable requests arriving from domains on a specific port, manually mapped on Docker, and redirect it to a standard port on nginx.
To do so, set up a rule that includes nginx in the domain settings.
Start by connecting to the section dedicated to proxy rules. This section can be found by navigating the ‘Websites and domains’ section and clicking on your domain name.
In the ‘Proxy Rules’ section, add new rules. Clicking on ‘Add rule’, you will be redirected to a screen where some information can be specified:
- URL of the website using an app running in the container
- Container
- Port, previously mapped in the settings of the relevant container
To verify the correct configuration of the proxy rules, check them in the web server configuration file, called nginx.conf.
Below, is an example of what a rule specified for the domain looks like in the configuration file:
#extension docker begin
location ~ ^/.* {
 proxy_pass http://0.0.0.0:9080;
 proxy_set_header Host $host;
 proxy_set_header X-Real-IP $remote_addr;
 proxy_set_header X-Forwarded-For $proxy_add_x_forwarded_for;
}
#extension docker end
Conclusions
By the end of this guide, you will have been able to properly enable and configure containers for Docker, via Plesk, and set up proxy rules with nginx.