Introduction
Nowadays all personal information and files, from the least significant to the most important, are saved on our computers.
Backups to prevent data loss are therefore an essential requirement, both for the sysadmin who needs to secure the data of their remote workers’ workplaces, and for the webmaster or developer who needs to have a backup copy of the website.
If you have a cloud backup space, the backup process can be automated and the cloud backup space can be transferred to an external storage available to you. In this way, you always have an updated backup copy of your server's files.
In this tutorial you will learn how to set up this type of automatic backup of files and folders directly on your server and transfer it via SFTP to a backup space or to another server, saving your data remotely quickly and safely.
Prerequisites
To follow this guide, you must be in possession of:
- A local server or computer, where the files you want to back up are stored;
- An external cloud backup space, to which you can connect via the SFTP protocol.
To get started, connect to your server via an SSH connection. If you haven’t done so yet, following our guide is recommended to connect securely with the SSH protocol. In case of a local server, go to the next step and open the terminal of your server.
Installing Zip
The first tool to install is called Zip. Zip allows you to generate an archive containing all the data you intend to save.
If not already installed on your server, install Zip using the following command:
sudo apt-get update -y && sudo apt install zip -y
Creating Scripts: Insertion of files and folders to be saved
Once the tool is installed, proceed with the creation of the script through which to generate a .zip archive. First create a file called "script.sh":
sudo nano script.sh
The text editor, where to add the different instructions for creating the backup, will be shown. Let's see step by step what these instructions are.
sudo zip backup_$(date +"%m_%d_%Y").zip file_1 file 2 folder_1 folder_2 .. folder_n
With this instruction, every day the script is executed, a new archive, which will not overwrite the one created previously, will be generated.
NB. Instead of 'file_1', 'file_2, ..' file_n ', specify the path and the single file you wish to save. Same thing goes for the folders. There is no limit of files and folders that can be saved.
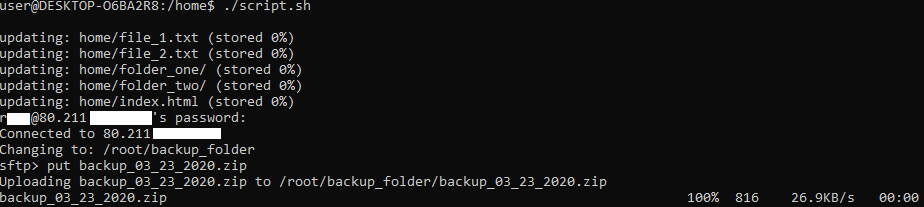
For example, to save the files "file_1.txt", "file_2.txt", "index.html" and the folders "folder_one" and "folder_two" (all present in the / home directory), the command should be entered in the file 'script.sh as shown in the figure:
.png.aspx;)
Creating Scripts: Transfer of backup to external storage
After generating the backup, it has to be sent to an external storage. To transfer the backup, use the SFTP protocol. Add two further instructions to the script:
sudo sftp user@host:/backup_folder <<<$'put backup_'$(date +"%m_%d_%Y")'.zip'
sudo rm -r /path/backup_$(date +"%m_%d_%Y").zip
With the first instruction, sending is made via SFTP to an external storage. Obviously, instead of user and host, enter the username and IP / hostname of your backup space or server.
With the second instruction, instead, the local archive is deleted in such a way that it does not take up disk space.
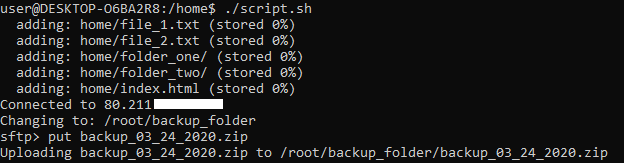
At this point, your 'script.sh' file will have a structure very similar to the following:

Once the commands are inserted into the "script.sh" file, the file itself has to be made executable. To do so, use the following instruction:
sudo chmod a+x script.sh
At this point, start the script, by calling it from the terminal:
./script.sh
Just type the command listed above to start the copy process. However, there are currently two drawbacks:
- When connecting to the server, the password is requested (it is an actualSSH connection);
- The script has to be started manually to back up and send to external storage.
To overcome these two problems, there are two useful tools:
Installing SSHPass
By installing this tool, it is possible to specify the password for the Server directly in the request defined in the script. Obviously, this practice carries risks: anyone in possession of your script could log in to your backup server.
Once clarified the main risk of this practice, to install the tool just type on your machine:
sudo apt-get install sshpass -y
Once the installation is completed, modify the script by entering the password for access. Then type:
sudo nano script.sh
Go to the point where the command regarding the sending via SFTP is written and make the following change:
sudo sshpass -p 'PASSWORD_SERVER_STORAGE' sftp user@host
The script will look very similar to the figure below.

If you run the script now by recalling it as previously done, you will not be requested for a password and the copy will be made instantly.
Automating backup with Cron
Cron is a system tool to make certain commands run at specific time intervals. To access Cron, just type in the console:
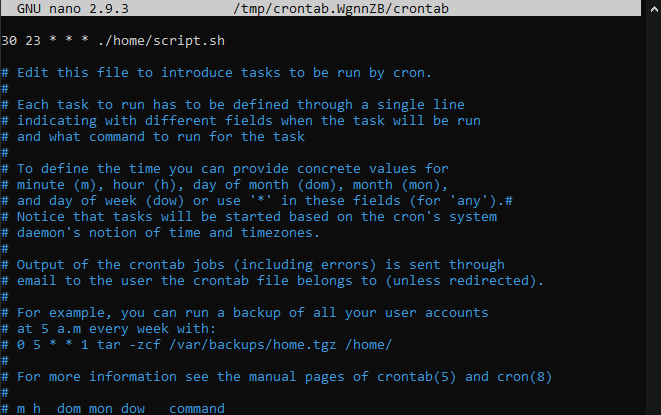
sudo crontab -e
In the editor opening, specify the command and the rules that define how often that command should be executed. More precisely, the syntax to be respected is "mh dom mon dow command" where:
- m: minute (0 - 59)
- h: hour (0 - 23)
- Sun: Day of the month (1 - 31)
- mon: Month (1 - 12)
- dow: Day of the week (0 - 7 (0: Sunday - 6: Saturday))
In this case, assuming that you want to perform the automatic backup at 11.30 pm each evening. The syntax here becomes:
30 23 * * * ./path/script.sh
Conclusion
If you performe all the steps of this tutorial, every day at 11.30 pm your local server or computer will create a zip backup archive, containing the selected files and folders, send it to an external storage via SFTP and delete the archive from your hard disk to avoid occupying the memory.
In this way you will be sure that the backup of your files is saved on a cloud backup space, allowing you to protect yourself from any inconvenience or malfunctioning of your local server or computer.
In case of data loss, the backup can be recovered from the external storage and restore on your machine.