Introduction
The acronym LAMP stands for Linux, Apache, MariaDB, PHP and refers to a series of open-source software that work in synergy to help you manage a web space to build apps with PHP.
Among the different software installed:
- Linux is the operating system
- Apache is the web server
- MariaDB manages persistent data in the database
- PHP manages the dynamics of processes in the web space.
Pre-requisites
To perform the procedure, use the privileges sudo but with user different from the administrator.
Installing the Apache Web Server
The first service to be installed is the webserver, to make your site accessible to visitors.
To do so, start by installing the httpd package, using the command:
$ sudo dnf install httpd
Confirm you want to install Apache by entering the character y.
Once the installation process is completed, start the server via the command:
$ sudo systemctl start httpd
The next step is to give Apache permissions from the firewall. To do so, use the command:
$ sudo firewall-cmd --permanent --add-service=http
By doing so, the firewall will enable HTTP connections on port 80. To verify the correct functioning of the changes applied, follow the procedure below:
Restart the firewall via
$ sudo firewall-cmd --reload
If everything went well, an output similar to the following should be seen:
public
 target: default
 icmp-block-inversion: no
 interfaces:
 sources:
 services: cockpit dhcpv6-client http ssh
 ports:
 protocols:
 masquerade: no
 forward-ports:
 source-ports:
 icmp-blocks:
 rich rules:
If the http protocol appears in the list of services, the enabling has been successful.
At this point, due to the unblocking of the firewall, the service offered can now be accessed by your web space simply by connecting to your public IP address or the chosen domain name.
In case of difficulty identifying the domain name or IP address of your webserver, just launch a command in the terminal:
$ ip addr show eth0 | grep inet | awk '{ print $2; }' | sed 's/\/.*$//'
The output of this command is a list of IP addresses to connect to via a web browser in order to locate the one on your server.
Through this other command, however, it can be seen which IP address is publicly accessible by external agents on the internet:
$ curl -4 icanhazip.com
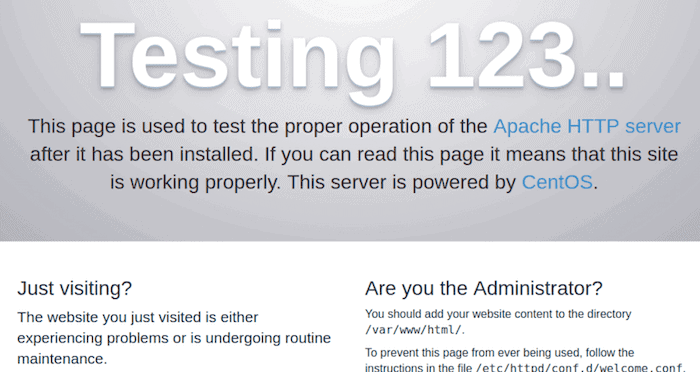
By connecting to the IP address, the Apache landing page should be displayed as a confirmation that you are connected to the right server.
Installing the MariaDB database
Once the web server is running, it’s time to install the component that stores persistent data in a database. MariaDB is an excellent alternative to MySQL.
Start by running:
$ sudo dnf install mariadb-server
Once the installation is completed, just start the database server
$ sudo systemctl start mariadb
The MariaDB installation will entail a script to set good security criteria and allow you to customize other preferences. To do so, simply run the command:
$ sudo mysql_secure_installation
Through this script, a number of information and preferences necessary for a correct configuration of MariaDB (for example, the credentials of the root user) can be entered.
To log into MariaDB, just use the command :
$ sudo mysql
At this point, the new database can be created using the command:
CREATE DATABASE dbexample;
With this command, your first database will have been created.
Choose whether or not to assign privileges regarding individual databases to users of your server. To do so, use a command similar to the one in the example.
GRANT ALL ON dbexample.* TO userexample@'localhost' IDENTIFIED BY 'passwordexample' WITH GRANT OPTION;
To save the changes and make them effective in the open session, use the FLUSH command :
FLUSH PRIVILEGES;
To exit, finally use the exit command.
Now, proceed with the verification of the assigned privileges by logging in with the user for whom you created those privileges.
$ mysql -u userexample -p
Once the command is sent, you will be prompted for the password you previously set to access to the DBMS.
At this point, the database_example should be found in the list of available databases, which can be called up using the command:
SHOW DATABASES;
If the sample database is there, the user privilege verification will have been successful.
Installing PHP
At this point, it’s time to install the component for using the PHP code files to create the dynamic part of your web space that the end user will interact with.
To allow effective communication also with the database, install the php and php-mysqlnd packages, using the commands:
$ sudo dnf install php php-mysqlnd
Once the installation is completed, simply restart the entire Web Server to apply the changes and enable the PHP component.
$ sudo systemctl restart httpd
Final test of PHP functioning with Apache
Basically, the Apache settings are not to be touched, in order to allow correct operation with PHP. However, to avoid the inconvenience of having to run each command with the sudo prefix, the configuration file, located in the / var / www / html / directory, can be modified to allow one or more users to access the root folder.
With the command below, assign ownership of the file:
$ sudo chown -R userexample:groupexample /var/www/html/
With this command line, the ownership of the file will have been assigned to the user named userexample and the group groupexample.
Now, it's time to test the proper functioning of your web space by creating a PHP page.
To create a new file from the console, just use the command of your favorite text editor. (In the example, you will find used nano.)
$ nano /var/www/html/test.php
With this nano command, y a PHP file named test.php has been created and opened.
To test the correct functioning of PHP with Apache, just insert some PHP code in this file and connect to the corresponding page on your webserver.
Save and close the file using the command CTRL + X to nano.
To connect to the page, simply enter the IP address of your webserver and the name of the page you want to open. For instance, :
http://IP_ADDRESS/test.php

If you see the output specified in your test file correctly, your web space has been checked for proper functioning.
Conclusions
Well done! You should now have a web space to deploy PHP pages or full stack web applications for your visitors.