Introduction
The SSH service represents the main access point to your Cloud Server and, at the same time, one of the protocols that may be more subjected to attacks than others.
To better improve SSH security, it is advisable to configure a type of encrypted access based on the use of RSA keys, as an alternative to password-based login. In this type of authentication, the client generates a private key and its public key, which is installed on the server machine, in order to authenticate the client.
In this tutorial you will see how to set SSH keys on your Linux CentOS 8 server. At the end of the guide, you will be able to authenticate on your server using encrypted keys, without entering the password every time.
Key pair generation
The first thing to do is generate the key pair on the Client machine, assuming here the Client is your local PC.
Then, type the following command on your machine's terminal to create a 2048-bit RSA key pair:
ssh-keygen
This type of key is secure enough for most users. If a higher level of security is needed, 4096-bit RSA keys can be generated by adding the -b flag at the end of the command.
After pressing the Enter key, you will be requested where to save the key pair. In case of no particular need to save the keys elsewhere, confirm by pressing Enter, otherwise, simply type the new path for the id_rsa file .

NB If a pair of keys has been previously generated, an alert message asking whether to overwrite the existing files may be received. If this is the case, be careful because the operation is irreversible and, when a file is overwritten, the old keys can no longer be recovered.
After choosing the path where to save your files, you will be requested to specify an optional passphrase , through which the security level for your keys can be increased. Then, type a password and press Enter.
If the key generation procedure was successful, the output shown will be similar to that in the following figure.
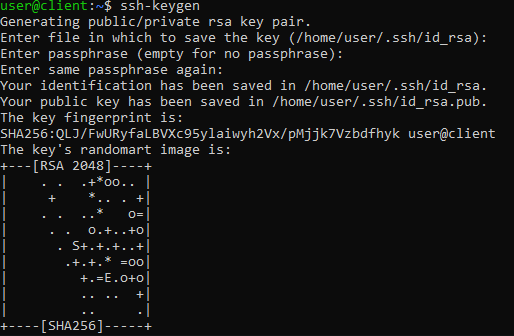
At the end of this operation, ssh-keygen will save two files in the paths shown:
- id_rsa: client's private key, not to be shared with anyone.
- id_rsa.pub: public key, easily distributable.
At this point, you have the two keys. Now, communicate the public key to the Server so that it can create the authentication system.
Copy of the public key on the Server
At this point, install the public key on your server. The quickest way to send your public key to the Server is surely through ssh-copy-id, a simple but effective tool pre-installed on many operating systems.
In case you don’t have it, the key can be still copied through direct access via SSH, or by manually copying the file on the server. These 3 methods are described in the following paragraphs.
Copy via ssh-copy-id
To use this tool, specify the remote host to send your public key to. Of course, to do so, the login data to connect to the server are necessary. Then, type:
ssh-copy-id user@remote_host
NB Replace "user" with the username to access the Server and "remote_host" with, with the public IP of the Server (or the domain that points it).
When connecting to the remote host for the first time, an alert message to inform you that your Client does not recognize the Server will be shown .

Then, type "yes" and press Enter.
Then, enter the password of the user specified above to access the server. At the end of this operation, the output should be similar to the following.
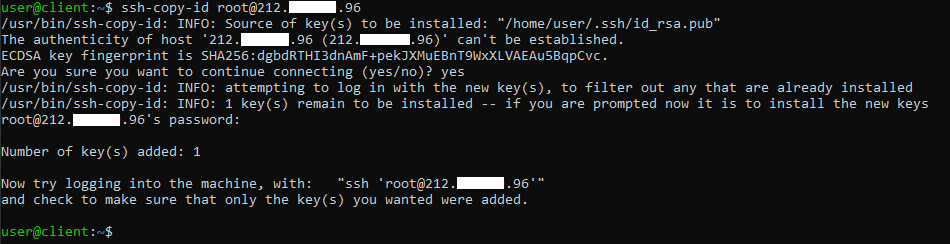
After inserting the password, the ssh-copy-id tool will attempt to connect with the specified credentials. If successful, copy the contents of the key "~ / .ssh / id_rsa.pub" into the file "~ / .ssh / authorized_keys "on the remote host.
Copy via SSH
If the ssh-copy-id tool is not pre-installed on your system, but your Server can still be accessed via SSH, read the contents of the ~ / .ssh file using cat and copy it directly into the ~ / file. ssh / authorized_keys
In this case, the command to be typed is the following:
cat ~/.ssh/id_rsa.pub | ssh user@remote_host "mkdir -p ~/.ssh && touch ~/.ssh/authorized_keys && chmod -R go= ~/.ssh && cat >> ~/.ssh/authorized_keys"
NB Replace "user" with the username to access the Server and "remote_host" with the public IP of the Server (or the domain that points it).
In this way, you are adding your public key to the "~ / .ssh / authorized_keys" file without overwriting its contents.
Also in this case, enter the password for the user "user" through which you are trying to log in to the remote Server.
Manual copy
In case the Server cannot be accessed using the methods listed above, manually add the public key to your Server.
First, display the contents of the "~ / .ssh / id_rsa.pub" file, an operation always possible via cat. Then, go to the folder where you generated the keys: if a different path has not been specified, the default one is /home/your_username/.ssh/.
cd /home/your_username/.ssh/
NB Replace "your_username" with the name of the user through which you logged in on your Client machine.
Then, type the following command:
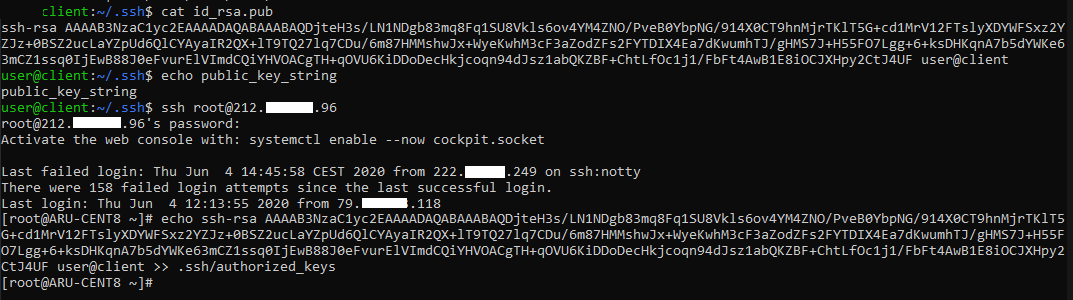
cat id_rsa.pub
An output similar to that in the figure below will be shown .

Then, connect to your server via SSH, always using the following command:
ssh user@remote_host
NB In the same way, replace "user" with the username to access the Server and "remote_host" with the IP address of the Server.
Make sure the "~ / .ssh" folder exists, by typing:
mkdir -p ~/.ssh
If the folder does not exist, this command will create it. When already present, the command will have no effect.
At this point, copy all the output obtained with the cat id_rsa.pub command into the authorized_keys file. If it doesn't exist, the next command will create the file. If, on the other hand, it is already present, it will add the key to the content of the file.
echo public_key >> ~/.ssh/authorized_keys
NB Replace "public_key" with the output obtained through the command cat id_rsa.pub.
In the figure below, an SSH connection was made from the client to the server and how the key was manually copied.
Finally, make sure that the authorized_keys file has the right permissions. Then, type:.
chmod -R go= ~/.ssh
When using the root account, specify also which users can access the ".ssh" folder. Then type:
chown -R user:user ~/.ssh
NB Then, replace the "user" parameter with the name of the authorized user.
Accessing the Server via SSH keys
If the copy of the public key was successfully completed, regardless of the method chosen, from now on the password will no longer need to be specified when connecting in SSH from your Client to the Server.
In fact your Server can be accessed via SSH using the command:
ssh user@remote_host
NB Always replace the "user" parameter with the name of the user enabled to connect in SSH and "remote_host" with the IP of the Server (or domain that points it).
Note that, unlike before, you will not need to specify the password to access. At most, if entered during the key generation phase, you will be requested the passphrase.

Disabling password-based login
At this point, you managed to access your server without having to specify the password for the login. However, the Server can be accessed in such a way that it entails the insertion of a username and password.
However, this exposes the Server to any external brute force attacks. Hence, it is a good practice to completely disable this type of authentication so that only authorized users can try to log in.
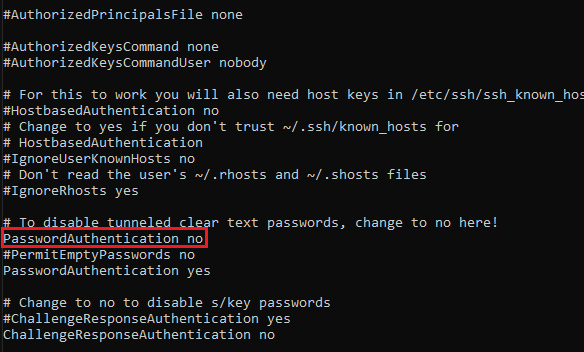
To do so, enter the Server as root (or user with administrative privileges) and open the file "/ etc / ssh / sshd_config".
sudo vi /etc/ssh/sshd_config
Inside the file, look for the PasswordAuthentication parameter and set its “no” value. Then, type i to enter Vim edit mode and uncomment (by deleting the "#" symbol) the line.
Once the parameters have been changed, press ESC and then type ": wq" to exit and save the changes. To apply all the changes, restart the sshd service:
sudo systemctl restart sshd
Conclusions
At this point, your Linux CentOS 8 server is correctly configured with an authentication system based on encrypted keys.
From this moment, only correctly configured clients will be able to connect to your Server through the use of the keys, and you will no longer have to authenticate each time with the password.